🧢 Beautiful ✨ Detailed πŸ’ Adorable

Worm Amigurumi Pattern

Worm Amigurumi Pattern
4.4β˜… Rating
5-7 Hours Time Needed
2.3K Made This
βœ‚οΈ

Intermediate Level

Ideal for those with basic crochet experience, featuring slightly more advanced stitches and techniques to expand your skills.

⏱️

Weekend Treat

Takes 5-7 hours, making it an enjoyable project to finish over a couple of days.

🧸

Cute Companion

An adorable friend to cherish, handcrafted with love to bring comfort and joy for years to come.

About This Worm Amigurumi Pattern

This pattern creates a flexible, colorful crochet worm made from a series of stuffed spherical segments joined together. You will crochet balls in different colors for the body, grey legs for each segment, and assemble a head with eyes, antennae, and embroidered facial features. The instructions include every round for each piece and guidance for joining the small and large pieces for a neat finish.

Worm Amigurumi Pattern crochet pattern - detailed view of completed project

The finished worm measures about 17 cm high at the head, and the length depends on how many colored balls you make. The pattern uses 2.5 mm crochet hook and cotton thread for crisp stitches and good shape retention.

Why You'll Love This Worm Amigurumi Pattern

I absolutely love this pattern because it transforms simple crochet rounds into a playful, characterful toy that kids and adults adore. I enjoy the rhythm of crocheting the separate balls and watching a colorful worm emerge as you join them. The design is versatile so I can experiment with color sequences for a different mood each time. It is satisfying to add small details like embroidered eyebrows and a smile that instantly bring the toy to life. I also like that the assembly offers opportunities to practice neat joining techniques for a professional finish.

Worm Amigurumi Pattern step 1 - construction progress Worm Amigurumi Pattern step 2 - assembly progress Worm Amigurumi Pattern step 3 - details and accessories Worm Amigurumi Pattern step 4 - final assembly and finishing

Switch Things Up

I love to customize this pattern by changing the color order of the balls to create stripes or ombre effects; this small change makes each worm unique.

I sometimes switch to a finer or thicker cotton thread and adjust the hook size to make mini keychain versions or a much larger cuddle-sized worm.

I add tiny accessories like a crocheted bow or a felt tag to personalize each worm as a gift.

Try embroidering different facial expressions β€” moving the eyes or changing the smile alters the personality completely.

For a more playful look I mix textures, using a soft, fuzzy yarn for some balls; just test tension to keep sizes consistent.

I also experiment with adding wire inside the body seam for slight poseability, especially useful for display pieces.

If you want a sturdier toy for toddlers, I reinforce seams when joining balls and avoid small glued pieces, opting to embroider details instead.

I sometimes create themed worms by selecting color palettes (pastels for baby gifts, bold primaries for kids) to match occasions or nursery decor.

To make a set, I craft worms in graduated sizes so they look like a family β€” a fun way to practice sizing and gauge control.

Finally, I document each color sequence so I can reproduce designs I love, or remix them later to keep my collection varied and inspiring.

Common Mistakes & How to Fix Them

βœ— Skipping the small piece insertion step for the balls can leave large exposed holes; always insert and sew the small piece into the large piece, taking both loops on the large piece and only the outer loop of the small piece. βœ— Forgetting to stuff gradually causes lumps and uneven shaping; stuff each round a little at a time and adjust stuffing as you close to keep a smooth sphere. βœ— Using inconsistent tension between balls makes the worm uneven and floppy; maintain the same hook and consistent tension throughout to keep ball sizes uniform. βœ— Not leaving a long sewing tail when cutting the strand makes assembly difficult; always leave thread for sewing when instructed so you can join pieces neatly without reattaching yarn. βœ— Ignoring the instruction to work legs in grey may break the color harmony of the design; crochet all legs in grey as specified to match the photos and maintain the pattern look.

Worm Amigurumi Pattern

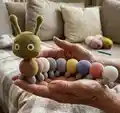
Make a charming, colorful crochet worm that doubles as a playful toy or a sweet decorative piece. This pattern walks you through creating individual crocheted balls, assembling them into a flexible worm body, and adding adorable facial details. You will enjoy mixing colors to create a unique, soft friend that measures about 17 cm high at the head. Perfect for gifting or brightening a nursery.

Intermediate 5-7 Hours

Materials Needed for Worm Amigurumi Pattern

β€” Main Fabric

  • 01
    Cotton thread (colors of choice) - main body colors, amounts depend on number of balls
  • 02
    Grey cotton thread - small amount for legs for each ball
  • 03
    Green cotton thread - for head, neck and antennae pieces
  • 04
    Brown cotton thread - for eyes center and embroidery details
  • 05
    White cotton thread - for eye whites
  • 06
    Polyester stuffing (doll stuffing) - small amount to fill balls and small pieces

β€” Tools Required

  • 01
    Crochet hook 2.5 mm
  • 02
    Scissors
  • 03
    Sewing needle
  • 04
    Yarn needle for sewing pieces together
  • 05
    Stitch markers (optional)
  • 06
    Pins for assembly (optional)

Progress Tracker

0% Complete

β€” Difficulty & Measurements :

Info :

It measures 17 cm (6,69 inches) high (at the head part). The length depends on the number of balls.

β€” Materials :

Info :

COTTON THREAD (COLORS OF CHOICE). CROCHET HOOK 2,5 MM. DOLLS STUFFING. SCISSORS AND SEWING NEEDLE.
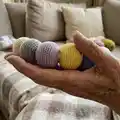
β€” Body :

Info :

The body is made up of colored balls. With pink cotton thread and 2,5 mm crochet hook)...

Round 1 :

6 sc in MR. (6)

Round 2 :

6 inc. (12)

Round 3-7 :

1 sc around. (12)

Round 8 :

1 sc, 1 inc. 6 times. (18)

Round 9 :

FLO, 2 sc, 1 inc. 6 times. (24)

Round 10 :

3 sc, 1 inc. 6 times. (30)

Round 11 :

4 sc, 1 inc. 6 times. (36)

Round 12 :

5 sc, 1 inc. 6 times. (42)

Round 13 :

6 sc, 1 inc. 6 times. (48)

Round 14 :

7 sc, 1 inc. 6 times. (54)

Round 15-25 :

1 sc around. (54)

Round 26 :

7 sc, 1 dec. 6 times. (48)

Round 27 :

6 sc, 1 dec. 6 times. (42)

Round 28 :

5 sc, 1 dec. 6 times. (36)

Round 29 :

4 sc, 1 dec. 6 times. (30)

Round 30 :

3 sc, 1 dec. 6 times. (24)

Round 31 :

2 sc, 1 dec. 6 times. (18)

Info :

Cut the thread and fill the ball.

Small piece :

1) 6 sc in MR. (6) 2) 6 inc. (12) 3) 1 sc, 1 inc. 6 times. (18) 4-8) 1 sc around. (18)

Info :

Cut the strand, leaving thread for sewing. Insert the small piece into the hole of the large piece (so that the right side of the piece is on the outside) and sew to join the edges taking both loops on the large piece and only the outer loop of the small piece.

β€” Legs :

Leg (small) :

With grey cotton thread and 2,5 mm crochet hook)... 1) 6 sc in MR. (6) 2) 6 inc. (12) 3-8) 1 sc around. (12)

Info :

Cut the thread. Make two equal pieces and fill them. Then sew them to the bottom of the previous piece.

Leg (long) :

1) 6 sc in MR. (6) 2) 6 inc. (12) 3) 1 sc around. (12) 4) 1 sc, 1 inc. 6 times. (18) 5) 2 sc, 1 inc. 6 times. (24) 6) 3 sc, 1 inc. 6 times. (30) 7) 4 sc, 1 inc. 6 times. (36) 8) 5 sc, 1 inc. 6 times. (42) 8-16) 1 sc around. (42) 17) 5 sc, 1 dec. 6 times. (36) 18) 4 sc, 1 dec. 6 times. (30) 19) 3 sc, 1 dec. 6 times. (24) 20) 2 sc, 1 dec. 6 times. (18)

Info :

Cut the thread. Fill.

β€” Tail :

Info :

With orange cotton thread and 2,5 mm crochet hook)... Large piece:

Info :

Follow the same ball construction method as other body balls, then finish, cut the strand leaving thread for sewing and join to the last ball of the body as desired.

β€” Neck :

Info :

With green cotton thread and 2,5 mm crochet hook)... Large piece:

Round 1 :

6 sc in MR. (6)

Round 2 :

6 inc. (12)

Round 3 :

1 sc, 1 inc. 6 times. (18)

Round 4 :

2 sc, 1 inc. 6 times. (24)

Round 5 :

3 sc, 1 inc. 6 times. (30)

Round 6 :

4 sc, 1 inc. 6 times. (36)

Round 7 :

5 sc, 1 inc. 6 times. (42)

Round 8 :

6 sc, 1 inc. 6 times. (48)

Round 9-18 :

1 sc around. (54)

Round 19 :

6 sc, 1 dec. 6 times. (42)

Round 20 :

5 sc, 1 dec. 6 times. (36)

Round 21 :

4 sc, 1 dec. 6 times. (30)

Round 22 :

3 sc, 1 dec. 6 times. (24)

Round 23 :

2 sc, 1 dec. 6 times. (18)

Info :

Cut the thread and fill.

Small piece (A) :

Piece that connects with the body: 1) 6 sc in MR. (6) 2) 6 inc. (12) 3-7) 1 sc around. (12) 8) FLO, 1 sc, 1 inc. 6 times. (18)

Info :

Cut the thread and fill. Sew, joining row 8) to row 23) from previous piece (large piece).

Small piece (B) :

Head connecting piece: 1) 6 sc in MR. (6) 2) 6 inc. (12) 3) 1 sc, 1 inc. 6 times. (18) 4-10) 1 sc around. (18)

Info :

Cut the thread. Fill and sew to the top of the large piece.

β€” Head :

Info :

With green cotton thread and 2,5 mm crochet hook)... Large piece:

Round 1 :

6 sc in MR. (6)

Round 2 :

6 inc. (12)

Round 3 :

1 sc, 1 inc. 6 times. (18)

Round 4 :

2 sc, 1 inc. 6 times. (24)

Round 5 :

3 sc, 1 inc. 6 times. (30)

Round 6 :

4 sc, 1 inc. 6 times. (36)

Round 7 :

5 sc, 1 inc. 6 times. (42)

Round 8 :

6 sc, 1 inc. 6 times. (48)

Round 9 :

7 sc, 1 inc. 6 times. (54)

Round 10 :

8 sc, 1 inc. 6 times. (60)

Round 11-17 :

1 sc around. (60)

Round 18 :

2 hdc inc, 18 sc, 2 hdc inc. 38 sc. (64)

Round 19 :

*1 hdc, 1 hdc inc* 2 times, 18 sc, *1 hdc inc, 1 hdc* 2 times, 38 sc. (68)

Round 20-21 :

1 sc around. (68)

Round 22 :

*1 hdc, 1 hdc dec* 2 times, 18 sc, *1 hdc dec, 1 hdc* 2 times, 38 sc. (64)

Round 23 :

2 hdc dec, 18 sc, 2 hdc dec. (60)

Round 24 :

*8 sc, 1 dec* 6 times. (54)

Round 25 :

*7 sc, 1 dec* 6 times. (48)

Round 26 :

*6 sc, 1 dec* 6 times. (42)

Round 27 :

*5 sc, 1 dec* 6 times. (36)

Round 28 :

*4 sc, 1 dec* 6 times. (30)

Round 29 :

*3 sc, 1 dec* 6 times. (24)

Round 30 :

*2 sc, 1 dec* 6 times. (18)

Info :

Cut the thread and fill.

Small piece :

1) 6 sc in MR. (6) 2) 6 inc. (12) 3) 1 sc, 1 inc. 6 times. (18) 4-11) 1 sc around. (18)

Info :

Cut the strand, leaving thread for sewing. Insert the small piece into the hole of the large piece (so that the right side is out) and sew to join the edges taking both loops on the large piece and only the outer loop of the small piece.

β€” Eyes :

Info :

With brown cotton thread and 2,5 mm crochet hook)...

Round 1 :

6 sc in MR. (6)

Info :

Change to white cotton thread: 2) BLO, 6 inc. (12)

Info :

Cut leaving a bit of yarn to embroider the points of light. Make two identical eyes and sew them to the face of the worm.

β€” Details :

Info :

With brown thread embroider the eyebrows and the smile.

β€” Antennae :

Info :

With green cotton thread and 2,5 mm crochet hook)... 1) 6 sc in MR. (6) 2) 6 inc. (12) 3-5) 1 sc around. (12) 6) 6 dec. (6) 7-14) 1 sc around. (6)

Info :

Cut the strand leaving thread to sew. No need to fill. Make another antenna and sew them to the head of the worm.

β€” References :

Info :

MR: Magic Ring. c: chains. sc: single crochet. inc: increase. dec: decrease. hdc: half double crochet. hdc inc: half double crochet increase. hdc dec: half double crochet decrease. BLO: Back Loop Only. FLO: Front Loop Only. tinc: triple inc. sl st: slip stitch. *...* repeat only what is between asterisks.

Assembly Instructions

  • Insert the small piece into the hole of the large piece (right side out) and sew the edges together taking both loops on the large piece and only the outer loop of the small piece to close each ball.
  • Repeat the process to obtain as many colored balls as you want for the worm body, then join each ball edge-to-edge using the sewing tails so the worm becomes flexible.
  • Sew two grey legs to the bottom of each ball segment where noted, making two equal leg pieces for each placement and filling them before attaching.
  • Join the neck pieces by sewing the small neck piece (A) row 8 to the large neck piece row 23 to connect the neck to the body securely.
  • Sew the head connecting small piece (B) to the top of the large neck piece, then attach the head assembly to the neck connection on the body.
  • Attach the antennae to the top of the head (no filling required), sew on the eyes, and embroider eyebrows and smile with brown thread for final facial details.

Important Notes

  • πŸ’‘Repeat the ball construction as many times as necessary to reach the desired worm length; each ball is made in different colors and legs are crocheted in grey.
  • πŸ’‘When joining small and large pieces, take both loops on the large piece and only the outer loop on the small piece for a neat, flat seam.
  • πŸ’‘Cut the thread leaving a sewing tail where instructed to allow easy assembly; do not weave in ends before sewing pieces together.
  • πŸ’‘Stuff pieces firmly but gradually; overstuffing or stuffing too late can distort the spherical shape.

This charming worm amigurumi is a delightful little project you can make in an afternoon, mixing colors to match your style. The design is playful and perfect for gifts or nursery decor, with simple finishing steps for clean joins. Happy crocheting and enjoy creating your colorful worm friend! 🧢😊

You ask,

we answer.

FAQs

What size will the finished piece be?

The finished amigurumi measures approximately 17 cm high at the head, and the overall length depends on the number of balls you choose to make.

Can I use different yarn weights for this pattern?

Yes, but different yarn weights will significantly change the size and appearance; if you change yarn weight, adjust the hook size accordingly and expect a different finished size.

Do I need prior crochet experience for this pattern?

This pattern is rated intermediate and requires familiarity with single crochet, increases, decreases, BLO and FLO techniques, and basic assembly and sewing skills.

How long does this project typically take to complete?

Most crocheters complete this project in 5-7 hours, depending on how many balls you crochet and your assembly speed.