🧢 Beautiful ✨ Detailed πŸ’ Adorable

Snowman Gingerbread Amigurumi Pattern

Snowman Gingerbread Amigurumi Pattern
4.8β˜… Rating
5-7 Hours Time Needed
2.8K Made This
βœ‚οΈ

Intermediate Level

Ideal for those with basic crochet experience, featuring slightly more advanced stitches and techniques to expand your skills.

⏱️

Weekend Treat

Takes 5-7 hours, making it an enjoyable project to finish over a couple of days.

🧸

Cute Companion

An adorable friend to cherish, handcrafted with love to bring comfort and joy for years to come.

About This Snowman Gingerbread Amigurumi Pattern

This pattern creates a decorative snowman gingerbread amigurumi made from cotton yarn with a removable hat and layered body. It includes step-by-step rounds, color change notes, and photo references to guide you through shaping and assembly. Embroidery instructions for the face and finishing touches are included for a friendly, expressive result.

Snowman Gingerbread Amigurumi Pattern crochet pattern - detailed view of completed project

Detailed stitch charts and picture guides make shaping the head, hat, arms and body straightforward. The finished toy measures approximately 22 cm tall using the recommended yarn and hook.

Why You'll Love This Snowman Gingerbread Amigurumi Pattern

I absolutely love this pattern because it brings a cheerful, vintage-inspired snowman to life with bright colors and charming details. I enjoy the combination of shaping rounds and simple color changes which make each section fun and satisfying to crochet. The removable hat and embroidered face allow for easy customization and personal touches. I also appreciate how the pattern uses straightforward techniques, but yields a professional-looking finished toy that is perfect for display or gifting.

Snowman Gingerbread Amigurumi Pattern step 1 - construction progress Snowman Gingerbread Amigurumi Pattern step 2 - assembly progress Snowman Gingerbread Amigurumi Pattern step 3 - details and accessories Snowman Gingerbread Amigurumi Pattern step 4 - final assembly and finishing

Switch Things Up

I love how easy it is to customize this snowman by changing yarn colors and accents; try pastel shades for a soft nursery decor look or jewel tones for a richer holiday display.

I often switch yarn weight and hook size to make mini keychain versions or jumbo cuddle sizes; adjust stitch counts or scale evenly to keep proportions correct.

I like to swap the hat style β€” a beret or beanie works well β€” simply by changing the rounds for the crown and brim to create different silhouettes.

Try adding wire inside the arms if you want posable limbs; just use thin floral wire and wrap it before stuffing to keep it safe and secure.

I sometimes embroider a different expression or add rosy cheeks with a bit of blush or yarn to give each snowman unique personality.

Adding tiny crocheted accessories like mittens, a scarf fringe, or a tiny crocheted candy cane can make the toy more playful and gift-ready.

If you want a sturdier base for display, insert felt-covered cardboard rounds or lightweight plastic discs inside the body before closing to help it stand proud.

I recommend experimenting with textured stitches on the coat area to mimic knit or puffy effects β€” front post stitches or puff stitches add interesting texture.

Try replacing buttons with small wooden beads or safety buttons for varied finishes; always sew them securely if the toy will be handled by children.

I like to create matching sets by making different sized snowmen with complementary colors and arranging them as a festive centerpiece or mantel trio.

Common Mistakes & How to Fix Them

βœ— Skipping stitch markers during rounds can cause you to lose track of the beginning of rows; place a marker at the start of each round and move it up as you work. βœ— Forgetting to mark eye, nose and mouth positions results in misplaced facial features; mark spots between the specified rows (eyes between 12 and 13, nose between 14 and 15, mouth between 18 and 19) before stuffing. βœ— Not stuffing as you go leads to uneven shaping and lumps; stuff gradually, especially before closing the head and when shaping the hat brim and body sections. βœ— Pulling embroidery threads too tight will distort the head fabric; embroider gently, pulling through slowly and evenly to maintain a round shape for eyes and nose.

Snowman Gingerbread Amigurumi Pattern

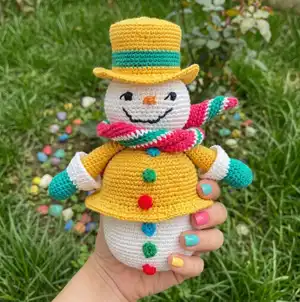
Make a charming snowman gingerbread amigurumi with this detailed crochet pattern. You will enjoy shaping the head, hat, arms and layered body with clear round-by-round instructions. Perfect for holiday decorations or a handmade gift, this pattern uses cotton yarn and colorful accents for a festive look. Follow the stitch charts, photo references and embroidery tips to finish a polished, smiley snowman.

Intermediate 5-7 Hours

Materials Needed for Snowman Gingerbread Amigurumi Pattern

β€” Main Fabric

  • 01
    Cotton yarn - ST.GEORGE TANGO (main yarn used, cotton)
  • 02
    Color 0006 white - used for head, body and some trims (small amounts)
  • 03
    Color 0420 red - used for buttons and scarf details (small amounts)
  • 04
    Color 0015 green - used for mittens, trims and scarf details (small amounts)
  • 05
    Color 0131 blue - used for one button accent (small amount)
  • 06
    Color 0391 orange - used for nose (small amount)
  • 07
    Color 0424 ocher - used for hat and second piece of body (main quantity)
  • 08
    Color 0409 indigo - used for scarf or small trim details (small amount)

β€” Tools Required

  • 01
    Crochet hook size 2.0 mm
  • 02
    A little bit of stuffing (eg. from a pillow or combed wool)
  • 03
    Embroidery needle
  • 04
    Sewing needle
  • 05
    Scissors
  • 06
    Pins for assembly and placement
  • 07
    Cardboard or plastic inserts for base support
  • 08
    Yarn needle for sewing pieces together

Progress Tracker

0% Complete

β€” HEAD :

Info :

Use the white color yarn. Mark the beginning of each row with wool of a different color (Picture 1).

Info :

How to Crochet - Magic Ring. LINK to the video: https://www.youtube.com/watch?v=PkzAomF3suk

Round 1 :

start 6 sc in a magic ring (6)

Round 2 :

(inc) x6 (12)

Round 3 :

(sc,inc) x6 (18)

Round 4 :

(sc,inc,sc) x6 (24)

Round 5 :

(3 sc,inc) x6 (30)

Round 6 :

(2 sc,inc,2sc) x6 (36)

Round 7 :

(inc,5 sc) x6 (42)

Round 8 :

(5 sc,inc,sc) x6 (48)

Round 9 :

BLO 48 sc around (48)

Info :

How To Crochet in The Back Loops Only (BLO). LINK to the video: https://www.youtube.com/watch?v=CKyojsCeqVc&t=23s

Round 10 :

(3 sc,inc,4 sc) x6 (54)

Round 11-19 :

54 sc around (54)

Info :

While crocheting from round 11 to round 19 mark with a different color yarn spots intended for eyes, nose and mouth. Mark the spot for the eyes between rows 12 and 13. The space between the eyes counts 8 loops. Mark the spot for the nose between rows 14 and 15. The nose is 2 loops wide. Mark the spot for the mouth between rows 18 and 19. The mouth is 2 loops wide.

Round 20 :

(3 sc,dec,4 sc) x6 (48)

Round 21 :

(5sc,dec,sc) x6 (42)

Round 22 :

(dec,5 sc) x6 (36)

Round 23 :

(2 sc,dec,2 sc) x6 (30)

Round 24 :

(3sc,dec) x6 (24)

Info :

Stuff the head. The remaining part of the head fill with stuffing material. Leave the yarn thread longer (around 40 cm). Do not sew the bottom opening of the head. We shall later sew the head to the body.

Info :

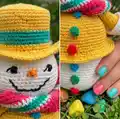
Embroider the eyes by pulling the needle with cotton yarn 8 times through the marked stitches slowly to get a round shape. Embroider the nose vertically 10 times with orange yarn. Embroider the lips following the pattern below. Use lip balm as a snowman blush. Completed the head of the snowman (Picture 8). LINK to the video: https://www.youtube.com/watch?v=8PcCt1Ijocw

β€” HAT :

Info :

Use the ocher color yarn.

Round 1 :

start 6 sc in a magic ring (6)

Round 2 :

(inc) x6 (12)

Round 3 :

(sc,inc) x6 (18)

Round 4 :

(sc,inc,sc) x6 (24)

Round 5 :

(3 sc,inc) x6 (30)

Round 6 :

(2 sc,inc,2sc) x6 (36)

Round 7 :

(inc,5 sc) x6 (42)

Round 8 :

(5 sc,inc,sc) x6 (48)

Round 9 :

(3 sc,inc,4 sc) x6 (54)

Round 10 :

BLO 54 sc around (54)

Round 11 :

54 sc (54)

Round 12 :

(3 sc,dec,4 sc) x6 (48)

Round 13-15 :

48 sc (48)

Round 16 :

Use the green color yarn 48 sc (48)

Round 17-19 :

48 sc (48)

Round 20 :

Use the ocher color yarn 48 sc (48)

Round 21 :

48 sc (48)

Round 22 :

FLO 48 sc (48)

Round 23 :

(sc,inc) x24 (72)

Round 24 :

72 sc (72)

Round 25 :

(2 sc,inc) x24 (96)

Round 26 :

96 sc (96)

Info :

Leave the yarn thread longer (around 40 cm). LINK to the video: How to change colors yarn in crochet https://www.youtube.com/watch?v=9cdgaePHefo. How To Crochet in The Front Loops Only (FLO) https://www.youtube.com/watch?v=PUFgqCk1aPc

Info :

The hat is completed (Picture 14).

Item Name (P1) :

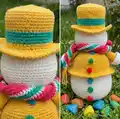
SEW THE HAT TO THE HEAD: Fill up the hat (Picture 16). Attach the hat to the head with pins (Picture 17). Sew the hat to the head (Picture 18). Finished hat (Picture 19).

β€” ARM (MAKE 2) :

Info :

Use the green color yarn.

Round 1 :

start 6 sc in a magic ring (6)

Round 2 :

(inc) x6 (12)

Round 3 :

(sc,inc) x6 (18)

Round 4-5 :

18 sc (18)

Round 6 :

16 sc,dec (17)

Round 7 :

7 sc,dec,8 sc (16)

Round 8-9 :

16 sc (16)

Round 10 :

Use the white color yarn 16 sc (16)

Round 11 :

BLO 16 sc (16)

Round 12 :

Use the ocher color yarn 16 sc (16)

Info :

Fill the arm with stuffing material (Picture 23).

Round 13-26 :

16 sc (16)

Info :

Fill the arm with stuffing material. Fasten off, leave the yarn thread longer (30 cm) so that we can later sew arms to the body.

β€” MAKING THE LACE AROUND THE SLEEVE :

Info :

Use the white color yarn. Let's go back to the 11th row of the arm (Picture 25).

Round 1 :

16 sc (16)

Round 2 :

(sc,inc) x8 (24)

Round 3 :

24 sc (24)

Round 4 :

(2 sc,inc) x8 (32)

Round 5 :

32 sc (32)

β€” BODY 1 :

Info :

Use the white color yarn.

Round 1 :

start 6 sc in a magic ring (6)

Round 2 :

(inc) x6 (12)

Round 3 :

(sc,inc) x6 (18)

Round 4 :

(2sc, inc) x6 (24)

Round 5 :

(3sc,inc) x6 (30)

Round 6 :

(4sc, inc) x6 (36)

Round 7 :

(5sc,inc) x6 (42)

Round 8 :

(6 sc,inc) x6 (48)

Round 9 :

BLO 48 sc (48)

Round 10 :

(7sc,inc) x6 (54)

Round 11 :

(8sc,inc) x6 (60)

Round 12 :

(9sc,inc) x6 (66)

Round 13 :

(10sc,inc) x6 (72)

Round 14-25 :

72 sc (72)

Round 26 :

FLO 72 sc (72)

Info :

Button (make 3): Use the red, green and blue color yarn. R1= 6 sc in magic ring, slip stitch to finish each button.

Item Name (P1) :

Crochet the second piece snowman body 1: Use the ocher color yarn. R1 start 6 sc in a magic ring (6). R2 (inc) x6 (12). R3 (sc,inc) x6 (18). R4 (2sc, inc) x6 (24). R5 (3sc,inc) x6 (30). R6 (4sc, inc) x6 (36). R7 (5sc,inc) x6 (42). R8 (6 sc,inc) x6 (48). R9 BLO 48 sc (48). R10 (7sc,inc) x6 (54). R11 (8sc,inc) x6 (60). R12 (9sc,inc) x6 (66). R13 (10sc,inc) x6 (72). R14-24 72 sc (72). Fasten off, leave the yarn thread longer (40 cm) so that we can later sew to the body.

Info :

Cut the pad out of cardboard or plastic and put plastic or cardboard inserts (Picture 36,37,38). Insert the second piece snowman into the first and sewing 72 sc in a circle on both sides of the two pieces (Picture 39,40).

β€” BODY 2 :

Info :

Use the white color yarn.

Round 1 :

start 6 sc in a magic ring (6)

Round 2 :

(inc) x6 (12)

Round 3 :

(sc,inc) x6 (18)

Round 4 :

(2sc, inc) x6 (24)

Round 5 :

BLO 24 sc (24)

Round 6 :

Use the ocher color yarn (3sc,inc) x6 (30)

Round 7 :

(4sc, inc) x6 (36)

Round 8 :

(5sc,inc) x6 (42)

Round 9 :

(6 sc,inc) x6 (48)

Round 10 :

(7sc,inc) x6 (54)

Round 11 :

(8sc,inc) x6 (60)

Round 12 :

(9sc,inc) x6 (66)

Round 13 :

(10sc,inc) x6 (72)

Round 14-20 :

72 sc (72)

Round 21 :

FLO 72 sc (72)

Round 22 :

72 sc (72)

Round 23 :

BLO 72 sc (72)

Info :

We return to the 23th row of the body. Use the ocher color yarn: R1= 72 sc. R2=(sc,inc) x36. R3-4=108 sc.

Item Name (P1) :

BUTTON (make 3): Use the red, green and blue color yarn. R1= 6 sc in magic ring, slip stitch. Attach buttons to the body in the positions shown (Picture 50-53).

Info :

Crochet the second piece snowman body 2 using ocher color yarn: R1 start 6 sc in a magic ring (6). R2 (inc) x6 (12). R3 (sc,inc) x6 (18). R4 (2sc, inc) x6 (24). R5 BLO 24 sc (24). R6 (3sc,inc) x6 (30). R7 (4sc, inc) x6 (36). R8 (5sc,inc) x6 (42). R9 (6 sc,inc) x6 (48). R10 (7sc,inc) x6 (54). R11 (8sc,inc) x6 (60). R12 (9sc,inc) x6 (66). R13 (10sc,inc) x6 (72). R14-19 72 sc (72). Fasten off, leave the yarn thread longer (40 cm).

Info :

Insert the second piece snowman into the first and sewing 72 sc in a circle on both sides of the two pieces (Picture 56,57,58).

β€” CONNECTING THE HEAD TO THE BODY :

Info :

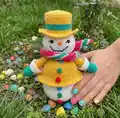
Attach the head to the body with pins (Picture 59). Sew the head to the body (Picture 60). Final assembled snowman shown in Picture 61.

Assembly Instructions

  • Attach the hat to the head: fill the hat, position it on the head with pins (Picture 16-17), then sew securely around the brim to the head (Picture 18-19).
  • Sew the head to the body: position the head opening over the top of the body, pin in place (Picture 59), then sew evenly around the seam to secure the head to the body (Picture 60).
  • Attach the arms to the body: use the long yarn tails left on the arms to stitch each arm to the sides of the body at the appropriate round height, securing firmly with whipstitch and weaving in ends.
  • Insert cardboard or plastic support into the bottom assembly: cut a round pad for the base, insert it into the second body piece, then sew the two body pieces together with 72 sc around to form a stable base (Picture 36-40).
  • Sew buttons and decorative pieces: embroider or sew the three small crocheted buttons to the front of the body in the positions shown, then add any scarf or accessory pieces as desired.

Important Notes

  • πŸ’‘Use stitch markers to keep track of the start of rounds and marked placement for facial features to ensure symmetry.
  • πŸ’‘Leave longer yarn tails when fastening off (around 30-40 cm) so you have enough length to sew pieces neatly without rethreading.
  • πŸ’‘Stuff firmly and shape as you go, especially for the head and hat brim, but avoid overstuffing which can distort the crochet fabric.
  • πŸ’‘Pin pieces in place before sewing to verify placement and balance, then sew securely with a yarn needle and weave in ends neatly.

This adorable Snowman Gingerbread amigurumi combines classic holiday charm with playful color pops for an irresistible handmade decoration. Complete with a removable hat, embroidered face, and layered body, it makes a perfect gift or mantle piece. Enjoy the satisfying process of shaping, stuffing, and finishing each whimsical detail. πŸ§ΆπŸŽ„

You ask,

we answer.

FAQs

What size will the finished piece be?

The finished amigurumi measures approximately 22 cm tall when made with the indicated cotton yarn and a 2.0 mm hook.

Can I use different yarn weights for this pattern?

Yes, you can use different yarn weights, but the final size will change; use an appropriate hook for your chosen yarn and expect to adjust stitch counts for proportions.

Do I need prior crochet experience for this pattern?

This pattern is rated intermediate, so basic knowledge of single crochet, increases, decreases, and working in front or back loops is recommended.

How long does this project typically take to complete?

Most crocheters complete this project in 5-7 hours, though time may vary based on experience, finishing details, and embroidery work.