🧢 Beautiful ✨ Detailed πŸ’ Adorable

Winnie The Pooh Amigurumi Pattern

Winnie The Pooh Amigurumi Pattern
4.6β˜… Rating
5-7 Hours Time Needed
2.4K Made This
βœ‚οΈ

Intermediate Level

Ideal for those with basic crochet experience, featuring slightly more advanced stitches and techniques to expand your skills.

⏱️

Weekend Treat

Takes 5-7 hours, making it an enjoyable project to finish over a couple of days.

🧸

Cute Companion

An adorable friend to cherish, handcrafted with love to bring comfort and joy for years to come.

About This Winnie The Pooh Amigurumi Pattern

This pattern creates a small Winnie the Pooh amigurumi wearing a bee costume with a removable headband and antennas. Youll crochet the head, body, limbs, ears and little details with color changes for the striped body and costume accents. Clear round-by-round instructions make shaping and stitch counts easy to follow.

Winnie The Pooh Amigurumi Pattern crochet pattern - detailed view of completed project

Includes materials list, abbreviations and helpful finishing notes to assemble the face and accessories. A delightful intermediate project that results in a sweet collectible toy.

Why You'll Love This Winnie The Pooh Amigurumi Pattern

I absolutely love this pattern because it transforms simple crochet stitches into a joyful, character-filled toy you can hold in your hands. I enjoy the playful color changes and the small accessories like the bee headband which give so much personality with very little extra work. Sewing the face and embroidering tiny details always makes me smile when the expression appears. This project balances quick rounds with satisfying finishing work, and I find it perfect for practicing shaping and color switching while creating something adorable.

Winnie The Pooh Amigurumi Pattern step 1 - construction progress Winnie The Pooh Amigurumi Pattern step 2 - assembly progress Winnie The Pooh Amigurumi Pattern step 3 - details and accessories Winnie The Pooh Amigurumi Pattern step 4 - final assembly and finishing

Switch Things Up

I love how easy it is to customize the costume colors β€” swap the red shirt for pastel shades or change the bee stripes to any combination you like.

You can make the amigurumi larger or smaller by switching yarn weight and using a larger or smaller hook; bulky yarn with a bigger hook yields a chunkier toy while thinner yarn makes a mini version.

I often add embroidered details like freckles, blush or different mouth expressions to give each face a unique personality.

Try different eye types: safety eyes, embroidered eyes, or tiny buttons depending on the look and safety requirements for children.

Add wire inside the arms for posability if you want the toy to hold tiny accessories or pose in photos.

Make a whole set with matching accessories β€” hats, scarves or tiny props to tell a story with your characters.

Use felt or tiny crocheted pieces for additional accessories like a honey pot or a little scarf to increase play value.

Experiment with alternate yarn fibers (cotton for a crisp look, acrylic for soft and washable options) and see how the texture changes the finished piece.

I sometimes mix two yarns together for a subtle marled effect on the body or costume to make the surface more visually interesting.

If you like sewing details, try adding appliqued patches or embroidered trim to the shirt for a handcrafted, signature finish that makes each toy one-of-a-kind.

Common Mistakes & How to Fix Them

βœ— Skipping stitch counts during increases or decreases leads to incorrect shaping; always count your stitches at the end of each round to ensure the correct totals. βœ— Not inserting safety eyes at the recommended rounds can misplace facial features; place the safety eyes between the rounds specified and check spacing before securing. βœ— Overstuffing the head or body makes seams bulge and shapes distort; stuff gradually and evenly, adding small amounts until the piece is firm but not overfilled. βœ— Changing colors without securing tails results in messy joins; weave in or hide your color changes as you go, and carry yarn strategically when possible. βœ— Sewing parts without pinning causes uneven placement; pin or use stitch markers to position limbs and ears before sewing to keep them symmetrical.

Winnie The Pooh Amigurumi Pattern

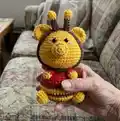
Make a charming Winnie the Pooh amigurumi dressed as a busy little bee. This pattern gives you complete, step-by-step instructions to crochet the head, body, limbs and accessories with clear round-by-round guidance. Youll learn simple shaping, color changes, and how to sew the pieces together for a polished finish. Perfect for gifting or displaying, this cute companion comes to life stitch by stitch.

Intermediate 5-7 Hours

Materials Needed for Winnie The Pooh Amigurumi Pattern

β€” Main Fabric

  • 01
    Color A: yellow YarnArt Jeans 35 (50g, 160m) - main body/head color for Winnie the Pooh
  • 02
    Color B: brown YarnArt Jeans 70 (50g, 160m) - trim and accents
  • 03
    Color C: red YarnArt Jeans 90 (50g, 160m) - shirt color
  • 04
    Piglet: Color A: light pink Madame Cotton 28 (100g, 280m); Color B: pink Madame Cotton 08 (100g, 280m); Color C: brown YarnArt Jeans 70 (50g,160m); Color D: yellow YarnArt Jeans 35 (50g,160m)
  • 05
    Eeyore: Color A: blue YarnArt Jeans 15 (50g,160m); Color B: white YarnArt Jeans 01 (50g,160m); Color C: purple YarnArt Jeans 89 (50g,160m); Color D: black YarnArt Jeans 53 (50g,160m); Color E: green YarnArt Jeans 60 (50g,160m); Color F: orange YarnArt Jeans 23 (50g,160m)
  • 06
    Tigger: Color A: orange YarnArt Jeans 85 (50g,160m); Color B: white YarnArt Jeans 01 (50g,160m); Color C: black YarnArt Jeans 53 (50g,160m); Color D: green YarnArt Jeans 69 (50g,160m)

β€” Tools Required

  • 01
    Crochet hook size 2mm-2.5mm
  • 02
    Tapestry needles
  • 03
    Brown thread (for Winnie the Pooh facial embroidery)
  • 04
    Pins for assembly
  • 05
    Stitch markers
  • 06
    Scissors
  • 07
    Polyester fiberfill for stuffing
  • 08
    Safety eyes (insert between specified rounds) - choose size as desired

Progress Tracker

0% Complete

β€” Winnie the Pooh - Head (yarn A) :

Round 1 :

sc 6 into a magic loop (6)

Round 2 :

inc 6 (12)

Round 3 :

[sc 1, inc] 6x (18)

Round 4 :

[sc 1, inc, sc 1] 6x (24)

Round 5 :

[sc 3, inc] 6x (30)

Round 6 :

sc 30 (30)

Round 7 :

[sc 2, inc, sc 2] 6x (36)

Round 8 :

sc 36 (36)

Round 9 :

sc 8, [sc 1, inc] 3x, sc 8, [sc 1, inc] 3x, sc 8 (42)

Round 10 :

sc 42 (42)

Round 11 :

sc 8, [sc 1, inc, sc 1] 3x, sc 8, [sc 1, inc, sc 1] 3x, sc 8 (48)

Round 12-17 :

sc 48 (6 rnds), insert safety eyes between rnd 8&9, 2-3 sts apart (48)

Round 18 :

[sc 6, dec] 6x (42)

Round 19 :

[sc 5, dec] 6x (36)

Round 20 :

[sc 4, dec] 6x (30)

Round 21 :

[sc 3, dec] 6x (24)

Info :

Break the yarn, stuff firmly.

β€” Winnie the Pooh - Nose (yarn A) :

Round 1 :

sc 6 into a magic loop (6)

Round 2 :

inc 6 (12)

Round 3 :

[sc 3, inc] 3x (15)

Round 4-5 :

sc 15 (2 rnds) (15)

Info :

Break the yarn, stuff slightly. Sew the nose under the eyes.

β€” Winnie the Pooh - Ears (yarn A, X2) :

Round 1 :

sc 6 into a magic loop (6)

Round 2 :

inc 6 (12)

Round 3 :

[sc 1, inc] 6x (18)

Round 4-5 :

sc 18 (2 rnds) (18)

Round 6 :

[sc 1, dec] 6x (12)

Info :

Break the yarn, sew 2 edges together. Sew the ears between rnd 5&8 of the head, 7-8 sts apart.

β€” Winnie the Pooh - Body (yarn A) :

Round 1 :

sc 6 into a magic loop (6)

Round 2 :

inc 6, change to yarn B (12)

Round 3 :

[sc 1, inc] 6x, change to yarn A (18)

Round 4 :

[sc 1, inc, sc 1] 6x (24)

Round 5 :

[sc 3, inc] 6x, change to yarn B (30)

Round 6 :

[sc 2, inc, sc 2] 6x, change to yarn A (36)

Round 7 :

[sc 5, inc] 6x (42)

Round 8 :

sc 42, change to yarn B (42)

Round 9 :

sc 42, change to yarn A (42)

Round 10-11 :

sc 42 (2 rnds), break yarn A, change to yarn B (42)

Round 12 :

sc 42, break yarn B, change to yarn C (42)

Round 13 :

[sc 5, dec] 6x (36)

Round 14-15 :

sc 36 (2 rnds) (36)

Round 16 :

[sc 4, dec] 6x (30)

Round 17 :

sc 30 (30)

Round 18 :

[sc 3, dec] 6x (24)

Round 19 :

sc 24 (24)

Info :

Break the yarn, stuff firmly. Sew the body to the head.

β€” Winnie the Pooh - Legs (yarn A, X2) :

Round 1 :

sc 6 into a magic loop (6)

Round 2 :

inc 6 (12)

Round 3-5 :

sc 12 (3 rnds) (12)

Info :

Break the yarn, stuff slightly. Sew the legs between rnd 6&9 of the body.

β€” Winnie the Pooh - Arms (yarn A, X2) :

Round 1 :

ch 4, start on the 2nd st from the hook, sc 2, (sc 3) on the last st, continue on the opposite side, sc 1, inc (8)

Round 2 :

sc 8, break yarn A, change to yarn C (8)

Round 3 :

sc 8 (8)

Round 4 :

sc 6, dec (7)

Info :

Break the yarn, sew 2 edges together. Sew the arms between the body & the head.
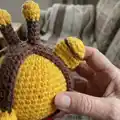
β€” Winnie the Pooh - Bee Headband (yarn B) :

Round 1 :

ch 45, slst on the 1st ch to make a ring, sc 45 (45)

Info :

Break the yarn, hide the remaining yarn.

β€” Winnie the Pooh - Bee's Antennas (yarn A, X2) :

Round 1 :

sc 6 into a magic loop (6)

Round 2 :

[sc 1, inc] 3x (9)

Round 3 :

sc 9 (9)

Round 4 :

[sc 1, dec] 3x, change to yarn B (6)

Round 5-8 :

sc 6 (4 rnds) (6)

Info :

Break the yarn, stuff slightly, sew the Antennas on the headband, 1-2 sts apart. Wear the Bee headband on the Poohs head.

β€” Winnie the Pooh - Finishing :

Info :

Use brown thread to sew the eyebrows (3 rnds above the eyes, 2 sts apart), the nose & the mouth.

β€” Piglet - Head (yarn A) :

Round 1 :

sc 6 into a magic loop (6)

Round 2 :

inc 6 (12)

Round 3 :

[sc 1, inc] 6x (18)

Round 4 :

[sc 1, inc, sc 1] 6x (24)

Round 5 :

[sc 3, inc] 6x (30)

Round 6 :

sc 30 (30)

Round 7 :

[sc 2, inc, sc 2] 6x (36)

Round 8 :

sc 36 (36)

Round 9 :

sc 8, [sc 1, inc] 3x, sc 8, [sc 1, inc] 3x, sc 8 (42)

Round 10 :

sc 42 (42)

Round 11 :

sc 8, [sc 1, inc, sc 1] 3x, sc 8, [sc 1, inc, sc 1] 3x, sc 8 (48)

Round 12-17 :

sc 48 (6 rnds), insert safety eyes between rnd 8&9, 2-3 sts apart (48)

Round 18 :

[sc 6, dec] 6x (42)

Round 19 :

[sc 5, dec] 6x (36)

Round 20 :

[sc 4, dec] 6x (30)

Round 21 :

[sc 3, dec] 6x (24)

Info :

Break the yarn, stuff firmly.

β€” Piglet - Nose (yarn B) :

Round 1 :

sc 6 into a magic loop (6)

Round 2 :

[sc 1, (sc 3) on the next st] 3x, break yarn B, change to yarn A (12)

Round 3 :

(blo) sc 12 (12)

Round 4 :

sc 12 (12)

Info :

Break the yarn, stuff slightly. Sew the nose under the eyes.

β€” Piglet - Inner Ears (yarn C, X2) :

Round 1 :

ch 12, start on the 2nd st from the hook, sc 3, hdc 4, dc 3, (dc 6) on the last st, continue on the opposite side, dc 3, hdc 4, sc 3 (26)

Info :

Break the yarn, stuff slightly. Sew inner ears in position.

β€” Piglet - Outer Ears (yarn A, X2) :

Round 1 :

Repeat rnd 1 of the Inner Ears (26)

Round 2 :

inc, sc 3, hdc 4, dc 3, dc inc 4, dc 3, hdc 4, sc 3, inc, slst on the 1st st (32)

Info :

Do not break the yarn, place the inner ear above the outer ear, continue to use yarn A to crochet both edges rnd 3. Break the yarn, fold the ears in half, sew 3 first sts together. Sew the ears between rnd 4&7 of the head, 5-6 sts apart.

β€” Piglet - Sunflower (yarn C) :

Round 1 :

ch 45, slst on the 1st ch to make a ring, break yarn C, change to yarn D, *sc 2, slst on the next st, ch 6, start on the 2nd st from the hook, sc 5*, repeat ** till the end, slst on the 1st st

Round 2 :

sc on the next st, *skip the next st, crochet on the sc 5 string, slst 1, hdc 1, (dc 2) on the next st, hdc 1, slst 1, ch 1, continue to crochet on the opposite side, slst 1, hdc 1, (dc 2) on the next st, hdc 1, slst 1, skip the next st, sc 1*, repeat ** till the end (we have total 15 petals)

Info :

Break the yarn, hide the remaining yarn. Wear the sunflower on the head.

Assembly Instructions

  • Attach head to body by sewing the opening of the body to the bottom of the head securely; stuff firmly before closing for a rounded shape.
  • Position and sew legs between rounds 6 and 9 of the body so they sit evenly; use pins to mark placement before stitching.
  • Sew ears to the head between the rounds indicated (Winnie the Pooh: between rnd 5 & 8), spacing them the specified number of stitches apart for symmetry.
  • Sew arms between the body and the head, aligning them with the photos or pattern rounds referenced for a natural pose.
  • Attach the bee headband and antennas after finishing embroidery; sew antennas to the headband 1-2 sts apart and place the headband on the Poohs head.

Important Notes

  • πŸ’‘Insert safety eyes before closing the head and between the rounds stated in the pattern to ensure correct facial placement.
  • πŸ’‘Use stitch markers to keep track of the beginning of each round and changes in stitch counts during shaping and color changes.
  • πŸ’‘Weave in ends and hide color change tails as you go to keep the amigurumi neat and avoid bulky joins.
  • πŸ’‘Stuff gradually and evenly to preserve shape; overstuffing can distort curves and under-stuffing may flatten the piece.

This adorable Winnie the Pooh amigurumi in a tiny bee costume is a joyful project for intermediate crocheters. It combines playful color changes with small accessories like a removable headband and antennas. Make one for yourself or a friend β€” it makes a treasured gift. 🧢🐝

You ask,

we answer.

FAQs

What size will the finished piece be?

The finished amigurumi measures approximately 12-15 cm tall depending on your tension and yarn; using the recommended yarn and hook yields the proportions shown in photos.

Can I use different yarn weights for this pattern?

Yes, you can use different yarn weights but this will change the final size; choose an appropriate hook for the yarn weight and expect altered stitch counts and proportions.

Do I need prior crochet experience for this pattern?

This pattern is rated intermediate because it includes color changes, shaping and small accessories; basic knowledge of single crochet, increases, decreases and magic ring is recommended.

How long does this project typically take to complete?

Most crocheters complete this project in 5-7 hours, though time may vary depending on experience level, detailing and assembly work.