🧶 Beautiful ✨ Detailed 💝 Adorable

WILLOW Mittens Pattern

WILLOW Mittens Pattern
4.6★ Rating
2-3 Hours Time Needed
2.7K Made This
✂️

Intermediate Level

Ideal for those with basic crochet experience, featuring slightly more advanced stitches and techniques to expand your skills.

⏱️

Bite-Sized Project

Finishes in 2-4 hours—perfect for an afternoon of creative relaxation.

🧣

Snug Essential

Everyday comfort with practical charm, designed for both functionality and style through changing seasons.

About This WILLOW Mittens Pattern

WILLOW Mittens is a textured mitten pattern worked in a ribbed cuff and fan-stitch body for a cozy, stylish finish. The pattern includes five sizes: Baby, Toddler, Child, Teen/Adult, and Large Adult, with clear notes for size changes. Youll work the cuff flat, then join to work the body in the round and finish with a shaped thumb.

WILLOW Mittens Pattern crochet pattern - detailed view of completed project

The stitch pattern creates an attractive scalloped texture while remaining comfortable and warm. Detailed instructions and photos guide placement of the thumb opening and finishing steps.

Why You'll Love This WILLOW Mittens Pattern

I absolutely love this pattern because the fan stitch texture looks intricate but is surprisingly easy to work, making the mittens feel special without being fussy. I enjoy that the ribbed cuff creates a snug, comfortable fit that keeps the mittens securely in place. The pattern includes five sizes so I can make matching pairs for family members of different ages. It is satisfying to sew the cuff seam and see the mitten take shape quickly, and I always appreciate a project that finishes into a wearable gift.

WILLOW Mittens Pattern step 1 - construction progress WILLOW Mittens Pattern step 2 - assembly progress WILLOW Mittens Pattern step 3 - details and accessories WILLOW Mittens Pattern step 4 - final assembly and finishing

Switch Things Up

I love how easily you can customize these mittens by switching colors — try a contrasting cuff and body for a bold look.

If you want a chunkier mitten, use a bulky yarn and a larger hook for a squishier result and a shorter make time.

For a dainty mini version, use fingering or sport weight yarn with a smaller hook to create tiny mittens perfect for ornaments or doll accessories.

I often substitute the fan stitch with a shell or puff stitch to vary the texture while keeping the same shaping and thumb placement.

You can lengthen the cuff by adding more rows to create a longer, slouchier fit that covers more of the wrist or forearm.

Try adding a thumb gusset by increasing along the thumb area for extra width if you need more room for the thumb.

Embellish with embroidery over the fan stitches or add a small button or pompom to the cuff for a playful accent.

I sometimes line the mittens with a thin fleece for extra warmth and wind protection, simply cut and sew the lining after finishing the crochet piece.

To make matching sets, change yarn hue across several pairs to create coordinated gifts for friends and family.

When experimenting, always make a small swatch to ensure your stitch pattern and gauge produce the size and drape you expect.

Common Mistakes & How to Fix Them

✗ Starting the cuff chain with the wrong number for your chosen size; check the chain count 8[9, 10, 11, 12] before you begin and use the number for the correct size. ✗ Seaming the cuff unevenly by not matching the first and last rows; fold the cuff in half and join the last stitch with the first stitch of Row 1 to form an even seam. ✗ Skipping stitch markers when working the body in spiral rounds will make it hard to find the round start; use a stitch marker and move it up each round to keep track of the start and end. ✗ Not leaving a long tail for seaming will make finishing difficult; leave the recommended 10 inch tail after the starting chain for the cuff and a 4-6 inch tail for weaving in after finishing rounds. ✗ Stuffing or gathering the thumb end incorrectly can create lumps; use a tapestry needle to gather the end through the front loops only and weave in the tail securely to close the tip neatly.

WILLOW Mittens Pattern

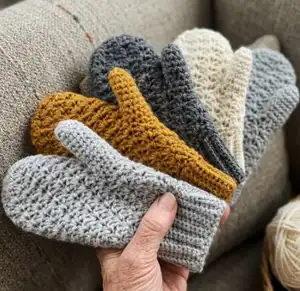
Make cozy, textured mittens with the WILLOW Mittens Pattern — a versatile crochet project that works up in worsted weight yarn. This pattern includes five sizes from Baby to Large Adult and clear step-by-step instructions for the cuff, body, and thumb. Youll enjoy the lovely fan stitch texture and a comfortable ribbed cuff that fits snugly and stylishly. Perfect for gifting or keeping your hands warm all season long.

Intermediate 2-3 Hours

Materials Needed for WILLOW Mittens Pattern

— Main Fabric

  • 01
    Worsted weight yarn (#4) - Baby size: approximately 120 yds
  • 02
    Worsted weight yarn (#4) - Toddler size: approximately 130 yds
  • 03
    Worsted weight yarn (#4) - Child size: approximately 150 yds
  • 04
    Worsted weight yarn (#4) - Teen/Adult size: approximately 170 yds
  • 05
    Worsted weight yarn (#4) - Large Adult size: approximately 180 yds
  • 06
    Suggested yarns: Loops & Threads Impeccable or Red Heart with Love (or any worsted weight #4 yarn)

— Tools Required

  • 01
    Crochet hook G-6 / 4.25mm
  • 02
    Stitch markers
  • 03
    Tapestry needle (yarn needle) for sewing and weaving in ends
  • 04
    Scissors
  • 05
    Measuring tape (to check gauge and mitten length)

Progress Tracker

0% Complete

— CUFF :

Info :

-Directions are given for size Baby and the changes for Toddler, Child, Teen/Adult, Adult L are in parentheses, so: Baby [Toddler, Child, Teen/Adult, Adult L].

Info :

Chain 8[9, 10, 11, 12], leaving a long tail (10inches) to seam the edges.

Row 1 :

SC in 2nd ch from hook and in each ch across, turn. < 7[8, 9, 10, 11]>

Row 2 :

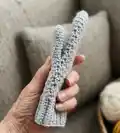
Ch 1( does not count as a stitch), SC in first st, BLSC in each of next 5[6, 7, 8, 9] sts, SC in last st, turn < 7[8, 9, 10, 11]> To obtain a nice edge, I prefer to make a standard SC( under both loops) in first and in the last st.

Rows 3 – 18[ 20, 22, 26, 28] :

repeat Row 2.

Info :

You must have 18[ 20, 22, 26, 28] Rows. Fold cuff in half and join with a slip stitch, the last stitch with the first stitch of Row 1, to form the cuff. Do not cut the yarn.

Info :

Continue with the body of mitten – in the top side of the ribbing.

— BODY :

Info :

– worked in the round, onto the edge of the ribbed cuff. - do not turn at the end of the rounds.

Round 1 :

Ch 1, working in row-end stitches of cuff, work evenly SC around the cuff edge, to obtain a total of 21[ 24, 27, 33, 36]SC, as follow:

Round 1 - Baby ( Toddler) size :

ch1, *SC in each of the next 5 (4) sts, 2SC in the next st*, repeat from *-* around, join with a Slst in Ch1. < 21(24) SC>.

Round 1 - Child ( Teen/ Adult) size :

ch1, 1SC ( 2SC) in first st, (SC in the next 3sts, 2SC in the next st) x 5(6) times, SC in last st, join with a Slst in Ch1. < 27(33) SC>.

Round 1 - Large Adult size :

ch1, (SC in next st, 2SC in the next st)x 2 times, *SC in the next 3 sts, 2SC in the next st*, repeat from *-*around, join with a Slst in Ch1. < 36 SC>.

Info :

The next rounds are worked in spiral (no slip stitch at the end of the round). Use stitch marker to keep track of start/end of rounds.

Round 2 :

Fan in first st, skip 2sts, * Fan in next st, skip 2 sts* repeat *-*around, < 7[8, 9, 11, 12]) Fan>

Round 3 :

Fan in first SC of previous round (move st marker up as you work), skip next 2 DC. Continue with Fan in each SC of next fans. ( make a fan in SC and skip the 2DC, around). < 7[8, 9, 11, 12]) Fan >

Info :

From now on, - each Fan is worked in SC of Fan of previous round, and the DC are skipped, unless otherwise specified. Continue depending on size:

— Baby size :

Round 4-10 :

Repeat Round 3. <7 Fan>

Round 11-12 :

SC2tog around, in continuous rounds. Join with a slip st at the end of last row. < 6 SC>. Fasten off, leaving a 5"-6" tail for weaving in. The Baby mitten should now be finished.

— Toddler [Child, Teen/Adult, Adult L] sizes :

-The following directions are given for size Toddler and the changes for Child, Teen/Adult, Adult L are in parentheses, so: Toddler [Child, Teen/Adult, Adult L],

Round 4- 5[ 6, 7, 7] :

Repeat Round 3 < 8[ 9, 11, 12] Fan >

Info :

In next round, make the opening for the thumb:

Round 6[7, 8, 8] :

Fan in first SC of previous round, skip the 2 DC, SC in the SC of the next fan, chain 3, skip the 2 DC and the next 2 Fan ( for thumb hole), continue with Fan in each SC of next fans. < 5[ 6, 8, 9] Fan and 1 SC before the Chain3>

Round 7[8, 9, 9] :

Fan in first SC of previous round, skip the 2 DC, Fan in the in the SC before the Chain3, Fan in the second chain of Chain3, Fan in each SC of next fans. < 7[8, 10, 11] Fan>

Round 8[9, 10, 11] -12[ 14, 17, 18] :

Fan in each SC < 7[8, 10, 11] Fan>

Round 13[ 15, 18, 19] -14[ 16, 19, 20] :

SC2tog around, in continuous rounds. Join with a slip st at the end of last row. 6[ 6, 8, 9 SC]. Fasten off, leaving a 5"-6" tail for weaving in.

— THUMB :

See thumb instructions below.

Round 1 :

Pull up a loop on the mitten side of the hole, ch1 and SC in the same space, 4[4, 5, 5]SC across the top of thumb hole, 1SC into the space on the other side of thumb hole, 4[5, 5, 6]SC across the bottom of thumb hole. <10[11, 12, 13]SC> Do not join, the next rounds are worked in spiral (no slip stitch at the end of the round).

Round 2 - 5 [6, 9, 10] :

SC in each SC around. <10[11, 12, 13]SC>.

Round 6 [7, 10,11] :

SC2tog around, SC in last stitch for sizes Child and Adult L. Join with a slip st. Fasten off, leaving a 4"-5" tail for weaving in.

— ASSEMBLY :

Info :

Using the long tail of the cuff section, seam the edges of the cuff by whip stitching through the SC and the base of the starting chain. Secure and weave in ends.

Info :

Use a tapestry needle to gather the end of the mitten and the end of the thumb closed: go through the front loops only of every stitch around and weave in. Secure the tail.

Info :

Congratulations! You have your WILLOW mittens!

Assembly Instructions

  • Fold the cuff in half and join the last stitch with the first stitch of Row 1 using a slip stitch to form the cuff, leaving the working yarn attached for the body.
  • Seam the edges of the cuff using the long tail from the starting chain by whip stitching through the SC and the base of the starting chain; secure and weave in ends.
  • When finishing the mitten and thumb tips, use a tapestry needle to gather the end through the front loops only of every stitch around and pull tight to close; weave in and secure the tail.
  • If you created a thumb hole, follow the thumb instructions: pick up stitches around the thumb opening, work the thumb in spiral rounds without joining, then decrease and fasten off leaving a tail for weaving in.
  • Weave in all ends neatly and block lightly if desired to even out the fan stitch texture and shape the mitten.

Important Notes

  • 💡Use a stitch marker when working the body in spiral rounds to keep track of the start and end of each round.
  • 💡Leave a long tail (about 10 inches) after the starting chain to seam the cuff edges easily and securely.
  • 💡Do not cut the yarn when joining the cuff to the body; fold and join the cuff first then continue with the body from the same yarn.
  • 💡Fasten off leaving 4"-6" tails at the mitten and thumb ends for easy gathering and weaving in of ends.

These mittens are a warm and stylish addition to your winter accessories, worked in an attractive fan texture and comfortable ribbed cuff. Make matching pairs for family and friends or try color-blocking for a modern twist. Happy crocheting and stay cozy! 🧶🧤

You ask,

we answer.

FAQs

What size will the finished mittens be?

The pattern includes five sizes (Baby, Toddler, Child, Teen/Adult, Large Adult) and finished dimensions will vary with yarn and tension; follow the stitch counts for your chosen size to achieve the correct fit.

Can I use a different yarn weight?

Yes, but changing yarn weight will change the finished size; if using a different weight, swatch to match gauge or adjust hook size and stitch counts accordingly.

Do I need a special technique for the fan stitch?

No special technique is required—each Fan is worked into a single stitch as (SC, DC, DC) and the pattern explains where to place fans and which DCs to skip as you progress.

How do I create the thumb opening and attach the thumb?

Follow the specified round where you skip fans and chain 3 to form the thumb hole, then pick up stitches around that opening and work the thumb in spiral rounds as instructed in the Thumb section.