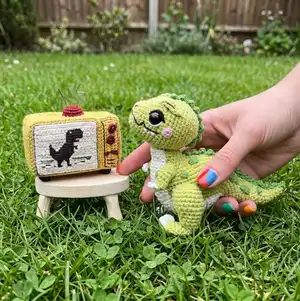
Make a lovable little Tyrannosaurus named Oliver with this detailed crochet pattern. You will learn shaping, simple jacquard color changes, and secure assembly techniques to create a sturdy, poseable toy that stands on its own. The pattern includes step-by-step rounds, crest and spot details, plus a bonus retro TV set for display. Perfect for crafters who enjoy photo-supported instructions and playful finishing touches.
Progress Tracker
0% Complete
— HEAD (Yarn A) :
Round 1 :
7 loops, turning, 6sc (starting from the 2nd loop from the hook), 6sc (from the back of the chain) (12l)
Round 2 :
[sc, inc]x6 (18l)
Round 5 :
[2sc, inc]x6 (24l)
Round 8 :
3sc, [inc]x18, 3sc (42l)
Round 9 :
18sc, 4dc in the next loop, [dec]x4, 4dc in the next loop, 14sc (44l)
Round 10 :
19sc, [2dc in the next loop]x2, sc, 4 sl st, sc, [2dc in the next loop]x2, 15sc (48l)
Round 11-13 :
24sc, 4 sl st, 20sc (48l)
Round 14 :
18sc, [dec]x3, 4sc, [dec]x3, 14sc (42l)
Round 16 :
[5sc, dec]x6 (36l)
Round 17 :
[4sc, dec]x6 (30l)
Round 18 :
[3sc, dec]x6 (24l)
Info :
Insert safety eyes between the rounds 7 and 8, the distance between them is approximately 10 stitches, don't fix yet (see photo 1).
Info :
Using the yarn needle to do from above of the eye 'loose stitch' of black thread floss. Separate one thread and fasten with a needle 'loose stitch' in the middle of the eye. Embroider one more 'loose stitch' 1 mm higher than the previous one to get an oval shape. Using yarn needle to do from below the eye 'loose stitch' of white thread floss, separate one thread and fasten with a needle 'loose stitch'. Press the eye to the embroidered line and fasten it.
Round 21 :
[2sc, dec]x6 (18l)
Round 22 :
[sc, dec]x6 (12l)
Info :
Completely fill the head before continuing.
Info :
Trim the thread. Pass the thread through all the loops using a yarn needle. Tighten and secure.
— CREST on the head :
Info :
Crochet crest with a hook 1,5 mm and green mouline threads.
Round 1 :
27 loops, turning, sl st (starting from the 2nd loop from the hook), [sl st; crochet in one loop - {sl st, dc, sl st}; sl st]x8, sl st
Info :
Cut and fix the thread, leaving a very long end for sewing. Sew the crest to the head, pre-fixing it with needles for cutting, in order to achieve perfect symmetry (see photos 37-39).
— NECK and BODY :
Round 1 :
Yarn A 1: 2 loops, 8sc in 2nd loop from hook (amigurumi ring) (8l)
Info :
Next, you need to crochet the body of yarn A and yarn B at once, alternately change the thread, but not cutting it to get a white breast. This technique is called jacquard. Color changing technique: when crocheting the last green sc, insert the hook into the loop, pull out the thread, crochet this sc to the end with a white thread. Then the green thread is thrown forward, and the white working thread goes backwards. To change the color back: when crocheting the last white sc, insert the hook into the loop, pull out the thread, crochet this sc to the end with the green thread.
Round 3 :
[3sc, inc]x2 (Yarn B); [3sc, inc]x2 (Yarn A) (20l)
Round 4 :
only through back loops 10sc (Yarn B); 10sc (Yarn A) (20l)
Round 5 :
[4sc, inc]x2 (Yarn B); [4sc, inc]x2 (Yarn A) (24l)
Info :
Insert cotter pin in the middle of the neck, put the disk on the cotter pin and wrap the ends in the 'rings' with the help of round-nosed pliers (see photos 55-60).
Round 6 :
12sc (Yarn B); 6sc, 4 loops, turning, 3sc starting from the 2nd loop from the hook, sl st in the same loop (in which the last sc was crocheted before the chain), 6sc (Yarn A) (30l)
Round 7 :
12sc, (Yarn B); 9sc, 4 loops, turning, 3sc starting from the 2nd loop from the hook, sl st in the same loop, 9sc (Yarn A) (36l)
Round 8 :
[5sc, inc]x2 (Yarn B); [5sc, inc]x4 (Yarn A) (42l)
Round 9 :
14sc (Yarn B); [6sc, inc]x2, 4 loops, turning, 3sc starting from the 2nd loop from the hook, sl st in the same loop, [6sc, inc]x2 (Yarn A) (52l)
Round 10 :
14sc (Yarn B); [7sc, inc]x2, 6sc, [7sc, inc]x2 (Yarn A) (56l)
Round 11 :
14sc (Yarn B); 21sc, 4 loops, turning, 3sc starting from the 2nd loop from the hook, sl st in the same loop, 21sc (Yarn A) (62l)
Round 12 :
14sc (Yarn B); 24sc, 4 loops, turning, 3sc starting from the 2nd loop from the hook, sl st in the same loop, 24sc (Yarn A) (68l)
Info :
Don't cut the thread. Take another end of the yarn ball and crochet the tail. At the end of the row, when crocheting the last green sc, insert the hook into the loop, pull out the thread, and crochet this sc to the end with a white thread grabbing it in the place where it remained. A 'loose stitch' is formed on the wrong side. You need to move it forward along with the green thread, so when crocheting jacquard it will be inside and the wrong side will become as neat as the front one.
— TAIL (Yarn A) :
Round 1 :
2 loops, 4sc in 2nd loop from hook (amigurumi ring) (4l)
Round 2 :
[inc]x2, dec (5l)
Round 3 :
sc, [inc]x2, dec (6l)
Round 4 :
sc, [inc]x2, sc, dec (7l)
Round 5 :
sc, [inc]x3, sc, dec (9l)
Round 6 :
2sc, inc, sc, inc, 2sc, dec (10l)
Round 8 :
3sc, [inc]x3, 2sc, dec (12l)
Round 10 :
3sc, [inc]x5, 2sc, dec (16l)
Round 12 :
dec, 4sc, [inc]x4, 4sc, dec (18l)
Round 14 :
dec, 5sc, [inc]x4, 5sc, dec (20l)
Info :
Cut and fix the thread. Stuff the tail with synthepus. Mark with a pin the place where the tail connects to the back - move the pin to the 12 loop from the beginning of the round count clockwise.
Info :
Connect the body with the tail in the next round. To connect the details insert the hook initially into the tail (from the inside to the outside), and then into the body (from the outside to the inside). Continue crocheting the body from the place where you left off.
Round 13 (incomplete) :
14sc (Yarn B); crochet 26sc along the body, crochet 2sc of the body together with 2sc of the tail, then crochet 26sc along the body (Yarn A) (see photo 74)
Round 14 :
15sc (Yarn B); crochet 25sc on the body, crochet 18sc on the tail, crochet 26sc on the body (Yarn A) (84l)
Info :
Sew the holes between the body and the tail using extra thread. Start stuffing the body with synthepus.
Round 15 :
15sc (Yarn B); 19sc, [dec]x3, 18sc, [dec]x3, 20sc (Yarn A) (78l)
Round 16 :
16sc (Yarn B); 15sc, [dec]x3, 18sc, [dec]x3, 17sc (Yarn A) (72l)
Round 17 :
16sc (Yarn B); 12sc, [dec]x3, 18sc, [dec]x3, 14sc (Yarn A) (66l)
Round 18 :
17sc (Yarn B); 14sc, [sc, dec]x6, 17sc (Yarn A) (60l)
Round 19 :
17sc (Yarn B); 14sc, [dec]x6, 17sc (Yarn A) (54l)
Round 20 :
[7sc, dec]x6 (48l)
Round 21 :
[6sc, dec]x6 (42l)
Round 22 :
[5sc, dec]x6 (36l)
Round 23 :
[4sc, dec]x6 (30l)
Round 24 :
[3sc, dec]x6 (24l)
Round 25 :
[2sc, dec]x6 (18l)
Round 26 :
[sc, dec]x6 (12l)
Info :
Completely fill the body. Tip: Cut out a circle of white felt a little larger than the resulting hole and insert it into the hole to prevent stuffing from clinging to hook during closing.
Info :
Trim the thread. Pass the thread through all the loops using a yarn needle. Tighten and secure.
— LEGS, 2 pcs (Yarn A) :
Round 1 :
9 loops, turning, 8 sl st (starting from the 2nd loop from the hook), 8 sl st (from the back of the chain) (16l)
Round 2 :
[7sc, inc]x2 (18l)
Round 7 :
3sc, dec, 8sc, dec, 3sc (16l)
Round 8 :
3sc, dec, 6sc, dec, 3sc (14l)
Round 9 :
2sc, dec, 6sc, dec, 2sc (12l)
Info :
Start stuffing the leg with synthepus.
Round 12 :
sc, [dec]x2, 2sc, [dec]x2, sc (8l)
Round 13 :
sc, dec, 2sc, dec, sc (6l)
Info :
Completely fill the leg, do not stuff further.
Round 14 :
6sc only through back loops (6l)
Round 15 :
4sc, [inc]x2 (8l)
Round 16 :
4sc, [inc]x4 (12l)
Round 18 :
7sc, [inc]x4, sc (16l)
Info :
Change the thread to Yarn B (leave the long end of Yarn A). Remove the pin that marking the beginning of the round. Fold the resulting 16 loops in half and in the next round, crochet both halves together.
Round 20 :
1 loop, turning, 8 sl st (8l)
— HANDS, 2 pcs (Yarn A) :
Round 1 :
2 loops, 6sc in 2nd loop from hook (amigurumi ring) (6l)
Round 2 :
[inc, sc]x3 (9l)
Round 4 :
[inc]x3, [dec]x3 (9l)
Round 6 :
[dec]x3, [inc]x3 (9l)
Info :
Stuff the hand with synthepus.
Round 7 :
[sc, dec]x3 (6l)
Info :
Change the thread to Yarn B, cut the Yarn A thread. Remove the pin that marking the beginning of the round. Fold the resulting 6 loops in half and in the next round, crochet both halves together.
Round 8 :
1 loop, turning, 3 sl st (3l)
Round 9 :
1 loop, turning, crochet in 1 loop - {sc, 2 loops, sl st}; sl st; crochet in 1 loop - {sc, 2 loops, sl st}
— CREST on the body :
Info :
Crochet crest with a hook 1,5 mm and green mouline threads.
Round 1 :
45 loops, turning, sl st (starting from the 2nd loop from the hook), [sl st; crochet in one loop - {sl st, dc, sl st}; sl st]x14, sl st
Info :
Cut and fix the thread, leaving a very long end for sewing. Sew the crest to the body, pre-fixing it with needles for cutting, in order to achieve perfect symmetry (see photos 100-102).
— SPOTS :
SMALL, 8 pcs :
1: 3 loops, turning, 2sc (starting from the 2nd loop from the hook), 2sc (from the back of the chain) sl st in 1st sc (4l). Cut and fix the thread, leaving a long end for sewing.
MIDDLE, 6 pcs :
1: 4 loops, turning, 3sc (starting from the 2nd loop from the hook), 3sc (from the back of the chain) sl st in 1st sc (6l). Cut and fix the thread, leaving a long end for sewing.
BIG, 4 pcs :
1: 5 loops, turning, 4sc (starting from the 2nd loop from the hook), 4sc (from the back of the chain) sl st in 1st sc (8l). Cut and fix the thread, leaving a long end for sewing.
— ASSEMBLAGE :
Info :
Sew on the spots on the hands, legs, back and tail. Sew your crocheted hands and legs to the body with a threaded bracing (use round-nosed pliers to make it easier to pull the needle). For this, it is necessary: Attach the hands and legs using needles for cutting (hands between 9 and 10 rounds of body, distance between hands approx 16 stitches, legs between 17 and 18 rounds of body, distance between legs approx 26 stitches) - check that the dinosaur stands steadily. Detach the hands and legs without removing the needles from them, and insert other needles for cutting in their place.
Info :
Insert the needle through the back into the hand attachment point (leaving the loose end of the thread outside). Thread the needle through two loops on the inner surface of the hand (the needle for cutting must be in the middle). Insert the needle into the body at the hand attachment point and pull out it at the point of attachment of the second hand. Pass the needle through the second hand in the same way. Sew the body and the hands two more times in the same way for strength. Insert the needle at the hand attachment point and pull out it at the point of attachment of the opposite leg. Thread the needle through the leg, insert the needle into the body at the leg attachment point and pull out it at the point of attachment of the second leg. Pass the needle through the second leg. Sew the body and the legs two more times in the same way for strength.
This charming Tyrannosaurus Oliver pattern combines vintage charm with playful details to create a unique handmade friend. Perfect for gifting or displaying with the included retro TV bonus, it brings a bit of prehistoric fun to your craft table. Enjoy every stitch and watch Oliver come to life! 🧶🦖