🧢 Beautiful ✨ Detailed πŸ’ Adorable

Turtles Amigurumi Pattern

Turtles Amigurumi Pattern
4.2β˜… Rating
2-4 Hours Time Needed
2.4K Made This
βœ‚οΈ

Intermediate Level

Ideal for those with basic crochet experience, featuring slightly more advanced stitches and techniques to expand your skills.

⏱️

Bite-Sized Project

Finishes in 2-4 hoursβ€”perfect for an afternoon of creative relaxation.

🧸

Cute Companion

An adorable friend to cherish, handcrafted with love to bring comfort and joy for years to come.

About This Turtles Amigurumi Pattern

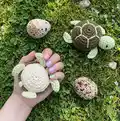
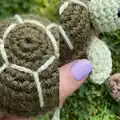
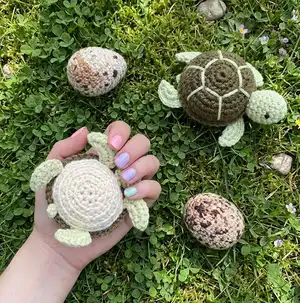
This pattern creates small, charming amigurumi turtles with a textured carapace and simple embroidery details. You will crochet separate details for the shell and assemble the pieces to create a finished toy with personality. The instructions include round-by-round counts, materials used, and clear assembly notes to guide you from start to finish.

Turtles Amigurumi Pattern crochet pattern - detailed view of completed project

Perfect for using cotton yarn scraps and practicing shaping in the round. Great as a gift, decoration, or small collectible.

Why You'll Love This Turtles Amigurumi Pattern

I absolutely love this pattern because it combines simple techniques with a delightful, finished result that feels rewarding to make. I enjoy how the carapace is built from two layered details to create a realistic shell without complicated colorwork. I also love that the pieces are small and portable, perfect for crafting on the go or gifting quickly. Making several variations with different colors is especially fun and always sparks joy in my crafting time.

Turtles Amigurumi Pattern step 1 - construction progress Turtles Amigurumi Pattern step 2 - assembly progress Turtles Amigurumi Pattern step 3 - details and accessories Turtles Amigurumi Pattern step 4 - final assembly and finishing

Switch Things Up

I love customizing this turtle by changing the yarn colors to make beachy or forest-themed turtles.

I often swap the main color for a variegated yarn to give the carapace subtle color shifts without extra embroidery.

To make a mini keychain version, I use finer yarn and a 1.5 mm hook and attach a small keyring before finishing.

For a larger, cuddly turtle, I use a thicker cotton blend and a larger hook and add extra stuffing for a plush feel.

I sometimes embroider spots, stars, or initials on the shell to personalize the toy as a gift.

Try adding felt or tiny crocheted accessories like a hat or scarf to give the turtle personality.

I recommend experimenting with safety eyes or embroidered eyes for child-safe toys depending on the recipient.

To make a nesting egg set, change yarn color for the egg details and sew them together as shown for decorative displays.

I like to create a matching family of turtles by varying yarn shades and slight size changes for a coordinated set.

When sewing pieces together, I pin and test placement before final stitching β€” it saves unpicking and keeps symmetry.

Common Mistakes & How to Fix Them

βœ— Skipping stitch counts during increases leads to misshapen details; always count each round after completing it to confirm stitch totals. βœ— Forgetting to stuff the carapace before closing makes assembly difficult later; stuff the shell firmly at the recommended step to keep the shape. βœ— Using a much larger hook than recommended will make loose stitches and show stuffing; switch to a smaller hook or tighter tension for a neat finish. βœ— Not leaving a long sewing tail when fastening off prevents easy closing and sewing; leave long yarn tails as instructed for weaving and attaching pieces.

Turtles Amigurumi Pattern

Make charming little crocheted turtles with this complete pattern. You will create a detailed carapace, head, paws, tail and an optional egg detail using simple amigurumi techniques. The pattern includes clear round-by-round instructions, materials, and assembly steps so you can finish a delightful toy to gift or display.

Intermediate 2-4 Hours

Materials Needed for Turtles Amigurumi Pattern

β€” Main Fabric

  • 01
    YarnArt Jeans (50 g / 150 m, 1.76 oz / 174 yds), blend 55% cotton / 45% PAC (fine #2) - Basic Color 01 (white) - 50 g
  • 02
    YarnArt Jeans (50 g / 150 m) - Basic Color 11 (light green) - 50 g
  • 03
    YarnArt Jeans (50 g / 150 m) - Basic Color 82 (dark olive green) - 50 g
  • 04
    Small amounts of contrasting yarn for embroidery/details (approx. 10-20 g)

β€” Tools Required

  • 01
    Crochet hook No. 2.25 mm (recommended)
  • 02
    Alternative crochet hook Gamma 1.5 mm for tighter stitches
  • 03
    Scissors
  • 04
    Tapestry/yarn needle for sewing and weaving ends
  • 05
    Stitch markers
  • 06
    2 button eyes (or safety eyes) if preferred
  • 07
    Small beads for decoration (optional)
  • 08
    Polyester stuffing (synthepuh) for filling carapace and head
  • 09
    Pins for assembly (optional)

Progress Tracker

0% Complete

β€” Introductory Lesson :

Info :

THE TOY IS MADE IN SPIRAL, WITHOUT ANY SL ST OR CH

β€” Carapace (1 Detail) :

Round 1 :

8 SC IN MC (8)

Round 2 :

8 INC (16)

Round 3 :

(1 SC, INC)*8 (24)

Round 4 :

1 SC, INC, (2 SC, INC)*7, 1 SC (32)

Round 5 :

(3 SC, INC)*8 (40)

Round 6 - 8 :

40 SC (40)

β€” Carapace (2 Detail) :

Round 1 :

BLO: 8 SC IN MC (8)

Round 2 :

BLO: 8 INC (16)

Round 3 :

BLO: (1 SC, INC)*8 (24)

Round 4 :

BLO: 1 SC, INC, (2 SC, INC)*7, 1 SC (32)

Round 5 :

BLO: (3 SC, INC)*8 (40)

Round 6 :

BLO: 40 SC (40)

Info :

NOW YOU SHOULD CROCHET 2 DETAILS AROUND (DETAIL 1 + DETAIL 2). !!! HERE YOU NEED TO FILL THE CARAPACE WITH SYNTEPUH

β€” Head :

Round 1 :

6 SC IN MC (6)

Round 2 :

6 INC (12)

Round 3 :

(1 SC, INC)*6 (18)

Round 4 - 7 :

18 SC (18)

Round 8 :

(1 SC, DEC)*6 (12)

Round 9 :

6 DEC (6)

Info :

FASTEN OFF LEAVING A TAIL ABOUT 15 CM LONG AND CUT THE YARN. USING A TAPESTRY NEEDLE, WEAVE THE YARN TAIL THROUGH THE FRONT LOOP OF EACH STITCH AND PULL TIGHT TO CLOSE.

Info :

WEAVE IN THE END.

β€” Paws (4 Pieces) :

Round 1 :

8 SC IN MC (8)

Round 2 :

8 INC (16)

Info :

FOLD THE PIECE IN HALVES AND WORK SC

β€” Tail :

Round 1 :

5 CH (5)

Round 2 :

1 SC IN THE SECOND CH FROM HOOK, 3 SC (4)

β€” Egg (1 Detail) :

Round 1 :

8 SC IN MC (8)

Round 2 :

8 INC (16)

Round 3 :

(1 SC, INC)*8 (24)

Round 4 :

1 SC, INC, (2 SC, INC)*7, 1 SC (32)

Round 5 :

32 SC (32)

Round 6 :

(3 SC, INC)*8 (40)

Round 7 :

2 SC, INC, (4 SC, INC)*7, 2 SC (48)

Round 8 - 14 :

48 SC (48)

Round 15 :

(4 SC, DEC)*8 (40)

Round 16 - 17 :

40 SC (40)

Info :

FASTEN AND CUT THE THREAD, LEAVE A LONG YARN TAIL.

β€” Egg (2 Detail) :

Round 1 :

8 SC IN MC (8)

Round 2 :

8 INC (16)

Round 3 :

16 SC (16)

Round 4 :

(1 SC, INC)*8 (24)

Round 5 - 6 :

24 SC (24)

Round 7 :

1 SC, INC, (2 SC, INC)*7, 1 SC (32)

Round 8 - 9 :

32 SC (32)

Round 10 :

(3 SC, INC)*8 (40)

Round 11 - 12 :

40 SC (40)

Round 13 :

7 CH ...

Info :

... 1 SC IN THE EIGHTH CH FROM HOOK ...

Info :

FASTEN AND CUT THE THREAD, LEAVE A LONG YARN TAIL.

Info :

SEW DETAIL 1 AND DETAIL 2

Info :

... 39 SC (39) FASTEN AND CUT THE THREAD, LEAVE A LONG YARN TAIL.

β€” Button :

Round 1 :

8 SC IN MC (8)

β€” Assembly :

Info :

SEW THE PAWS TO THE CARAPACE

Info :

SEW THE HEAD TO THE CARAPACE

Info :

SEW YOUR EYES TO YOUR HEAD

Info :

EMBROIDER SHELL LINES OR DETAILS ON THE CARAPACE AS SHOWN IN PHOTOS

Assembly Instructions

  • Sew the paws to the carapace aligning the four paws evenly around the shell and secure with a yarn needle.
  • Sew the head to the carapace centering it at the front of the shell and secure firmly with a tapestry needle.
  • Sew your eyes to the head in the positions shown in the photos, using buttons or safety eyes as preferred and securing them firmly.
  • Embroider shell lines on the carapace using contrasting yarn to recreate the segmented shell look, following photos for placement.
  • Fill the carapace with polyester stuffing (syntepu(h)) before closing the shell and assembling the top detail over the filling.
  • Weave in all yarn tails and secure knots on the inside so the finished toy is neat and safe for display.

Important Notes

  • πŸ’‘The toy is worked in continuous spiral rounds without slip stitches or joining chainsβ€”use a stitch marker to mark the start of each round.
  • πŸ’‘Stuff the carapace and head firmly but not overly tight to maintain shape and avoid distorting stitches.
  • πŸ’‘Leave long yarn tails when fastening off to allow easy sewing and closing of openings during assembly.
  • πŸ’‘Work with consistent tension and the recommended hook size for the neatest gauge and stitch definition.

This little turtle pattern brings seaside charm to your crochet basket and is perfect for gifting or decorating any room. The layered carapace technique gives a realistic shell texture without complex colorwork. Enjoy making a family of turtles in different colors and sizes for delightful handmade decor. 🧢🐒

You ask,

we answer.

FAQs

What size will the finished piece be?

The finished turtle measures approximately 6-9 cm (2.5-3.5 in) across depending on yarn tension and hook size when using the recommended yarn and hook.

Can I use different yarn weights for this pattern?

Yes, you can change yarn weight to alter the size; use a larger hook with bulky yarn for a chunkier toy or a smaller hook with finer yarn for a mini version, but adjust stuffing and proportions accordingly.

Do I need prior crochet experience for this pattern?

This pattern is rated intermediate and assumes you know how to work in the round, use increases and decreases, and sew pieces together.

How long does this project typically take to complete?

Most crocheters complete one turtle in about 2-4 hours depending on experience and assembly time.

What should I use to stuff the turtle?

Use polyester stuffing (synthepuh) as recommended; stuff gradually and firmly for the best shape but avoid overstuffing.