🧶 Beautiful ✨ Detailed 💝 Adorable

Twinkletoes the Tiny Gecko Amigurumi Pattern

Twinkletoes the Tiny Gecko Amigurumi Pattern
4.2★ Rating
2-4 Hours Time Needed
1.4K Made This
✂️

Beginner Friendly Level

Perfect for those just starting their crochet journey, with clear instructions and simple techniques

⏱️

Bite-Sized Project

Finishes in 2-4 hours—perfect for an afternoon of creative relaxation.

🎁

Tiny Treasure

Small, sweet, and gift-worthy creations that fit perfectly in the palm of your hand with detailed charm.

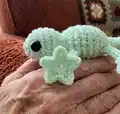
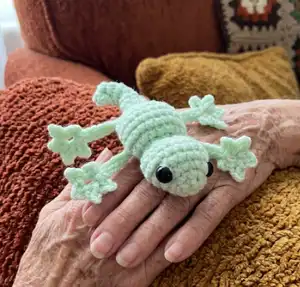
About This Twinkletoes the Tiny Gecko Amigurumi Pattern

This pattern creates a tiny palm-sized gecko called Twinkletoes with sculpted limbs and curled tail. The design is no-sew and beginner friendly, worked in continuous rounds from head to tail. It includes a photo tutorial for the special leg/toe stitch to make the little toes pop.

Twinkletoes the Tiny Gecko Amigurumi Pattern crochet pattern - detailed view of completed project

Two yarn options are provided for a tiny or chunky version with corresponding hook and eye sizes. Full materials, abbreviations, and step-by-step rounds are included so you can crochet with confidence.

Why You'll Love This Twinkletoes the Tiny Gecko Amigurumi Pattern

I absolutely love this pattern because it turns simple stitches into a charming little gecko that fits in your hand. I enjoy designing pieces that are both quick to make and packed with character, and Twinkletoes is exactly that. The special leg/toe technique gives such a delightful finish that I never get tired of making. I also love that it is truly beginner friendly—no sewing required—so makers of all levels can enjoy creating it.

Twinkletoes the Tiny Gecko Amigurumi Pattern step 1 - construction progress Twinkletoes the Tiny Gecko Amigurumi Pattern step 2 - assembly progress Twinkletoes the Tiny Gecko Amigurumi Pattern step 3 - details and accessories Twinkletoes the Tiny Gecko Amigurumi Pattern step 4 - final assembly and finishing

Switch Things Up

I love to change colors to give Twinkletoes a new personality; try ombre yarns or two-toned bodies for a playful effect.

I often make a chunky version using bulky yarn and a larger hook to create a squishier, larger gecko that still follows the same rounds.

I like to swap the safety eyes for embroidered eyes for a softer, child-safe version perfect for baby gifts.

For a keychain, I add a short chain and metal ring to the tail before finishing so the gecko can hang from bags or keys.

I sometimes add a thin wire inside the body and tail for posability so the gecko can curl or hold poses on display.

I enjoy stitching little spots or stripes along the back to create unique species—use embroidery or small felt shapes for extra detail.

You can change the toe length by adjusting the base chain in the leg tutorial for chunkier or daintier toes.

Try adding a tiny crocheted hat, scarf, or a ribbon collar to personalize Twinkletoes for gifts or seasonal themes.

If you want an even smaller version, use fingering weight yarn with a smaller hook and correspondingly smaller safety eyes to create a micro-gecko.

I sometimes use sparkly or novelty yarn for a magical Twinkletoes that catches the light—just be mindful of texture for the leg stitching.

Common Mistakes & How to Fix Them

✗ Skipping a stitch marker at the beginning of rounds will make counting difficult; always place a marker at the start of every round to stay oriented. ✗ Forgetting to move the limbs outward while crocheting can cause them to sit incorrectly; be sure to position limbs and double-check placement before continuing. ✗ Overstuffing the head or body makes shaping and limb placement awkward; stuff gradually and lightly to maintain correct shape. ✗ Not counting stitches after increases or decreases will throw off shaping immediately; count after each round and mark the stitch count when necessary. ✗ Crocheting into the chain stitches of the leg base accidentally will distort the limb; be careful to work into the intended stitches and avoid the chain base when instructed.

Twinkletoes the Tiny Gecko Amigurumi Pattern

Create an adorable palm-sized gecko with this beginner-friendly, no-sew crochet pattern. Twinkletoes is designed to be quick to make and full of personality, perfect for gifts or little desk buddies. Clear round-by-round instructions and a photo leg tutorial make each step easy to follow. Youll love how fast this little gecko comes together with simple stitches and charming toes.

Beginner Friendly 2-4 Hours

Materials Needed for Twinkletoes the Tiny Gecko Amigurumi Pattern

— Main Fabric

  • 01
    Medium weight yarn (for tiny Twinkletoes)
  • 02
    Premier Parfait Chunky (for chunky Twinkletoes)

— Tools Required

  • 01
    Crochet hook size 4.0mm (for medium weight yarn)
  • 02
    Crochet hook size 5.0mm (for Premier Parfait Chunky)
  • 03
    10mm safety eyes (for tiny Twinkletoes)
  • 04
    14mm safety eyes (for chunky Twinkletoes)
  • 05
    Fiber fill stuffing
  • 06
    Yarn needle for sewing and weaving tails
  • 07
    Stitch markers
  • 08
    Scissors

Progress Tracker

0% Complete

— Body :

Info :

Special stitch: Leg *picture tutorial on page 5*. Ch 10, sl st in 2nd ch from hook and the third ch. That third ch will be your "base chain". Ch 2, sl st in 2nd ch from hook, sl st in base stitch. Repeat * * 3 more times, for a total of 5 toes. Sl st in the 7 stitches back down the chain, then continue on with the round.

Round 1 :

Make 4 sc in a mc (4)

Round 2 :

Inc x 4 (8)

Round 3 :

*inc, 3 sc* x 2 (10)

Round 4 :

Inc x 5, 5 sc (15)

Round 5 :

3 sc in the next st, 8 sc, 3 sc in the next st, 5 sc (19)

Round 6 :

Sc in each st (19) *Place a SM between the 6th & 7th sc of this row. This is a guide for the center/top of the body.*

Round 7 :

Sc in in each st (19)

Info :

Insert safety eyes between r3 & r4, with 4 or 5 st visible in between them. Use the SM from r6 as a visual guide to place each eye equal distance away from the SM.

Round 8 :

Dec x 6, 7 sc (13)

Info :

Stuff head

Round 9 :

Dec x 4, 5 sc (9)

Round 10 :

3 sc in the next st, inc x 3, 3 sc in the next st, 4 sc (16)

Round 11 :

Leg, sc, inc, *2 sc, inc* x 2, sc, inc, leg, 6 sc (20)

Round 12-14 :

Sc in each st (20) *Make sure to move the limbs outward and be careful not to sc in the chain stitch from the leg*

Round 15 :

Leg, sc, *dec, sc* x 4, sc, leg, 6 sc (16)

Round 16 :

*2 sc, dec* x 3, 4 sc (13)

Info :

Stuff body

Round 17 :

*sc, dec* x 4, sc (9)

Info :

continued on next page

Round 18 :

Sc in each st (9)

Round 19 :

*dec, sc* x 2, 3 sc (7)

Round 20 :

Sc in each st (7)

Round 21 :

Dec, 5 sc (6)

Round 22 :

Sc in each st (6)

Round 23 :

Dec, 4 sc (5)

Round 24 :

Sc in each st (5)

Round 25 :

Dec, 3 sc (4)

Round 26 :

Sc in each st (4)

Info :

Fasten off and leave a long tail.

Infos :

Sew the hole closed, keep the yarn on your needle. Slightly curve the tip of the gecko-tail to the side so that the tip of the gecko-tail is beside R23/R24. Insert your needle between the rounds to bring the tip of the gecko-tail to it. Weave the yarn-tail through the stitches a few more times, to secure the curl. Don't weave the yarn-tail to the opposite side, it will give it an indent!

— Leg Tutorial :

Step 1 :

Ch 10

Step 2 :

Sl st in 2nd ch from hook and the third ch. That third ch will be your "base chain".

Step 3 :

Ch 2

Step 4 :

sl st in 2nd ch from hook, sl st in base stitch

Step 5 :

Ch 2

Step 6 :

sl st in 2nd ch from hook, sl st in base stitch

Step 7 :

Ch 2

Step 8 :

sl st in 2nd ch from hook, sl st in base stitch

Step 9 :

Ch 2

Step 10 :

sl st in 2nd ch from hook, sl st in base stitch

Step 11 :

Sl st in the 7 stitches back down the chain

Step 12 :

Finished view of R10

Assembly Instructions

  • Insert safety eyes between round 3 and round 4 with 4 or 5 stitches visible between them, using the stitch marker placed in round 6 as a guide for equal placement.
  • Sew the hole at the end of the tail closed using the long yarn tail and a yarn needle, keeping the yarn on the needle to weave and secure.
  • Curve the tail tip slightly to the side and weave the yarn tail through stitches beside R23/R24 to secure the curl, avoiding pulling to the opposite side which will indent the tail.
  • Position the limbs outward as instructed in rounds 12-14 and check that you are not single crocheting into the chain stitch of the leg base when working those rounds.
  • Use stitch markers to indicate the base chain for each leg and to keep track of the beginning of rounds, especially when shaping and placing eyes.

Important Notes

  • 💡This pattern is written in US crochet terminology.
  • 💡The stitch count at the end of the round does not include the limbs (legs/toes).
  • 💡The design is made all in one piece: it starts at the head and finishes at the tail, worked in continuous rounds.
  • 💡Place a stitch marker at the beginning of each round to keep track of the rounds and maintain consistent shaping.

This tiny gecko pattern was created to bring a smile to your crafting time and make a delightful little gift. Twinkletoes is quick to make, beginner friendly, and bursting with charm—perfect for handmade lovers and tiny collectors. Happy crocheting and may your stitches be cozy and full of joy! 🦎🧶✨

You ask,

we answer.

FAQs

What size will the finished piece be?

The finished amigurumi measures approximately palm-sized (about 8-12 cm) when using the recommended medium weight yarn and 4.0mm hook; size will vary with yarn and hook choice.

Can I use different yarn weights for this pattern?

Yes, you can use different yarn weights; the pattern provides two options (medium weight for tiny Twinkletoes and Premier Parfait Chunky for a larger version). Adjust hook size accordingly and note the eye sizes change with yarn weight.

Do I need prior crochet experience for this pattern?

This pattern is rated beginner friendly, so basic knowledge of single crochet, increases, decreases, slip stitch, and working in rounds is recommended for best results.

How long does this project typically take to complete?

Most crocheters complete this tiny gecko in 2-4 hours depending on experience and pace; the chunky version may take slightly less time due to thicker yarn.