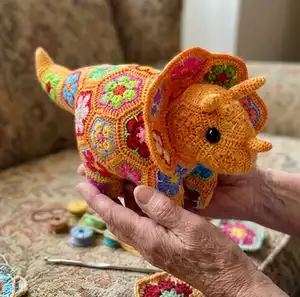
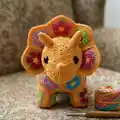
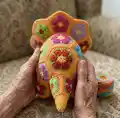
Create Plod, a colorful triceratops made from African Flower crochet motifs. This pattern guides you through making hexagons, pentagons, heptagons, octagons and squares, then joining them with join-as-you-go techniques to build a stuffed dinosaur. You will learn motif construction, joining methods, and finishing details for a playful 30cm toy. Perfect for using scrap sock yarn and making a vibrant handmade companion.
Progress Tracker
0% Complete
— African Flower Hexagon Crochet Motif Instructions :
Round 1 :
Ch5 and join with slip stitch to form a ring. Ch3 (counts as first dc), 1 dc in ring, ch1. Then, make * 2 dc in ring, ch1 *. Repeat from * to * 4 times more, slip stitch join to third chain of beginning "ch3" of the round. Cut yarn and pull through. (6 sets of 2dc's separated by chain stitches).
Round 2 :
Join next color in the ch1 space (just to the right of the previous round's ch3 beginning) and ch3 (counts as first dc). Make a dc in that same chain space then ch1. Make 2 dc (still in the same chain space). Move on to the next chain space of the previous round, and make the following: 2 dc, ch1, 2dc in that chain space. Repeat this in each of the next 4 chain spaces. Join with slip stitch to third chain of beginning "ch3" of the round. (6 clusters of [2dc,ch,2dc] )
Round 3 :
Continue with the same colour. Slip stitch into the chain space in the middle of the first cluster of the previous round. Ch3 (counts as first dc). Make 6 dc in same chain space (total of 7 dc's). Make 7 dc's into the chain space of the next cluster. Repeat 4 more times, so that each cluster has 7 dc's in its chain space. Join with slip stitch to the third chain of the beginning "ch3" of the round. Cut yarn and pull through. (6 sets of 7 dc's).
Round 4 :
Join new colour in the slip stitch of previous round's end, and ch1 (counts as a sc). Make one sc into each of the dc's of the cluster (this makes 7 sc including the ch1). Make one long dc (between clusters) that extends down into round 2 of the flower, so that it separates the round 2 clusters. * Sc into each of the 7 dc stitches of the next cluster. Make one long dc (between clusters) that extends down into round 2 of the flower, so that it separates the round 2 clusters. * Repeat from* to * four more times. Slip stitch to the beginning of the round 'ch1' stitch. Cut yarn and pull through. (42 sc and 6 long dc)
Round 5 :
Join next colour to the slip stitch at the end of the previous round. Ch3 (counts as first dc). Make one dc into each of the next 2 sc's, then (dc, ch1, dc) into the next sc (this forms the "apex" of the flower petal). Then make one dc into each of the next three sc. Make one dc into the previous round's "long dc" stitch. * Make one dc into each of the next petal's first three sc stitches, then (dc, ch1, dc) into the next sc (this forms the "apex" of the petal), then make one dc into each of the next three sc. Make one dc into the previous round's long dc stitch. * Repeat from * to * four more times. Slip stitch to the third chain of the "ch3" of the beginning of the round. Cut yarn and pull through. (You should have nine "dc" stitches between each petal apex, separated by a chain stitch, so 54 dc in all).
— African Flower Pentagon Crochet Motif Instructions :
Round 1 :
Ch5 and join with slip stitch to form a ring. Ch3 (counts as first dc), 1 dc in ring, ch1. Then, make * 2 dc in ring, ch1 *. Repeat from * to * 3 times more, slip stitch join to third chain of beginning "ch3" of the round. Cut yarn and pull through, leaving a tail. (5 sets of 2dc's separated by chain stitches).
Round 2 :
Join next color in the ch1 space (just to the right of the previous round's ch3 beginning) and ch3 (counts as first dc). Make a dc in that same chain space then ch1. Make 2 dc (still in the same chain space). Move on to the next chain space of the previous round, and make the following: 2 dc, ch1, 2dc in that chain space. Repeat this in each of the next 3 chain spaces. Join with slip stitch to third chain of beginning "ch3" of the round. (5 clusters of [2dc,ch,2dc] )
Round 3 :
Continue with the same color. Slip stitch into the chain space in the middle of the first cluster of the previous round. Ch3 (counts as first dc). Make 6 dc in same chain space (total of 7 dc's). Make 7 dc's into the chain space of the next cluster. Repeat 3 more times, so that each cluster has 7 dc's in its chain space. Join with slip stitch to the third chain of the beginning "ch3" of the round. Cut yarn and pull through, leaving a tail. (5 sets of 7 dc's).
Round 4 :
Join new colour in the slip stitch of previous round's end, and ch1 (counts as a sc). Make one sc into each of the dc's of the cluster (this makes 7 sc including the ch1). Make one long dc (between clusters) that extends down into round 2 of the flower, so that it separates the round 2 clusters. * Sc into each of the 7 dc stitches of the next cluster. Make one long dc (between clusters) that extends down into round 2 of the flower, so that it separates the round 2 clusters. * Repeat from* to * three more times. Slip stitch to the beginning of the round 'ch1' stitch. Cut yarn and pull through, leaving a tail. (35 sc and 5 long dc)
Round 5 :
Join next colour to the slip stitch at the end of the previous round. Ch3 (counts as first dc). Make one dc into each of the next 2 sc's, then (dc, ch1, dc) into the next sc (this forms the "apex" of the flower petal). Then make one dc into each of the next three sc. Make one dc into the previous round's "long dc" stitch. * Make one dc into each of the next petal's first three sc stitches, then (dc, ch1, dc) into the next sc (this forms the "apex" of the petal), then make one dc into each of the next three sc. Make one dc into the previous round's long dc stitch. * Repeat from * to * three more times. Slip stitch to the third chain of the "ch3" of the beginning of the round. Cut yarn and pull through, leaving a tail. (You should have nine "dc" stitches between each petal apex, separated by a chain stitch, so 45 dc in all).
— African Flower Heptagon Crochet Motif Instructions :
Round 1 :
Ch5 and join with slip stitch to form a ring. Ch3 (counts as first dc), 1 dc in ring, ch1. Then, make * 2 dc in ring, ch1 *. Repeat from * to * 5 times more, slip stitch join to third chain of beginning "ch3" of the round. Cut yarn and pull through, leaving a tail. (7 sets of 2dc's separated by chain stitches).
Round 2 :
Join next color in the ch1 space (just to the right of the previous round's ch3 beginning) and ch3 (counts as first dc). Make a dc in that same chain space then ch1. Make 2 dc (still in the same chain space). Move on to the next chain space of the previous round, and make the following: 2 dc, ch1, 2dc in that chain space. Repeat this in each of the next 5 chain spaces. Join with slip stitch to third chain of beginning "ch3" of the round. (7 clusters of [2dc,ch,2dc] )
Round 3 :
Continue with the same colour. Slip stitch into the chain space in the middle of the first cluster of the previous round. Ch3 (counts as first dc). Make 6 dc in same chain space (total of 7 dc's). Make 7 dc's into the chain space of the next cluster. Repeat 5 more times, so that each cluster has 7 dc's in its chain space. Join with slip stitch to the third chain of the beginning "ch3" of the round. Cut yarn and pull through, leaving a tail. (7 sets of 7 dc's).
Round 4 :
Join new colour in the slip stitch of previous round's end, and ch1 (counts as a sc). Make one sc into each of the dc's of the cluster (this makes 7 sc including the ch1). Make one long dc (between clusters) that extends down into round 2 of the flower, so that it separates the round 2 clusters. * Sc into each of the 7 dc stitches of the next cluster. Make one long dc (between clusters) that extends down into round 2 of the flower, so that it separates the round 2 clusters. * Repeat from* to * five more times. Slip stitch to the beginning of the round 'ch1' stitch. Cut yarn and pull through, leaving a tail. (49 sc and 7 long dc)
Round 5 :
Join next colour to the slip stitch at the end of the previous round. Ch3 (counts as first dc). Make one dc into each of the next 2 sc's, then (dc, ch1, dc) into the next sc (this forms the "apex" of the flower petal). Then make one dc into each of the next three sc. Make one dc into the previous round's "long dc" stitch. * Make one dc into each of the next petal's first three sc stitches, then (dc, ch1, dc) into the next sc (this forms the "apex" of the petal), then make one dc into each of the next three sc. Make one dc into the previous round's long dc stitch. * Repeat from * to * five more times. Slip stitch to the third chain of the "ch3" of the beginning of the round. Cut yarn and pull through. (You should have nine "dc" stitches between each petal apex, separated by a chain stitch, so 63 dc in all).
— African Flower Octagon Crochet Motif Instructions :
Round 1 :
Ch5 and join with slip stitch to form a ring. Ch3 (counts as first dc), 1 dc in ring, ch1. Then, make * 2 dc in ring, ch1 *. Repeat from * to * 6 times more, slip stitch join to third chain of beginning "ch3" of the round. Cut yarn and pull through, leaving a tail. (8 sets of 2dc's separated by chain stitches).
Round 2 :
Join next color in the ch1 space (just to the right of the previous round's ch3 beginning) and ch3 (counts as first dc). Make a dc in that same chain space then ch1. Make 2 dc (still in the same chain space). Move on to the next chain space of the previous round, and make the following: 2 dc, ch1, 2dc in that chain space. Repeat this in each of the next 6 chain spaces. Join with slip stitch to third chain of beginning "ch3" of the round. (8 clusters of [2dc,ch,2dc] )
Round 3 :
Continue with the same colour. Slip stitch into the chain space in the middle of the first cluster of the previous round. Ch3 (counts as first dc). Make 6 dc in same chain space (total of 7 dc's). Make 7 dc's into the chain space of the next cluster. Repeat 6 more times, so that each cluster has 7 dc's in its chain space. Join with slip stitch to the third chain of the beginning "ch3" of the round. Cut yarn and pull through, leaving a tail. (8 sets of 7 dc's).
Round 4 :
Join new colour in the slip stitch of previous round's end, and ch1 (counts as a sc). Make one sc into each of the dc's of the cluster (this makes 7 sc including the ch1). Make one long dc (between clusters) that extends down into round 2 of the flower, so that it separates the round 2 clusters. * Sc into each of the 7 dc stitches of the next cluster. Make one long dc (between clusters) that extends down into round 2 of the flower, so that it separates the round 2 clusters. * Repeat from* to * six more times. Slip stitch to the beginning of the round 'ch1' stitch. Cut yarn and pull through, leaving a tail. (56 sc and 8 long dc)
Round 5 :
Join next colour to the slip stitch at the end of the previous round. Ch3 (counts as first dc). Make one dc into each of the next 2 sc's, then (dc, ch1, dc) into the next sc (this forms the "apex" of the flower petal). Then make one dc into each of the next three sc. Make one dc into the previous round's "long dc" stitch. * Make one dc into each of the next petal's first three sc stitches, then (dc, ch1, dc) into the next sc (this forms the "apex" of the petal), then make one dc into each of the next three sc. Make one dc into the previous round's long dc stitch. * Repeat from * to * six more times. Slip stitch to the third chain of the "ch3" of the beginning of the round. Cut yarn and pull through. (You should have nine "dc" stitches between each petal apex, separated by a chain stitch, so 72 dc in all).
— African Flower Square Crochet Motif Instructions :
Info :
NOTE: There are two square motifs used in the making of Plod, and in my Plod, I have chosen to make them in one color. You can use different colors if you choose. I have drafted the chart so that each round is a different color, making it easier to read as well as indicating where you can change colors, if desired. The square has only 4 rounds instead of 5. If you are using the JAYG method, make the square only up to round 3 before starting the JAYG, which creates Round 4 (the final round).
Round 1 :
Ch5 and join with a slip stitch to make a ring. Ch3 (counts as first dc), then make 1dc into the ring, ch1. Make * 4 dc into ring, ch1. * Repeat from * to * twice more. Make 2 dc into ring and join with a slip stitch to the third chain of the "ch3" of the beginning of the round. (4 sets of 4dc's separated by chain stitches)
Round 2 :
If you choose, you can join a new color yarn. Ch3 into a chain space of Round 1. If you choose not to change colors, first slip stitch into the next along chain space, then Ch3 (counts as first dc). Make 7 dc into this same chain space. Make 8dc's into each of the three remaining chain spaces of Round 1. Join with a slip stitch to the third chain of the "Ch3" beginning of Round 1. (4 clusters of 8 dc's)
Round 3 :
Join a new color if you wish. Ch1 into the slip stitch of the previous round. Sc into each of the seven dc's of this cluster. Sc into each of the 8 dc's of the next cluster. Repeat for the remaining two clusters. Join with a slip stitch to the ch1 at the beginning of the round. (4 sets of 8 sc's)
Round 4 :
Join a new color yarn to the slip stitch of round 3. Ch3 (counts as first dc). Make a dc into each of the next four sc stitches.Ch1, then * make a dc into the same sc space as the previous dc. Make a dc into each of the next eight sc's from Round 3. Ch1. * Repeat from * to * two times more. Make a dc into the same sc space as previous dc. Make a dc into each of the next three sc stitches of Round3. Join with a slip stitch to the third chain of the "ch3" at the beginning of the round. (4 sets of 9 dc's separated by 4 chain stitches, ie four "gdc repeats")
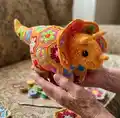
— Making the Feet and Belly :
Info :
You'll start by making all four of Plod's feet. Each foot is made up of two pentagons, which are joined along THREE SIDES to each other. Complete a pentagon up to round 5. Take a second pentagon that has been made up to Round 4 and join it to the completed pentagon along THREE SIDES as shown on the far left. In the photo on the left, you can see the three joined sides. The two pentagons form a "pocket" when opened up. Make three more feet in the same way.
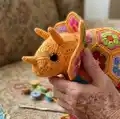
Info :
Pop open each of the feet so that you can only see half of each pentagon (photo left). Place the four opened-up feet as shown. Next, you will join the belly octagon. Follow along carefully, joining one side at a time so as not to get confused. The first TWO SIDES of the belly octagon are joined to the top INNER pentagons (photos in the instructions show orientation).
Info :
Now crochet TWO UN-JOINED SIDES on the octagon (photo references show blue lines). Then join the octagon on TWO SIDES to the feet again ... the first side is joined to the lower left inner pentagon and the second side is joined to the lower right inner pentagon. Finally, complete the remainder of the octagon's Round 5 without joining (photo references show black lines). Well done! Plod now has a tummy :D
— Joining a full row of Hexagons to the Body Base :
Info :
The next steps involve joining a full row of hexagons around the body base you have just made. You will need 8 hexagons for this part. Open up each foot and place on your work table as shown on the left. Notice that you will be facing the wrong (as opposed to right) side of the belly octagon. The octagon still has FOUR FREE SIDES (two free sides at the left-hand side of the body and two free sides on at the right-hand side of the body).
Info :
The first hexagon will be joined along TWO SIDES to the body. The first side is joined to the left-hand front leg pentagon and the second side is joined to one free side of the belly octagon. When the two sides have been joined, your dino looks like this (photo references in the original pattern). Next, join a hexagon to the body along THREE SIDES (photo references). The first side is joined to the previously-joined hexagon, then it is joined to the belly octagon and then finally to the left-hand hind leg pentagon. This is how things look now.
Info :
Continue joining hexagons, turning the work to face the correct side of the body as needed. Join hexagons along three or four sides as indicated in the illustrations and photographic sequence to build the body base. When you have joined the full row of hexagons, move on to making part of the tail; the pattern instructs that for now we only make part of the tail leaving a small hole to make stuffing the tail easier later.
— Making Plod's tail :
Info :
Turn the work so that you are facing the bum end. Join a hexagon to the "V"-shaped area between the two bum hexagons as shown, along two sides. The next motif you will join is a pentagon. It will be joined only along one side as seen in the photo. Follow the next steps carefully. Join a pentagon along one side of the pentagon you added in the previous step. In the photo you can see this joined side shown by a black line. Continue following the step-by-step photographic sequence to complete the partial tail; further finishing will be completed later in the pattern to leave a small hole for stuffing.
Plod the African Flower Triceratops is a joyous mix of colorful motifs and careful assembly that results in a one-of-a-kind handmade friend. Use your stash of sock yarn and experiment with bold or pastel colorways to make each Plod unique. Whether for display or gentle play, this vibrant triceratops brings personality and handmade charm to any home. 🧶🦖