🧶 Beautiful ✨ Detailed 💝 Adorable

Dove Amigurumi Pattern

Dove Amigurumi Pattern
4.0★ Rating
5-7 Hours Time Needed
2.1K Made This
✂️

Intermediate Level

Ideal for those with basic crochet experience, featuring slightly more advanced stitches and techniques to expand your skills.

⏱️

Weekend Treat

Takes 5-7 hours, making it an enjoyable project to finish over a couple of days.

🧸

Cute Companion

An adorable friend to cherish, handcrafted with love to bring comfort and joy for years to come.

About This Dove Amigurumi Pattern

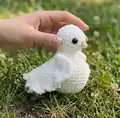
This pattern creates a plush dove amigurumi with a rounded head, soft body, curled tail and decorative wings. It combines a fluffy main yarn for the body with a tighter yarn for the beak and details for a neat finish. The pattern includes full round-by-round instructions and clear assembly steps so you can reproduce the same charming shape.

Dove Amigurumi Pattern crochet pattern - detailed view of completed project

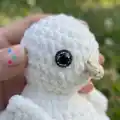
Perfect as a handmade gift or nursery decor, the dove is designed to be nhẹ to hold and display. You will sew wings and beak in place and use safety eyes for a secure finish.

Why You'll Love This Dove Amigurumi Pattern

I absolutely love this pattern because the combination of plush and finer yarn gives the dove a wonderfully soft body with crisp details. I enjoy how the wings form into a pretty layered shape that gives the bird real personality. Making the tail by folding and joining creates a lovely finished silhouette I am proud of. As a designer I appreciate patterns that are efficient yet allow for small custom touches, and this one offers both.

Dove Amigurumi Pattern step 1 - construction progress Dove Amigurumi Pattern step 2 - assembly progress Dove Amigurumi Pattern step 3 - details and accessories Dove Amigurumi Pattern step 4 - final assembly and finishing

Switch Things Up

I love how this dove pattern adapts to different looks by changing yarn and hook size; swap the plush yarn for a sport or DK weight to make a smaller, firmer bird, or use chunkier yarn for an oversized cuddly version.

I often change the eye style—try embroidered eyes for a baby-safe toy, or smaller glass eyes for a more delicate look; each choice changes the character of the dove.

I sometimes add a tiny ribbon or a crocheted flower on the head or neck to personalize gifts; these little accessories make each one unique and gift-ready.

Try subtle color changes along the wing edges or tail to give your dove a vintage or shaded effect—soft grays, blush pink or cream can look lovely and still keep the dove looking natural.

If you want a posable version, weave thin wire into the wing seams or tail base before closing, so you can bend and arrange the wings for display.

I recommend experimenting with textured stitches for the wings (like puff or bobble) if you want more feathery detail—just test on a swatch first to see how it blends with the plush body.

To make a set, create several doves in different sizes and arrange them as a family display; smaller versions can be keychain-sized if made with thinner yarn and a smaller hook.

For a festive theme, add a crocheted heart or tiny banner in the dove's beak, perfect for wedding favors or holiday decor; I stitch these on after finishing so they stay secure.

I also like to embroider small details such as eyelashes or a line along the wing to give a subtle expression; these stitches add personality without changing the structure.

Finally, feel free to combine yarns—use a sparkly or matte contrast yarn for the beak or wing edging to make your dove stand out in a charming, modern way.

Common Mistakes & How to Fix Them

✗ Skipping stitch markers at the start of rounds causes miscounted stitches; place a marker in the first stitch of every round and move it each round to keep your count accurate. ✗ Forgetting to stuff gradually will create lumps and uneven shaping; stuff in small increments while shaping, especially when you see 'start fill up' instructions. ✗ Using the wrong hook for the two yarns changes the size and texture drastically; use a 3.0 mm hook with Dolphin Baby and a 1.75 mm hook for Yarn Art Jeans as indicated. ✗ Attaching wings or beak without checking symmetry makes the finished dove look uneven; pin and align wings and eyes before sewing to ensure they are symmetric.

Dove Amigurumi Pattern

Make a soft, cuddly dove amigurumi using plush Himalaya Dolphin Baby yarn and finer Yarn Art Jeans for details. This pattern guides you step-by-step through the head, body, tail, wings and beak so you can create a sweet handmade keepsake. Clear rounds and assembly notes make it easy to follow for intermediate crocheters who love cozy textures.

Intermediate 5-7 Hours

Materials Needed for Dove Amigurumi Pattern

— Main Fabric

  • 01
    Himalaya Dolphin Baby plush yarn (main body) - use enough to complete body and wings (approx amount varies by size)
  • 02
    Yarn Art Jeans (finer yarn) - small amount for beak and detail work
  • 03
    Polyester filling (fiberfill) for body and tail
  • 04
    Safety eyes 10 mm (2 pieces)

— Tools Required

  • 01
    Crochet hook 3.0 mm (for Himalaya Dolphin Baby yarn)
  • 02
    Crochet hook 1.75 mm (for Yarn Art Jeans yarn)
  • 03
    10 mm safety eyes (2)
  • 04
    Needle and thread for sewing pieces
  • 05
    Scissors
  • 06
    Stitch markers or thin thread to mark rounds
  • 07
    Yarn needle for weaving ends
  • 08
    Pins for positioning pieces while assembling

Progress Tracker

0% Complete

— Head, Body, Tail :

Round 1 :

6sc in MR(6)

Round 2 :

(inc)x6 (12)

Round 3 :

(1sc, inc)x6 (18)

Round 4 :

(2sc, inc)x6 (24)

Round 5 :

(3sc, inc)x6 (30sc)

Round 6 :

30sc

Round 7 :

30sc

Round 8 :

30sc

Round 9 :

(3sc, dec)x6 (24)

Round 10 :

(2sc, dec)x6 (18)

Round 11 :

(1sc, dec)x6 (12)

Round 12 :

(1sc, inc)x6 (18)

Round 13 :

2sc, inc, 4sc, (inc)x4, 4sc, inc, 2sc (24)

Round 14 :

3sc, inc, 5sc, inc, (1sc, inc)x3, 4sc, inc, 3sc (30sc)

Round 15 :

13sc, (inc)x4, 13sc (34) start fill up

Round 16 :

15sc, (inc)x4, 15sc (38)

Round 17 :

38sc

Round 18 :

38sc

Round 19 :

38sc

Round 20 :

38sc

Round 21 :

38sc

Round 22 :

15sc, (dec)x4, 15sc (34)

Round 23 :

34sc

Round 24 :

13sc, (dec)x4, 13sc (30sc)

Round 25 :

30sc

Round 26 :

dec, 11sc, (dec)x2, 11sc, dec (26)

Round 27 :

dec, 10scp, dec, 12sc (24)

Round 28 :

(2sc, dec)x6 (18)

Round 29 :

(1sc, dec)x6 (12) fill up

Round 30 :

3sc, fold in half, connect front to back making 6sc

Round 31 :

ch, turn the piece, for the front loops of 6 sc - work 6sc, turn the piece, on the remaining six stitches work 6sc (12)

Round 32 :

(inc, 5sc)x2 (14)

Round 33 :

(inc, 6sc)x2 (16)

Round 34 :

(inc, 7sc)x2 (18)

Round 35 :

(inc)x2, 7sc, (inc)x2, 7sc (22)

Round 36 :

2sc, inc, 10sc, inc, 8sc (24)

Round 37 :

24sc

Round 38 :

24sc

Round 39 :

24sc

Round 40 :

(2sc, dec)x6 (18)

Round 41 :

18sc

Round 42 :

18sc do not fill the tail

Round 43 :

(1sc, dec)x6 (12)

Round 44 :

12sc

Round 45 :

3sc, fold in half, connect front to back making 6sc

Round 46 :

ch, piece rotation. In each of the 6 sc, work 3 dc in one stitch. Finish

— Wings :

Info :

Do 2 elements

Round 1 :

6sc in MR(6)

Round 2 :

(inc)x6 (12)

Round 3 :

(1sc, inc)x6 (18)

Round 4 :

(2sc, inc)x6 (24)

Round 5 :

(3sc, inc)x6 (30sc)

Round 6 :

(4sc, inc)x6 (36)

Round 7 :

Fold in half, close front and back with 9sc, a circle of 18 sc remains. Continue on it: 7.1. 18sc

Round 7.2 :

18sc

Info :

Then fold in half, close front to back doing: 4sc, 5 dc. Next: ch, the rotation of the work. There are 18 sc in the closing row.

— Beak :

Info :

Yarn Art Jeans crochet 1.75

Round 1 :

5sc in MR(5)

Round 2 :

5sc

Round 3 :

inc, 5sc (6)

Round 4 :

inc, 6sc (7) finish

Info :

Sew the beak, glue the eyes. Attach the wings with a needle and thread. Remember to be symmetrical.

Assembly Instructions

  • Sew the beak to the head using a length of Yarn Art Jeans thread and needle; glue or secure the 10 mm safety eyes on either side of the beak, checking symmetry before finishing.
  • Attach each wing to the sides of the body between rounds where the body side begins to narrow, pinning in place before sewing to ensure matching placement.
  • Fold and close the tail as described (fold in half and connect front to back making 6sc) and secure the joining stitches evenly so the tail holds its shape.
  • Stuff the head and body as noted in the rounds (start fill up at Round 15); stuff gradually and evenly then close the remaining rounds securely.
  • Use a needle and thread to weave and secure all joins, then weave in ends neatly so seams are tidy and stable.

Important Notes

  • 💡Use a stitch marker or thin thread in the first stitch of each round to track your progress and avoid losing the start of the round.
  • 💡Stuff gradually when the pattern indicates 'start fill up' to achieve smooth shaping and avoid lumps in the head and body.
  • 💡Pin parts in place and check symmetry before sewing wings and beak so the finished dove looks balanced and tidy.
  • 💡Use the recommended hooks for each yarn to keep the correct gauge and plush texture; a 3.0 mm for the plush yarn and 1.75 mm for the Jeans yarn.

This sweet Dove pattern brings timeless charm to your handmade collection with soft textures and elegant wings. Create a keepsake perfect for nurseries, gifts or shelf displays—each stitch made with care and love. Share your finished dove and spread handmade joy! 🕊️🧶

You ask,

we answer.

FAQs

What size will the finished piece be?

The finished amigurumi is approximately a medium plush toy; exact size depends on yarn tension and hook but with the recommended yarns and hooks the dove measures roughly a small to medium hand-sized plush.

Can I use different yarn weights for this pattern?

Yes, you can substitute yarn weights but the final size and texture will change; use an appropriate hook for your chosen yarn and be prepared for a larger or smaller finished dove.

Do I need prior crochet experience for this pattern?

This pattern is rated intermediate, so basic knowledge of single crochet, increases, decreases and working in the round is recommended for best results.

How long does this project typically take to complete?

Most crocheters complete this project in 5-7 hours, though time may vary based on experience level and working speed.