🧢 Beautiful ✨ Detailed πŸ’ Adorable

Turtles Amigurumi Pattern

Turtles Amigurumi Pattern
4.8β˜… Rating
5-7 Hours Time Needed
3.9K Made This
βœ‚οΈ

Intermediate Level

Ideal for those with basic crochet experience, featuring slightly more advanced stitches and techniques to expand your skills.

⏱️

Weekend Treat

Takes 5-7 hours, making it an enjoyable project to finish over a couple of days.

🧸

Cute Companion

An adorable friend to cherish, handcrafted with love to bring comfort and joy for years to come.

About This Turtles Amigurumi Pattern

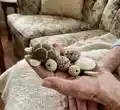
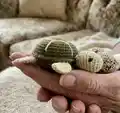
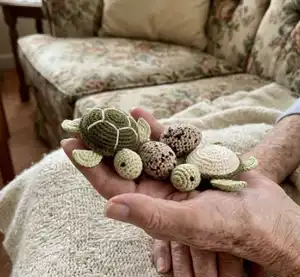
This pattern shows how to crochet small turtle toys worked in continuous spiral for neat shaping. You will make the carapace (two-layer detail), head, four paws and a tail, then assemble and embroider the shell. Clear round-by-round instructions and photos help you place parts and sew details precisely.

Turtles Amigurumi Pattern crochet pattern - detailed view of completed project

Designed to be made with YarnArt Jeans (fine cotton blend) and a small hook for firm stitches. The pattern is ideal for creating tiny keepsakes and decorative toys.

Why You'll Love This Turtles Amigurumi Pattern

I absolutely love this pattern because it combines simple amigurumi shaping with a lovely two-layer carapace that looks professional when finished. I enjoy how the spiral construction gives a seamless look and makes embroidery easy to align. The design is compact and portable, so I can make several in a short session and gift them to friends. Sewing and embroidery details let me personalise each turtle, which is always my favourite part of a project.

Turtles Amigurumi Pattern step 1 - construction progress Turtles Amigurumi Pattern step 2 - assembly progress Turtles Amigurumi Pattern step 3 - details and accessories Turtles Amigurumi Pattern step 4 - final assembly and finishing

Switch Things Up

I love customizing these little turtles by changing the carapace colors and embroidery thread β€” try bright contrasting lines for a playful look.

You can change yarn weight and hook size to make different sizes: use thicker yarn and a larger hook for a chunky, cuddly turtle or thinner yarn for a tiny keychain version.

I often replace button eyes with embroidered eyes for safety around children, or use small safety beads for a shiny look.

Try making the carapace in variegated yarn for a natural mottled shell effect without extra embroidery.

For a realistic texture, experiment with surface slip stitches or raised embroidery on the shell segments.

If you want poseable limbs, insert thin wire into the paws before stuffing and close the ends securely.

Use felt accents glued or sewn to the carapace for a whimsical mixed-media finish that’s quick to add.

Make a set of turtles in graduated sizes and display them together as a sweet shelf vignette or gift set.

I sometimes add tiny crocheted accessories like a scarf or a tiny flower for seasonal variations and giftable charm.

Don’t be afraid to swap the greens for pastel baby colors to create nursery-friendly toys β€” just match hook size and stuffing for consistent results.

Common Mistakes & How to Fix Them

βœ— Working rounds with joins or chains instead of spiral will create an obvious seam; work continuously in spiral as instructed to keep a smooth surface. βœ— Forgetting to stuff the carapace before closing causes gaps and an uneven shell shape; stuff the carapace firmly with small amounts of stuffing as you go to maintain shape. βœ— Miscounting after increases and decreases leads to wrong stitch counts and distorted pieces; count stitches at the end of each round to ensure accuracy. βœ— Skipping the instruction to use BLO for the second carapace detail will prevent the two layers from nesting correctly; follow the BLO steps exactly when making detail 2. βœ— Sewing parts without pinning can make placement uneven and off-center; pin or use stitch markers to position paws and head before sewing to secure symmetry.

Turtles Amigurumi Pattern

Make a charming set of tiny crochet turtles with this detailed pattern. You will create a textured carapace, a rounded head, four little paws and a tail β€” all worked in spiral for smooth shaping. The pattern includes step-by-step rounds, assembly photos and tips so you can sew and embroider the shell with confidence. Perfect for gifting, keychains, or a sweet handmade collection.

Intermediate 5-7 Hours

Materials Needed for Turtles Amigurumi Pattern

β€” Main Fabric

  • 01
    YarnArt Jeans (50 g / 150 m, 1.76 oz / 174 yds, 55% cotton / 45% PAC, fine 2) - Basic colors: Color 01 (white), Color 11 (light green), Color 82 (dark green)

β€” Tools Required

  • 01
    Crochet hook size 2.25 mm (Soft Touch) or Gamma 1.5 (as recommended)
  • 02
    Scissors
  • 03
    Stitch markers
  • 04
    Tapestry (yarn) needle for sewing and weaving ends
  • 05
    Buttons or beads for eyes (2)
  • 06
    Polyester stuffing (syntepuH / syntefuh) for filling carapace and head
  • 07
    Pins for assembly
  • 08
    Beads (optional) for decoration

Progress Tracker

0% Complete

β€” Introductory Lesson :

Info :

The toy is made in spiral, without any SL ST or CH

β€” Carapace (1 detail) (Basic color 82) :

Round 1 :

8 SC IN MC (8)

Round 2 :

8 INC (16)

Round 3 :

(1 SC, INC)*8 (24)

Round 4 :

1 SC, INC, (2 SC, INC)*7, 1 SC (32)

Round 5 :

(3 SC, INC)*8 (40)

Round 6 - 8 :

40 SC (40)

β€” Carapace (2 detail) (Basic color 11) :

Round 1 :

BLO: 8 SC IN MC (8)

Round 2 :

BLO: 8 INC (16)

Round 3 :

BLO: (1 SC, INC)*8 (24)

Round 4 :

BLO: 1 SC, INC, (2 SC, INC)*7, 1 SC (32)

Round 5 :

BLO: (3 SC, INC)*8 (40)

Round 6 :

BLO: 40 SC (40)

Info :

Now you should crochet 2 details around (detail 1 + detail 2).

Info :

!!! HERE YOU NEED TO FILL THE CARAPACE WITH SYNTEPUH

β€” Head (Basic color 11) :

Round 1 :

6 SC IN MC (6)

Round 2 :

6 INC (12)

Round 3 :

(1 SC, INC)*6 (18)

Round 4 - 7 :

18 SC (18)

Round 8 :

(1 SC, DEC)*6 (12)

Round 9 :

6 DEC (6)

Info :

FASTEN OFF LEAVING A TAIL ABOUT 15 CM LONG AND CUT THE YARN. USING A TAPESTRY NEEDLE, WEAVE THE YARN TAIL THROUGH THE FRONT LOOP OF EACH STITCH AND PULL TIGHT TO CLOSE.

Info :

WEAVE IN THE END.

β€” Paws (4 pieces) (Basic color 11) :

Round 1 :

8 SC IN MC (8)

Round 2 :

8 INC (16)

Info :

FOLD THE PIECE IN HALVES AND WORK SC

β€” Tail (Basic color 11) :

Round 1 :

5 CH (5)

Round 2 :

1 SC IN THE SECOND CH FROM HOOK, 3 SC (4)

β€” Assembly and Embroidery :

Info :

SEW THE PAWS TO THE CARAPACE

Info :

SEW THE HEAD TO THE CARAPACE

Info :

SEW YOUR EYES TO YOUR HEAD

Info :

EMBROIDER SHELL DETAILS AS SHOWN IN PHOTOS

β€” Egg (1 detail) (Color 01) :

Round 1 :

8 SC IN MC (8)

Round 2 :

8 INC (16)

Round 3 :

(1 SC, INC)*8 (24)

Round 4 :

1 SC, INC, (2 SC, INC)*7, 1 SC (32)

Round 5 :

32 SC (32)

Round 6 :

(3 SC, INC)*8 (40)

Round 7 :

2 SC, INC, (4 SC, INC)*7, 2 SC (48)

Round 8 - 14 :

48 SC (48)

Round 15 :

(4 SC, DEC)*8 (40)

Round 16 - 17 :

40 SC (40)

Info :

FASTEN AND CUT THE THREAD, LEAVE A LONG YARN TAIL.

β€” Egg (2 detail) (Color 01) :

Round 1 :

8 SC IN MC (8)

Round 2 :

8 INC (16)

Round 3 :

16 SC (16)

Round 4 :

(1 SC, INC)*8 (24)

Round 5 - 6 :

24 SC (24)

Round 7 :

1 SC, INC, (2 SC, INC)*7, 1 SC (32)

Round 8 - 9 :

32 SC (32)

Round 10 :

(3 SC, INC)*8 (40)

Round 11 - 12 :

40 SC (40)

Round 13 :

7 CH ... (follow photo sequence) 1 SC IN THE EIGHTH CH FROM HOOK ...

Round ... :

... 39 SC (39)

Info :

FASTEN AND CUT THE THREAD, LEAVE A LONG YARN TAIL. SEW DETAIL 1 AND DETAIL 2.

β€” Button (Color 01) :

Round 1 :

8 SC IN MC (8)

Assembly Instructions

  • Sew the paws to the carapace, spacing them evenly around the edge and orienting the toes outward for a natural pose.
  • Sew the head to the carapace at the front opening and secure with several passes of the tapestry needle so it sits firmly.
  • Embroider the shell lines on the top carapace using a contrasting color and a simple running stitch to create the segmented shell pattern.
  • Stuff the carapace with syntepuH (polyester stuffing) before closing the last rounds to ensure a full, rounded shell.
  • Sew the egg details (detail 1 and detail 2) together and use a long yarn tail to attach to the project or to close the egg.
  • Sew eyes or buttons to the head before final closing to ensure correct placement and symmetry.

Important Notes

  • πŸ’‘Work in continuous spiral without joining rounds as shown in the introductory lesson to avoid a visible seam.
  • πŸ’‘Stuff pieces gradually and firmly to keep shape but avoid overstuffing which can distort the stitches.
  • πŸ’‘Use stitch markers to mark the beginning of rounds and maintain correct stitch counts during increases and decreases.
  • πŸ’‘Pin parts in place before sewing to check symmetry and positioning, then stitch securely with a tapestry needle.

This sweet turtle amigurumi pattern is perfect for creating tiny handmade companions to give or collect. Make a set of turtles in different greens or soft pastels to personalise each one. Enjoy stitching and assembling every little part β€” the shell embroidery adds the final charming touch. 🧢🐒✨

You ask,

we answer.

FAQs

What size will the finished piece be?

The finished turtle measures approximately 6-9 cm across depending on yarn tension and hook size; using the recommended YarnArt Jeans and 2.25 mm hook will produce the small toy shown in photos.

Can I use different yarn weights for this pattern?

Yes, you can substitute yarn weights, but the final size and stitch density will change; use an appropriate hook for the yarn you choose and adjust stuffing amounts to keep shape.

Do I need prior crochet experience for this pattern?

This pattern is rated intermediate because it uses continuous spiral construction, increases and decreases, and requires precise sewing and embroidery for the shell.

How long does this project typically take to complete?

Most crocheters complete one small turtle in 5-7 hours including assembly and embroidery, depending on experience and how many details you add.