๐Ÿงถ Beautiful โœจ Detailed ๐Ÿ’ Adorable

Turtles Amigurumi Pattern

Turtles Amigurumi Pattern
4.5โ˜… Rating
5-7 Hours Time Needed
1.7K Made This
โœ‚๏ธ

Intermediate Level

Ideal for those with basic crochet experience, featuring slightly more advanced stitches and techniques to expand your skills.

โฑ๏ธ

Weekend Treat

Takes 5-7 hours, making it an enjoyable project to finish over a couple of days.

๐Ÿฅ

Charming Critter

Delightful animal designs with sweet details that capture the essence of your favorite woodland and farmyard friends.

About This Turtles Amigurumi Pattern

This pattern teaches you how to crochet a small, detailed turtle with a layered carapace made from multiple pieces. It includes stitch-by-stitch rounds for each piece, photos to guide assembly and finishing notes for a neat result. The design emphasizes texture and contrast for a playful finished toy.

Turtles Amigurumi Pattern crochet pattern - detailed view of completed project

Perfect for crafty gift makers and amigurumi fans who enjoy sewing small parts together. The pattern uses common stitches but requires careful counting and assembly for the best outcome.

Why You'll Love This Turtles Amigurumi Pattern

I absolutely love this pattern because it creates a charming, tactile toy with lots of personality and texture. I enjoy the process of making the layered carapace pieces โ€” each spiral detail brings the design to life. As a maker I find the assembly steps rewarding; placing and sewing the pieces transforms flat rounds into a three-dimensional shell. The color combinations are also so satisfying to experiment with, and I love gifting the finished turtles to friends who appreciate handmade details.

Turtles Amigurumi Pattern step 1 - construction progress Turtles Amigurumi Pattern step 2 - assembly progress Turtles Amigurumi Pattern step 3 - details and accessories Turtles Amigurumi Pattern step 4 - final assembly and finishing

Switch Things Up

I love customizing the carapace colors to change the personality of the turtle; try pastel shades for a softer look or bright contrasts for a playful toy.

You can change scale easily by using bulkier yarn and a larger hook for a chunky version, or finer thread and a small hook for a tiny keychain-sized turtle.

I often add embroidery or tiny felt details to the spirals to create eyes-catching contrasts and texture on the shell.

Swap the spiral brown rings for a single solid color to make a modern minimalist shell design.

Make the shell removable by using a button or small snap inside so the turtle can hide a tiny surprise or egg inside.

Try using variegated yarn for one of the carapace pieces to get unexpected color transitions and a unique look.

I sometimes stitch a loop on the top to hang the turtle as an ornament or mobile piece for a nursery decoration.

Experiment with different stuffing densities in the shell: a firmer shell shows spiral detail, while a softer shell creates a squishier toy.

Embroider small freckles or spots on the head for added personality and character to each turtle you make.

If you want a poseable toy, insert a short length of flexible wire into the limbs before stuffing, securing ends inside with thread.

Common Mistakes & How to Fix Them

โœ— Skipping stitch markers during rounds leads to lost stitch counts; place a marker at the start of each round to track progress precisely. โœ— Forgetting to change to BLO or FLO where instructed will change the shape; follow the BLO/FLO notes exactly to keep the intended edge shaping. โœ— Stuffing too early or too much can distort the shell shape; stuff gradually and leave a small opening until assembly is nearly complete. โœ— Not weaving in tails before assembly causes bulky seams; weave ends neatly or leave short tails for sewing so seams lie flat.

Turtles Amigurumi Pattern

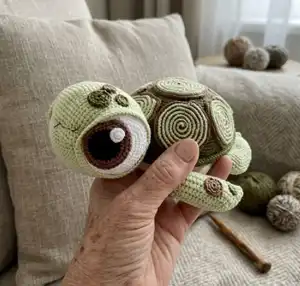
Create an adorable crocheted turtle with this complete pattern. You will make a multi-piece carapace, body, head, eyes and tail with step-by-step rounds and clear assembly guidance. This pattern uses YarnArt Jeans and small hooks for a firm, detailed finish โ€” perfect for gifting or decorating your home.

Intermediate 5-7 Hours

Materials Needed for Turtles Amigurumi Pattern

โ€” Main Fabric

  • 01
    YarnArt Jeans, 50 g / 150 m (55% cotton / 45% PAC), Fine 2: Color 01 (white) - small amount
  • 02
    YarnArt Jeans: Color 11 (light green) - main green approx 100 g
  • 03
    YarnArt Jeans: Color 82 (dark green) - carapace main approx 100 g
  • 04
    YarnArt Jeans: Color 40 (brown) - for spiral edges and details approx 30-50 g
  • 05
    YarnArt Jeans: Color 53 (black) - small amount for eye center
  • 06
    YarnArt Jeans: Color 67 (light yellow) - second carapace piece approx 50 g

โ€” Tools Required

  • 01
    Crochet hook size 2.25 mm (Soft Touch) or 1.5 mm Gamma as alternative
  • 02
    Tapestry needle for sewing and weaving ends
  • 03
    Stitch markers
  • 04
    Scissors
  • 05
    Polyester stuffing (sintepuh or syntepu) for filling
  • 06
    Beads (optional) for eyes or decoration

Progress Tracker

0% Complete

โ€” Supplies :

Info :

Yarn YarnArt Jeans 50 g/150 m (55% cotton/45% PAC, fine 2). Basic colors: Color 01, Color 11, Color 82, Color 40, Color 53, Color 67

Info :

Hook No 2.25 crochet Soft Touch or Gamma 1.5. Additional supplies: scissors, markers, beads, syntepuh (stuffing)

โ€” Introductory Lesson :

Info :

The toy is made in spiral, without any SL ST or CH. You must know some basic crochet skills. The pattern does not include tutorials.

โ€” Carapace (1) (Basic Color 82 Dark Green) :

Round 1 :

8 SC in MR (8)

Round 2 :

8 INC (16)

Round 3 :

(1 SC, INC)*8 (24)

Round 4 :

1 SC, INC, (2 SC, INC)*7, 1 SC (32)

Round 5 :

(3 SC, INC)*8 (40)

Round 6 :

2 SC, INC, (4 SC, INC)*7, 2 SC (48)

Round 7 :

(5 SC, INC)*8 (56)

Round 8-9 :

56 SC (56)

Round 10 :

3 SC, INC, (6 SC, INC)*7, 3 SC (64)

Round 11 :

(7 SC, INC)*8 (72)

Round 12 :

4 SC, INC, (8 SC, INC)*7, 4 SC (80)

Round 13-14 :

80 SC (80)

Round 15 :

(9 SC, INC)*8 (88)

Round 16 :

5 SC, INC, (10 SC, INC)*7, 5 SC (96)

Round 17 :

(11 SC, INC)*8 (104)

Round 18-19 :

104 SC (104)

Round 20 :

6 SC, INC, (12 SC, INC)*7, 6 SC (112)

Round 21 :

(13 SC, INC)*8 (120)

Round 22 :

7 SC, INC, (14 SC, INC)*7, 7 SC (128)

Round 23 - 27 :

128 SC (128)

Round 28 :

BLO: 128 SC (128)

Round 29 :

FLO: 128 SC (128)

Round 30 :

(15 SC, INC)*8 (136)

Round 31 :

136 SC (136)

Round 32 :

(15 SC, DEC)*8 (128)

Round 33 :

128 SC (128)

Info :

Fasten and cut the thread, leave a yarn tail.

โ€” Carapace (2) (Basic Color 67 Light Yellow) :

Round 1 :

8 SC in MR (8)

Round 2 :

BLO: 8 INC (16)

Round 3 :

BLO: (1 SC, INC)*8 (24)

Round 4 :

BLO: 1 SC, INC, (2 SC, INC)*7, 1 SC (32)

Round 5 :

BLO: (3 SC, INC)*8 (40)

Round 6 :

BLO: 2 SC, INC, (4 SC, INC)*7, 2 SC (48)

Round 7 :

BLO: (5 SC, INC)*8 (56)

Round 8 :

BLO: 56 SC (56)

Round 9 :

BLO: 3 SC, INC, (6 SC, INC)*7, 3 SC (64)

Round 10 :

BLO: (7 SC, INC)*8 (72)

Round 11 :

BLO: 4 SC, INC, (8 SC, INC)*7, 4 SC (80)

Round 12 :

BLO: 80 SC (80)

Round 13 :

BLO: (9 SC, INC)*8 (88)

Round 14 :

BLO: 5 SC, INC, (10 SC, INC)*7, 5 SC (96)

Round 15 :

BLO: (11 SC, INC)*8 (104)

Round 16 :

BLO: 104 SC (104)

Round 17 :

BLO: 6 SC, INC, (12 SC, INC)*7, 6 SC (112)

Round 18 :

BLO: (13 SC, INC)*8 (120)

Round 19 :

BLO: 7 SC, INC, (14 SC, INC)*7, 7 SC (128)

Round 20 :

BLO: 128 SC (128)

โ€” Carapace (3) (Basic Color 67 Light Yellow) :

Round 1 :

8 SC in MR (8)

Round 2 :

8 HDC INC (16)

Round 3 :

(1 HDC, HDC INC)*8 (24)

Round 4 :

1 HDC, HDC INC, (2 HDC, HDC INC)*7, 1 HDC (32)

Round 5 :

(3 HDC, HDC INC)*8 (40)

Round 6 :

2 HDC, HDC INC, (4 HDC, HDC INC)*7, 2 HDC (48)

Round 7 :

48 HDC (48)

Round 8 :

(5 HDC, HDC INC)*8 (56)

Round 9 - 21 :

56 HDC (56)

Round 22 :

56 SC (56)

โ€” Carapace (4) (7 pieces) (Basic Color 40 Brown) :

Round 1 :

8 SC in MR (8)

Round 2 :

BLO: 8 INC (16)

Round 3 :

BLO: (1 SC, INC)*8 (24)

Round 4 :

BLO: (2 SC, INC)*8 (32)

Round 5 :

BLO: (3 SC, INC)*8 (40)

Round 6 :

BLO: (4 SC, INC)*8 (48)

Round 7 :

BLO: (5 SC, INC)*8 (56)

Info :

Change color into light-green one (Color 11) and work slip stitch FLO from 6-1 rows.

โ€” Assembly (Carapace pieces) :

Info :

Return to the 1st piece, sew the 33rd row to the 28th one. See the photo.

Info :

Attach piece (4) to piece (1). Begin from the top, but firstly fold the piece to make 1st rows together.

Info :

The rest of pieces are attached with temporary seam. If you can't allocate all the pieces, sew in 1 piece less. See the photo.

Info :

Attach all pieces (4) to piece (1).

Info :

Fold piece (3) in halves. Place the marker to the folded edge as it's shown in the photo. Then attach line AB of piece (3) to piece (2).

Info :

Make some stitches between piece (2) and piece (3) to attach them to each other. Attach piece (3) to piece (1) from point A to point B.

Info :

Sew piece (1) to piece (2). Attention! Don't attach all the pieces at once. Leave a small hole to fill the piece with fiber. Don't fill too much fiber. Carapace must be filled with fiber a bit to insert an egg with a little turtle inside.

Info :

Attach all pieces (4) to piece (1). Fold and position pieces as in photos and sew to create the completed shell.
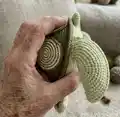
โ€” Tail (Basic Color 11 Light Green) :

Round 1 :

6 SC in MR (6)

Round 2 :

6 INC (12)

Round 3 - 6 :

12 SC (12)

Info :

Fold the piece in halves and work SC. Sew the tail to the carapace.

โ€” Head (Basic Color 11 Light Green) :

Round 1 :

8 SC in MR (8)

Round 2 :

8 INC (16)

Round 3 :

(1 SC, INC)*8 (24)

Round 4 :

1 SC, INC, (2 SC, INC)*7, 1 SC (32)

Round 5 :

(3 SC, INC)*8 (40)

Round 6 :

40 SC (40)

Round 7 :

2 SC, INC, (4 SC, INC)*7, 2 SC (48)

Round 8 :

48 SC (48)

Round 9 :

BLO: 48 SC (48)

Round 10 :

48 SC (48)

Round 11 :

48 SC (48)

Round 12 :

(5 SC, INC)*8 (56)

Round 13 - 14 :

56 SC (56)

Round 15 :

3 SC, INC, (6 SC, INC)*7, 3 SC (64)

Round 16 - 19 :

64 SC (64)

Round 20 :

(6 SC, DEC)*8 (56)

Round 21 - 22 :

56 SC (56)

Round 23 :

(5 SC, DEC)*8 (48)

Round 24 :

BLO: 48 SC (48)

Round 25 - 26 :

48 SC (48)

Round 27 :

(4 SC, DEC)*8 (40)

Round 28 :

40 SC (40)

Round 29 :

(3 SC, DEC)*8 (32)

Round 30 :

(2 SC, DEC)*8 (24)

Round 31 :

(1 SC, DEC)*8 (16)

Round 32 :

8 DEC (8)

Info :

Fasten off leaving a tail about 15 cm long and cut the yarn.

Info :

Using a tapestry needle, weave the yarn tail through the front loop of each stitch and pull tight to close.

โ€” Eyes (1 Detail) (2 pieces) (Basic Color 01 White) :

Round 1 :

8 SC in MR (8)

Round 2 :

8 INC (16)

Round 3 :

(1 SC, INC)*8 (24)

Round 4 :

1 SC, INC, (2 SC, INC)*7, 1 SC (32)

Round 5 :

(3 SC, INC)*8 (40)

Round 6 :

40 SC (40)

Round 7 :

2 SC, INC, (4 SC, INC)*7, 2 SC (48)

Round 8 :

48 SC (48)

Info :

FO, weave in ends.

โ€” Eyes (2 Detail) (2 pieces) (Basic Color 53 Black, Color 40 Brown) :

Round 1 :

8 SC in MR (8)

Round 2 :

8 INC (16)

Round 3 :

(1 SC, INC)*8 (24)

Round 4 :

4 R: 12 SC, 18 HDC (30) (as shown)

Info :

Fasten and cut the thread, leave a yarn tail. New thread brown. Work next rounds as photo instructions show, join and sew details 2 to details 1.
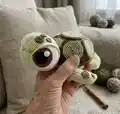
โ€” Assembly (Head & Eyes & Shell) :

Info :

Attach eyes to head. Return to the 9th row and work FLO with a new light green thread (Color 11). Work 3 rows - 48 SC. Work the 2nd eyelid in the same way, beginning from the 46th row.

Info :

Make contraction: insert thread in point A and pull thread out point C. Leave a long rail thread in point A. Pull a needle outside eyelid in point D. Skip 1 SC and insert a needle in point B, insert a needle in point E and pull it out point F.

Info :

Insert a needle through the eyelid on the opposite side and pull thread out point G. Hide tail threads. Tighten thread and make some strong knot to have constriction. Embroider a mouth with thin black thread.

Info :

Sew the carapace to the body and attach tail. Place spirals and sew them to the shell as shown in photos. Finish by hiding tails and arranging filling inside shell.

Assembly Instructions

  • Return to the first carapace piece and sew the 33rd row to the 28th row to shape the top; use the photos as a guide for alignment.
  • Attach the 7 brown spiral pieces (piece 4) to the assembled carapace starting from the top and fold each piece to align the first rows before sewing securely.
  • Fold piece (3) in halves and align line AB to piece (2), then stitch pieces (2) and (3) together along the marked edge so seams lie flat.
  • Sew piece (1) to piece (2) leaving a small opening for stuffing; fill the carapace lightly with fiber so there is space to insert a small egg or inner stuffing detail.
  • Sew the tail to the back of the carapace after folding in halves and securing the open seam with single crochet and finishing stitches.
  • Attach eyes to the head then return to the 9th row and work FLO with light green thread to create eyelids; perform the contraction technique and embroider a mouth.
  • Sew head to body opening, align and sew carapace on top of body, hiding all tails and making final shaping adjustments.

Important Notes

  • ๐Ÿ’กWork in a continuous spiral without joining rounds unless instructed; use stitch markers to mark the start of each round.
  • ๐Ÿ’กFollow BLO and FLO instructions carefully โ€” working in the wrong loop will alter the shape and texture of edges.
  • ๐Ÿ’กStuff parts gradually and leave a small hole when sewing pieces together to adjust fiber density as you go.

This sweet turtle is a delightful project for making a keepsake toy or a decorative piece for your home. The multi-piece carapace gives you lots of options to play with color and texture while learning precise assembly techniques. Finish with neat embroidery, hidden tails and a lightly stuffed shell for a charming, handcrafted look. ๐Ÿข๐Ÿงถ

You ask,

we answer.

FAQs

What size will the finished piece be?

The finished turtle is approximately a small hand-sized toy (about 12-15 cm across) when made with YarnArt Jeans and the recommended hook sizes; exact size varies with tension.

Can I use different yarn weights for this pattern?

Yes, you can change yarn weight, but this will change the final size; adjust your hook accordingly and check gauge by comparing a small round to the pattern stitches.

Do I need prior crochet experience for this pattern?

This pattern is rated intermediate and expects you to know how to work in spiral, make increases/decreases, BLO/FLO and basic assembly.

How long does this project typically take to complete?

Most crocheters finish this project in 5-7 hours, depending on experience and how carefully you sew the carapace pieces together.