🧢 Beautiful ✨ Detailed πŸ’ Adorable

Tulip Model Placemat Pattern

Tulip Model Placemat Pattern
4.1β˜… Rating
2-4 Hours Time Needed
3.0K Made This
βœ‚οΈ

Intermediate Level

Ideal for those with basic crochet experience, featuring slightly more advanced stitches and techniques to expand your skills.

⏱️

Bite-Sized Project

Finishes in 2-4 hoursβ€”perfect for an afternoon of creative relaxation.

🏑

Cozy Accent

A warm touch for your space that transforms ordinary corners into inviting nooks filled with handmade charm.

About This Tulip Model Placemat Pattern

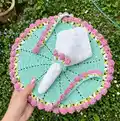
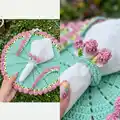
This pattern creates a round tulip placemat featuring fan-shaped rounds, decorative green leaves, and tulip popcorn details. You will work in rounds using double crochet, picot, and popcorn techniques on cotton yarn. The result is a durable, washable placemat with a pretty floral edge.

Tulip Model Placemat Pattern crochet pattern - detailed view of completed project

Intermediate-friendly instructions include step-by-step rounds and clear legend images for stitches. Use cotton yarn and a 3.5mm hook to get the look shown.

Why You'll Love This Tulip Model Placemat Pattern

I absolutely love this pattern because it turns basic crochet stitches into a beautiful floral placemat that brightens any table. The tulip popcorns add a lovely textured detail I find endlessly satisfying to make. Working the green leaf accents gives the piece a handcrafted, botanical feel that I enjoy gifting to friends. It is both functional and decorative, and I love how it photographs on a spring table setting.

Tulip Model Placemat Pattern step 1 - construction progress Tulip Model Placemat Pattern step 2 - assembly progress Tulip Model Placemat Pattern step 3 - details and accessories Tulip Model Placemat Pattern step 4 - final assembly and finishing

Switch Things Up

I love experimenting with colors for this placemat; try soft pastels for a gentle spring look or bold contrasts for a modern table.

I often change the yarn weight and hook to get different sizes; use a thicker cotton and larger hook for a chunky placemat.

I sometimes add a thin backing fabric or cotton felt with fabric glue to make the placemat more durable and heat-resistant.

I like to vary the tulip colors across the edge so each fan becomes a tiny flower garden around the placemat.

I sometimes replace popcorn tulips with small crocheted flowers sewn on afterward for a layered effect.

I recommend trying a monochrome version and then a multicolor version to see which suits your decor best.

I often make matching coasters or a runner using the same fan sequence to create a coordinated table set.

I will sometimes add embroidered veins on the green leaves for extra detail and dimension.

I also like to experiment with different picot sizes to make the leaf edges look sharper or softer depending on the style I want.

I occasionally block each motif individually before assembly to ensure a perfectly even edge when sewing pieces together.

I enjoy turning this placemat into a gift by packaging it with matching napkin rings crocheted using the same stitch sequences.

I encourage you to mix and match techniques β€” try metallic thread for festive menus or variegated yarn for a playful, painterly result.

Common Mistakes & How to Fix Them

βœ— Not keeping consistent tension when working in rounds causes uneven shape; maintain even tension throughout and check the edge often to keep rounds flat. βœ— Skipping the separating chains between fans can distort the fan shape and spacing; always include the separating chain exactly as written to preserve the motif. βœ— Forgetting to close the magic ring tightly leaves a hole in the center; pull the ring closed securely before closing the starting chains. βœ— Incorrect popcorn or picot execution can make petals look sloppy; follow the picot and popcorn steps carefully and tighten the final slip stitch to secure the stitch. βœ— Working without blocking can leave the placemat slightly warped; gently block and steam the finished piece to even out stitches and flatten the shape.

Tulip Model Placemat Pattern

Create a charming tulip-themed placemat using 100% cotton yarn and simple crochet techniques. This pattern guides you through circular double crochet rows, decorative green leaves, and tulip popcorn motifs to make a delightful table accent. Perfect for adding a handmade touch to your dining space and making coordinated sets for special occasions.

Intermediate 2-4 Hours

Materials Needed for Tulip Model Placemat Pattern

β€” Main Fabric

  • 01
    100% COTTON YARN N 4 - main yarn specified in the pattern (visible colors: mint/green, pink, white, yellow)

β€” Tools Required

  • 01
    Hook number 3.5 (3.5mm crochet hook)
  • 02
    Scissors
  • 03
    Upholstery needle
  • 04
    Fabric glue

Progress Tracker

0% Complete

β€” Materials :

Info :

100% COTTON YARN N 4. HOOK NUMBER 3.5. SCISSORS. UPHOLSTERY NEEDLE. FABRIC GLUE.

β€” Legend :

Infos :

CHAIN STITCH=CH. SLIP STITCH=SL ST. SINGLE CROCHET=SC. DOUBLE CROCHET=DC. POPCORN STITCH. PICOT STITCH. MAGIC RING.

β€” Pattern :

Round 1 :

Start with a magic circle, add two chains and one more chain for separation. Inside the magic circle make 12 double crochets separated by a chain, including the beginning chains. Close the magic ring and close the third starting chain.

Round 2 :

Go up three chains where you closed the magic circle and in the same place make another double crochet (INC) with a separating chain. In each base double crochet make two double crochets in the same place (inc) until the end. Close with a slip stitch in the third chain.

Round 3 :

Go up 3 chains, and in the next stitch make two double crochets in the same place, separate with a chain. On every row, make a double crochet by itself and in the next base stitch, make two double crochets in the same place, separated by a chain. Close with a slip stitch in the third chain.

Round 4 :

Let's work on each fan now. Raise 3 chains symbolizing a double crochet, in the next one, make a double crochet and in the next two double crochets with a separating chain. The sequence of this row is two single crochets and finally an increase separated by a chain.

Info :

Follow this sequence until the size of the placemat is to your liking. I usually do until I reach 12 double crochets alone and finally the increase.

Info :

We would have 14 rows.

β€” Green Leaves :

Info :

Start at the next double crochet after the low point of the previous row.

Info :

Make an initial knot, lacquer once on the needle, start with a double crochet.

Info :

Let's lacquer, remove 2 stitches and leave 2 loops on the hook, lacquer again, make the double crochet, remove two and leave three loops on the hook. Then remove the three threads from the needle, so they stay together, separate with 3 chains. And at the same point repeat the same process, separate with a chain.

Info :

Skip 3 base double crochets and in the fourth double crochet repeat the same process. End with a slip stitch.

β€” Tulips :

Info :

In the space where we made 3 chains, let's start the tulips.

Round 1 :

Lacquer on the needle and start with a double crochet, make 5 more double crochets, totaling 6 double crochets.

Round 2 :

Make a popcorn stitch with these seven double crochets (place the needle in the first double crochet, catch the final loop closing with a slip stitch.

Round 3 :

On the back, make 3 chains, enter the middle of the tulip and make a single crochet, repeat this process twice more, totaling 3 picot stitches, separate with a chain and between the fans make a single crochet to separate the tulips.

Assembly Instructions

  • Weave in all yarn ends with the upholstery needle, hiding tails neatly on the wrong side of the placemat.
  • Block the placemat gently to flatten rounds and open the tulip and leaf motifs; pin to shape and steam lightly if needed.
  • If desired, secure tulip motifs and leaves with small stitches from the wrong side to keep decorative pieces stable during use.
  • Trim any excess threads and secure loose loops with a tiny bit of fabric glue if necessary for extra durability.
  • Place the finished placemat on a flat surface and check spacing between tulips; resew any fans or separated motifs to make edges even.

Important Notes

  • πŸ’‘Use stitch markers to mark the start of rounds and each fan section for consistent placement and counting.
  • πŸ’‘Work with consistent tension so the placemat remains flat and the fan motifs lay evenly across the edge.
  • πŸ’‘Close the magic ring tightly before working the next rounds to avoid a hole in the center of the placemat.
  • πŸ’‘Block the finished placemat to open the lace and shape the tulip and leaf details properly.
  • πŸ’‘Use an upholstery needle for sewing in ends to handle cotton yarn thickness and get neat finishes.

This tulip placemat pattern creates a bright, floral table accent that mixes simple rounds with playful popcorn tulips and picot leaves. Bring spring to your table with colorful cotton yarn and make matching sets for a lovely handmade table setting. Enjoy making each petal and fanβ€”your guests will love the charm! 🧢🌷

You ask,

we answer.

FAQs

What size will the finished piece be?

The finished size depends on the yarn and hook tension, but using the recommended cotton yarn N4 and 3.5mm hook will produce a medium round placemat approximately 30-35 cm in diameter (estimate).

Can I use different yarn weights for this pattern?

Yes, you can use different yarn weights, but the final size and stitch definition will change; use an appropriate hook and swatch first to check the size and look.

Do I need prior crochet experience for this pattern?

This pattern is rated intermediate because it uses double crochet rounds, popcorn, and picot stitches; basic knowledge of DC, chains, and working in rounds is recommended.

How long does this project typically take to complete?

Most crafters finish this placemat in 2-4 hours depending on experience and whether they make multiple placemats or add lots of color changes.

How do I care for the finished placemat?

Hand wash or machine wash gently on a delicate cycle with cool water and lay flat to dry; blocking after washing will help maintain shape and motif definition.