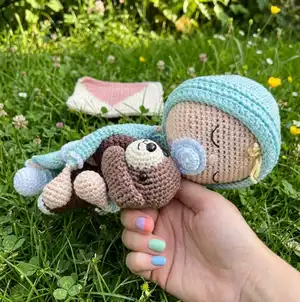
Create a sweet baby security blanket paired with a cuddly puppy using this step-by-step crochet pattern. You will make a soft blanket body, a cozy hood, a sleepy baby, and an adorable puppy — perfect for gifting or keeping. Clear rounds, helpful photos, and finishing tips guide you through every stitch so you can enjoy a calm, creative make.
Progress Tracker
0% Complete
— Arms :
Round 1 :
1st round: 6 sc in a magic ring (6)
Round 2 :
2nd round: 6 inc (12)
Round 3 :
3rd round: 1 sc, 1 inc (18)
Round 4-6 :
4th to 6th: 18 sc (3 rounds) (18)
Round 7 :
7th round: 1 sc, 1 dec (12)
Round 8-9 :
8th & 9th: 12 sc (2 rounds) (12) Start stuffing.
Round 10 :
10th round: hold the edge flat and close with 6 sc.
Round 11 :
11th round: sc around the 6 front loops and sc around the 6 back loops (you'll have 12 sc again), move the marker.
Round 12 :
12th round: change to light blue yarn and make 12 sc (12)
Round 13 :
13th round: 12 sc (12)
Round 14 :
14th round: BLO 3 sc, 1 inc (15)
Round 15-28 :
15th to 28th: 15 sc (14 rounds) (15)
— Body Blanket :
Info :
Starts on the feet with hook size 2.5mm
Round 1 :
1st round: 6 sc in a magic ring (6)
Round 2 :
2nd round: 6 inc (12)
Round 3 :
3rd round: 1 sc, 1 inc (18)
Round 4 :
4th round: 2 sc, 1 inc (24)
Round 5-7 :
5th to 7th: 24 sc (4 rounds) (24)
Round 8 :
8th round: 6 sc, 6 dec, 6 sc (18)
Round 9 :
9th round: 6 sc, 3 dec, 6 sc (15)
Round 10 :
10th round: 15 sc BLO (15)
Round 11 :
11th round: 15 sc (15) Stuff the tip of the feet.
Round 12 :
12th round: 15 sc (15)
Round 13 :
13th round: change to skin color, BLO 15 sc (15)
Round 14 :
14th round: 15 sc (15)
Round 15 :
15th round: change to light blue color, 15 sc (15)
Round 16 :
16th round: 15 sc (15)
Round 17 :
17th round: 15 sc + 3 sc after the marker.
Round 18 :
18th round: hold the edge flat and close with 7 sc (7)
Round 19 :
19th round: 7 sc on the front loops and 8 sc on the back loops, and another 15 sc around (photos 3-6)
Info :
Cut the yarn and make another piece.
Round 20 :
20th round: when the second foot is done, without cutting the yarn, make 5 ch, 1 sc on the first piece, 14 sc, 5 sc on the chain, 15 sc, 5 sc on the chain, place the marker (40)
Info :
Change to hook size 3.5mm
Round 21 :
21st round: 40 sc (40)
Round 22 :
22nd round: 19 sc, 1 inc, 19 sc, 1 inc (42)
Round 23 :
23rd round: 6 sc, 1 inc (48)
Round 24-25 :
24th & 25th: 48 sc (2 rounds) (48)
Round 26 :
26th round: 7 sc, 1 inc (54)
Round 27 :
27th round: 54 sc (54)
Round 28 :
28th round: 8 sc, 1 inc (60)
Round 29-32 :
29th to 32nd: 60 sc (5 rounds)
Round 33 :
33rd round: 60 sc BLO (60)
Round 34 :
34th round: 60 sc (60)
Round 35 :
35th round: 8 sc, 1 dec (54)
Round 36 :
36th round: 54 sc (54)
Round 37 :
37th round: 54 sc BLO (54)
Round 38 :
38th round: 7 sc, 1 dec (48)
Round 39 :
39th round: 48 sc (48)
Round 40 :
40th round: 48 sc BLO (48)
Round 41 :
41st round: 6 sc, 1 dec (42)
Round 42 :
42nd round: 42 sc BLO (42)
Round 43 :
43rd round: change to hook size 2.5mm, 42 sc (42)
Round 44 :
44th round: 5 sc, 1 dec (36)
Round 45 :
45th round: 36 sc (36)
Round 46 :
46th round: pin the arms: 3 sc, with the arm placed on the body, join the edges with 7 sc (photos 13-16) 11 sc, join the other arm with 7 sc, 8 sc (36)
Round 47 :
47th round: 3 sc, 8 sc with the upper edge of arm,11 sc and 8 sc on the other arm (38)
Round 48 :
48th round: 17 sc, 1 dec, 17 sc, 1 dec (36)
Round 49 :
49th round: 4 sc, 1 dec (30)
Round 50 :
50th round: 30 sc BLO (30)
Round 51 :
51st round: change to skin color, 30 sc (30)
Round 52 :
52nd round: 3 sc, 1 dec (24)
Round 53 :
53rd round: 2 sc, 1 dec (18)
Info :
Don't cut the yarn. The next rounds will be counted as head's rounds.
— Head :
Round 1 :
1st round: 2 dec, flat the edge, close it with 8 sc.
Info :
Sc around the edge. 8 sc FLO and 8 sc BLO (photos 21-22). Place the marker.
Round 2 :
2nd round: 16 inc (32)
Round 3 :
3rd round: 3 sc, 1 inc (40)
Round 4 :
4th round: 4 sc, 1 inc (48)
Round 5 :
5th round: 5 sc, 1 inc (56)
Round 6-7 :
6th & 7th: 56 sc (2 rounds) (56)
Round 8 :
8th round: 6 sc, 1 inc (64)
Round 9-16 :
9th to 16th: 64 sc (8 rounds) (64)
Round 17 :
17th round: 23 sc, (1 sc, 1 dec) x 2, 26 sc, (1 sc, 1 dec) x 2, 3 sc (60)
Round 18 :
18th round: 60 sc (60)
Round 19 :
19th round: 8 sc, 1 dec (54)
Round 20-21 :
20th & 21st: 54 sc (2 rounds) (54)
Round 22 :
22nd round: 7 sc, 1 dec (48)
Round 23 :
23rd round: 6 sc, 1 dec (42)
Round 24 :
24th round: 5 sc, 1 dec (36)
Round 25 :
25th round: 4 sc, 1 dec (30)
Round 26 :
26th round: 3 sc, 1 dec (24)
Round 27 :
27th round: 2 sc, 1 dec (18)
Round 28 :
28th round: 1 sc, 1 dec (12)
— Pacifier :
Round 1 :
1st round: 6 sc in a magic ring (6)
Round 2 :
2nd round: 6 inc (12)
Round 3 :
3rd round: 1 sc, 1 inc (18)
Round 4 :
4th round: 2 sc, 1 inc (24)
Round 5 :
5th round: 24 crab stitch
Info :
Pacifier ring: 6 ch, 1 sl st, 12 sc, 18 sc on the 12 sc made.
— Hood Hat :
Info :
With hook size 3.5mm
Round 1 :
1st round: 6 sc in a magic ring (6)
Round 2 :
2nd round: 6 inc (12)
Round 3 :
3rd round: 1 sc, 1 inc (18)
Round 4 :
4th round: 2 sc, 1 inc (24)
Round 5 :
5th round: 3 sc, 1 inc (30)
Round 6 :
6th round: 4 sc, 1 inc (36)
Round 7 :
7th round: 5 sc, 1 inc (42)
Round 8 :
8th round: 6 sc, 1 inc (48)
Round 9 :
9th round: 7 sc, 1 inc (54)
Round 10 :
10th round: 8 sc, 1 inc (60)
Round 11-17 :
11th to 17th: 60 sc (7 rounds) (60)
Round 18 :
18th round: 52 sc, 1 ch and turn (52)
Round 19-24 :
19th to 24th: FLO on the even rounds and BLO on the odd rounds: 52 sc (6 rounds) (52)
Round 25 :
25th round: 52 sl st (52)
Info :
Finish with a chain of 20 st, cut the yarn. Make another chain of 20 st on the other side.
— Final Touches :
Info :
Pacifier: Sew the pacifier on the middle, between the rounds 7 and 12.
Info :
Nose: Embroider a small loop in skin color in the center of round 13, by taking 2 sc, pass the needle 5 - 6 times.
Info :
Eyes: Embroider the eyes closed between rounds 14 and 15, making them 5 stitches wide. Between both eyes there is 6 sc of separation.
Info :
Details: On the loops that remain, make 1 sl st, 1 ch.
— Hair :
Info :
With extra light cotton yarn and hook size 2mm
Info :
Start with a chain of 21 stitches and 20 sc on the chain. On each sc: 20 ch and 1 sl st inthe next sc.
Info :
Sew the hair to the top center of the head.
— Collar :
Info :
On the round 50, mark the half of front and back sides with pins, the 7th st from the 15 stitches of each side (see photos).
Info :
Star crocheting from the back: (3 ch, 1 dc) in 1 st, 2 dc in each st until the 13th st. In the 14th st, make (1 dc, 1 hdc). In the 15th st, 1 sl st. In the 16th st (1 hdc, 1 dc). Continue with 2 dc in each st, close with sl st.
— Puppy Head :
Info :
With white yarn and hook size 2.5mm
Round 1 :
1st round: 6 sc in a magic ring (6)
Round 2 :
2nd round: 6 inc (12)
Round 3 :
3rd round: 1 sc, 1 inc (18)
Round 4-6 :
4th to 6th: 18 sc (3 rounds) (18)
Info :
Change to brown yarn
Round 7 :
7th round: 6 sc, 6 inc, 6 sc (24)
Round 8 :
8th round: 24 sc (24)
Round 9 :
9th round: 3 sc, 1 inc (30)
Round 10 :
10th round: 4 sc, 1 inc (36)
Round 11-13 :
11th to 13th: 36 sc (3 rounds) (36)
Round 14 :
14th round: 4 sc, 1 dec (30)
Round 15 :
15th round: 3 sc, 1 dec (24)
Round 16 :
16th round: 2 sc, 1 dec (18)
Round 17 :
17th round: 1 sc, 1 dec (12)
Round 18 :
18th round: 6 dec (6)
Round 19 :
19th round: 2 dec (close with tapestry needle)
— Puppy Arms :
Round 1 :
1st round: 6 sc in a magic ring (6)
Round 2 :
2nd round: 6 inc (12)
Info :
Change to brown yarn
Round 3-4 :
3rd to 4th: 12 sc (2 rounds) (12)
Round 5-8 :
5th to 8th: 12 sc (4 rounds) (12)
Round 9 :
9th round: 2 sc, 1 dec (8)
Round 10-12 :
10th to 12th: 8 sc (3 rounds) (8)
Round 13 :
13th round: hold the edge flat and close with 4 sc.
— Puppy Ears :
Round 1 :
1st round: 6 sc in a magic ring (6)
Round 2 :
2nd round: 6 inc (12)
Round 3 :
3rd round: 1 sc, 1 inc (18)
Round 4-7 :
4th to 7th: 18 sc (4 rounds) (18)
Round 8 :
8th round: 1 sc, 1 dec (12)
Round 9-11 :
9th to 11th: 12 sc (3 rounds) (12)
Round 12 :
12th round: 4 sc, 1 dec (10)
Round 13-14 :
13th and 14th: 10 sc (2 rounds) (10)
Round 15 :
15th round: hold the edge flat and close with 5 sc.
Info :
Leave a long yarn tail for sewing.
— Puppy Body :
Info :
With white yarn. Starts on the feet
Round 1 :
1st round: 6 sc in a magic ring (6)
Round 2 :
2nd round: 6 inc (12)
Round 3-5 :
3rd to 5th: 12 sc (3 rounds) (12)
Info :
Change to brown yarn
Round 6-11 :
6th to 11th: 12 sc (6 rounds). Cut the yarn and make another piece.
Info :
When you finish the second foot, don't cut the yarn and make 4 ch and 1 sc on the other foot.
Round 12 :
12th round: 11 sc, 4 sc on the chain, 12 sc, 4 sc on the chain and place marker (32)
Round 13-14 :
13th and 14th: 32 sc (2 rounds) (32)
Round 15 :
15th round: 7 sc, 1 aum (36)
Info :
Change to hook size 3.5mm
Round 16 :
16th round: 36 sc (36)
Round 17 :
17th round: 13 sc with brown, 2 sc with white, 21 sc with brown (36)
Round 18 :
18th round: 12 sc in brown, 4 sc in white, 20 sc in brown (36)
Round 19-20 :
19th and 20th: 11 sc in brown, 6 sc in white,19 sc in brown (36)
Round 21 :
21st round: 12 sc in brown, 4 sc in white, 20 sc in brown (36)
Round 22 :
22nd round: 13 sc in brown, 2 sc in white, 21 sc in brown (36)
Round 23 :
23rd round: in brown, 4 sc, 1 dec (30)
Round 24 :
24th round: 4 sc, with the arm placed on the edge of the body make 4 sc by taking both edges, 12 sc, 4 sc with the other arm, 6 sc (30)
Info :
Change to hook size 2.5mm
Round 25 :
25th round: 3 sc, 1 dec (24)
Round 26 :
26th round: 2 sc, 1 dec (18)
Round 27 :
27th round: 1 sc, 1 dec (12)
Info :
Hold the edge flat and close with 6 sc.
— Scarf :
Info :
46 ch and go back on the ch with 45 sl st.
— Tail :
Round 1 :
1st round: 6 sc in a magic ring (6)
Round 2-6 :
2nd to 6th: 6 sc (5 rounds) (6)
This Baby Security Blanket with Puppy pattern is a heartfelt project that makes a beautiful keepsake for little ones. It pairs a cozy hooded blanket with a lovable puppy companion for the sweetest result. Perfect for gifts or nursery decor — enjoy every stitch and the joy it brings! 🧶🧸