About This Voodoo Doll Amigurumi Pattern
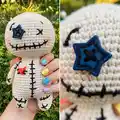
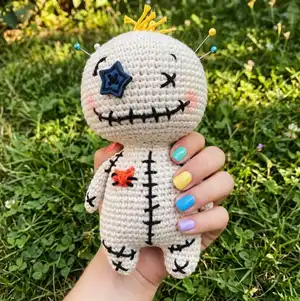
This pattern teaches you how to crochet a small Voodoo Doll amigurumi with stitched details and a tiny heart accent. The design uses basic amigurumi construction: magic rings, increases, decreases, and simple assembly. Photo references show shaping and embroidery placement to help you finish with personality. A fun project to practice neat sewing and decorative stitching.
You can use any cotton yarn color you like and adjust size by changing hook or yarn weight. The pattern includes clear round-by-round instructions and helpful notes for assembly.
Why You'll Love This Voodoo Doll Amigurumi Pattern
I absolutely love this pattern because it turns simple stitches into a character full of personality with minimal materials. I enjoy adding tiny details like the button eye and embroidered stitches to make each doll unique. The construction is satisfying — you make legs then seamlessly join into the body, which feels clever and neat. I also love how quick it is to make a complete doll in a weekend, yet it still feels special and gift-ready. Creating this pattern reminds me why I enjoy small, detailed amigurumi projects.
Switch Things Up
I love how easy it is to customize this Voodoo Doll by swapping yarn colors; try pastel shades for a softer look or dark tones for a spookier vibe.
I often change the yarn weight and hook to make different sizes — bulky yarn gives a chunky doll while finer yarn creates a delicate mini version.
I like to add different button eyes or embroidered eyes to vary personality; a mismatched button gives a playful, quirky character.
Try embroidering different mouth expressions with black yarn to make happy, sad, or surprised faces that change the doll's mood instantly.
For a seasonal twist, stitch small accessories like tiny hats, scarves, or miniature props to dress the doll for holidays or themes.
I sometimes add small felt details or sew on a tiny heart in contrasting yarn for a pop of color and charm.
To make posable limbs, consider inserting thin wire into the arms before attaching so you can bend them gently into poses.
If you want a keychain version, use thinner yarn and a smaller hook, then attach a split ring to the top of the head.
I recommend experimenting with embroidery thread or pearl cotton for decorative stitching so the stitches lie flat and defined.
Don't be afraid to mix textures — a fuzzy yarn for hair or a metallic thread for tiny accents can create an eye-catching, one-of-a-kind doll.
Common Mistakes & How to Fix Them
✗ Skipping stitch counts during increases or decreases can lead to poor shaping; count your stitches at the end of every round to ensure accuracy.
✗ Not cutting the thread after the first leg as instructed may make joining messy; follow the note and cut the first leg, then continue with the second so joins align cleanly.
✗ Stuffing too late or unevenly causes lumps and flat spots; stuff gradually and evenly as you shape the head and body for a smooth finish.
✗ Not leaving a long tail when fastening off prevents neat sewing; always leave a long tail as directed for secure assembly and easier finishing.
✗ Pulling yarn too tight when embroidering the face and seams distorts the surface; use gentle tension and test placement before securing stitches.