🧢 Beautiful ✨ Detailed πŸ’ Adorable

Tick the Rabbit Amigurumi Pattern

Tick the Rabbit Amigurumi Pattern
3.9β˜… Rating
5-7 Hours Time Needed
2.8K Made This
βœ‚οΈ

Intermediate Level

Ideal for those with basic crochet experience, featuring slightly more advanced stitches and techniques to expand your skills.

⏱️

Weekend Treat

Takes 5-7 hours, making it an enjoyable project to finish over a couple of days.

🧸

Cute Companion

An adorable friend to cherish, handcrafted with love to bring comfort and joy for years to come.

About This Tick the Rabbit Amigurumi Pattern

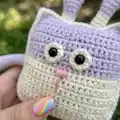
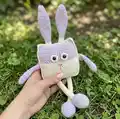
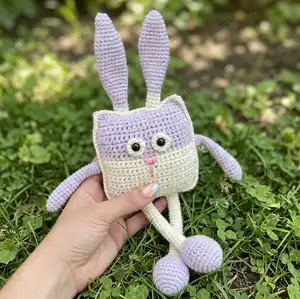
This pattern creates a stretchy rabbit toy with long, elastic limbs and a square body, perfect for gifting or play. The limbs are crocheted in one piece with the ears and legs integrated for a playful stretch effect. The design uses two yarn types and two hook sizes to get the intended texture and proportions. Clear step-by-step rounds and assembly notes guide you through sewing the pieces together.

Tick the Rabbit Amigurumi Pattern crochet pattern - detailed view of completed project

Perfect for makers who enjoy small toys with a clever construction and tactile features. Includes yarn recommendations, abbreviations, and full assembly instructions for accurate placement.

Why You'll Love This Tick the Rabbit Amigurumi Pattern

I absolutely love this pattern because it turns simple stitches into a playful, stretchy toy that kids adore. I enjoy how the integrated ear-leg pieces save time and create a unique, movable silhouette. The square body is a nice change from the usual round amigurumi, giving this rabbit a distinctive character. Stitching the face and tweaking the eye placement always makes each rabbit feel personal and special.

Tick the Rabbit Amigurumi Pattern step 1 - construction progress Tick the Rabbit Amigurumi Pattern step 2 - assembly progress Tick the Rabbit Amigurumi Pattern step 3 - details and accessories Tick the Rabbit Amigurumi Pattern step 4 - final assembly and finishing

Switch Things Up

I love changing the color blocks to give each rabbit a unique personality; try pastel combinations or high-contrast stripes for a bold look.

I often make a mini version by using fingering weight yarn and a 1.75 mm hook to create tiny keychain pals.

I sometimes substitute safety eyes with embroidered eyes for a fully soft toy, which is great for babies and small children.

Try adding a bit of wire inside the ears if you want them to be poseable; just be sure to secure wire ends well and use protective tape.

Make the limbs non-stretchy by adding extra stuffing inside the leg shafts if you prefer a firmer posture.

I like to embroider different mouth and nose shapes to change the expression; a small V-stitch nose creates a sweet profile.

For a seasonal twist, crochet tiny accessories like a scarf or bow in contrasting yarn and stitch them onto the finished toy.

To create a plush, squishier rabbit use a bulkier yarn and increase hook size for a cozy, cuddle-ready version.

I sometimes mix yarn brands to adjust the textureβ€”swap in a bamboo-cotton blend for a softer, cooler-feeling toy.

If you want a waterproof or wipeable toy, consider using machine-washable yarns and reinforced seams, and avoid delicate embellishments.

Common Mistakes & How to Fix Them

βœ— Skipping stitch markers during long straight rounds can cause confusion with placement; use a marker at the start of long sequences to keep track. βœ— Stuffing the white leg section too early will prevent correct limb movement; only stuff the lilac foot pieces and leave the long white section unstuffed until instructed. βœ— Forgetting to count increases and decreases creates misshapen ears or legs; count after each increase or decrease round to maintain the pattern shape. βœ— Pulling your yarn too tight when changing colors can distort the seam line between lilac and white; switch yarns loosely and adjust tension gently to keep edges flat. βœ— Sewing the ear-leg pieces in the wrong position will unbalance the finished toy; pin and check placement before you sew them into the body seam.

Tick the Rabbit Amigurumi Pattern

This stretchy rabbit toy is perfect for playful little hands and thoughtful handmade gifts. You will crochet a soft square-bodied rabbit with long stretchable limbs and sweet embroidered features. The pattern focuses on basic amigurumi techniques with clear piece-by-piece instructions for assembly. Suitable for makers who enjoy a charming, tactile toy that encourages fine motor development.

Intermediate 5-7 Hours

Materials Needed for Tick the Rabbit Amigurumi Pattern

β€” Main Fabric

  • 01
    YarnArt Jeans 50 gr / 160 m β€” 55% cotton, 45% acrylic; shades used: 19 (lilac) and 03 (white)
  • 02
    YarnArt Iris 20 gr / 170 m β€” 100% cotton; shade 917 (pink) for nose embroidery
  • 03
    Fiber filler β€” amount as needed to stuff feet and body
  • 04
    8 mm safety eyes (2 pieces) for the eyes

β€” Tools Required

  • 01
    Crochet hook size 2.0 mm for ears, legs and arms
  • 02
    Crochet hook size 3.0 mm for body
  • 03
    Scissors
  • 04
    Large eye needle for sewing and embroidery
  • 05
    Stitch markers
  • 06
    Yarn needle for sewing pieces together
  • 07
    Polyester stuffing (fiber filler)
  • 08
    Pins for assembly (optional)

Progress Tracker

0% Complete

β€” Ears and legs (make 2) :

Info :

Ears and legs are crocheted in one piece. Begin crocheting in lilac with 2 mm hook.

Round 1 :

6 MR (6)

Round 2 :

(1 SC, INC)*3 (9)

Round 3-4 :

2 rnds straight: 9 SC

Round 5 :

(2 SC, INC)*3 (12)

Round 6 :

(3 SC, INC)*3 (15)

Round 7-8 :

2 rnds straight: 15 SC

Round 9 :

(4 SC, INC)*3 (18)

Round 10-17 :

8 rnds straight: 18 SC

Round 18 :

(DEC, 4 SC)*3 (15)

Round 19 :

2 rnds straight: 15 SC

Round 20 :

(DEC, 3 SC)*3 (12)

Round 21-22 :

2 rnds straight: 12 SC

Round 23 :

1 rnd straight 10 SC

Info :

Stuff the lilac piece.

Info :

Switch to white yarn. Go on crocheting. Don't stuff the white piece.

Round 24 - 75 :

52 rnds straight: 10 SC

Info :

Switch to lilac yarn.

Round 76 :

(INC, 4 SC)*2 (12)

Round 77 :

(1 SC, INC)*6 (18)

Round 78 :

(2 SC, INC)*6 (24)

Round 79 :

(3 SC,INC)*6 (30)

Round 80 - 83 :

4 rnds straight: 30 SC

Round 84 :

(DEC, 3 SC)*6 (24)

Round 85 :

(DEC, 2 SC)*6 (18)

Round 86 :

(DEC, 1 SC)*6 (12)

Info :

Stuff the piece.

Round 87 :

DEC*6 fasten off.

β€” Arms (make 2) :

Info :

Begin crocheting in lilac with 2 mm hook.

Round 1 :

5 MR (5)

Round 2 :

INC*5 (10)

Round 3-9 :

7 rnds straight: 10 SC

Round 10 :

DEC, 8 SC (9)

Round 11-13 :

3 rnds straight: 9 SC

Info :

Stuff the piece to 13th row.

Round 14 :

DEC, 7 SC (8)

Round 15-20 :

6 rnds straight: 8 SC

Info :

Fold in half and single crochet 4 through both edges. Leave a long yarn tail for sewing.

β€” Eyes (make 2) :

Info :

Begin crocheting in white with 2 mm hook.

Round 1 :

6 MR (6)

Round 2 :

INC*6 (12)

Info :

Install safety eyes in the center of the ring.

β€” Body (make 2) :

Info :

Work in lilac with 3 mm hook. The first piece:

Instruction :

Chain 25, and starting into the 2nd stitch from hook work 24 SC.

Row 1 - 19 :

19 rows straight: 24 SC, make 1 turning CH at the end of each row.

Row 20 :

1 SC, DEC, 18 SC, DEC, 1 SC (22)

Row 21 :

1 rnd straight: 22 SC

Row 22 :

1 SC, DEC, 16 SC, DEC, 1 SC (20)

Row 23 - 25 :

3 rnds straight: 20 SC.

Info :

Fasten off and cut yarn.

Info :

Crochet the second piece alike: 1-16. crochet in white. 17-25. crochet in lilac.

β€” Assembly :

Begin joining the body parts :

Begin joining the body parts together from the right upper corner using 2 mm hook.

Step :

Put the two parts together and work 4 SC through both parts' stitches. You are going to insert the ear-leg piece here. 3 SC across the front part of the body only (skip 3 stitches on the back body part), put the first ear-leg piece and go on crocheting across both body parts 5 SC, 3 SC across the front part of the body only (skip 3 stitches on the back body part), put the second ear-leg piece and go on crocheting across both body parts 4 SC, 2 SC to the corner stitch.

Get to the side edge :

Work 24 SC through both parts' stitches, work 2 SC to the corner stitch.

Get to the bottom edge :

Work 6 SC through both parts' stitches. You are going to insert the ear-leg piece here. 3 SC across the front part of the body only (skip 3 stitches on the back body part), put the first ear-leg piece and go on crocheting across both body parts 5 SC, 3 SC across the front part of the body only (skip 3 stitches on the back body part), put the second ear-leg piece and go on crocheting across both body parts 6 SC, 2 SC to the corner stitch. Stuff the body.

Get to the side edge :

Work 24 SC through both parts' stitches, work 2 SC to the corner stitch. Stuff the body.

Eyes :

Sew on between rows 17 - 20 in the middle.

Nose :

Embroider a nose with pink yarn.

Arms :

Attach the arms on the back on between rows 14-17.

Assembly Instructions

  • Begin joining the body parts together from the right upper corner using a 2 mm hook and align the two panels carefully before starting.
  • Put the two parts together and work 4 SC through both parts' stitches, insert the ear-leg pieces where indicated, then continue with the sequence of 3 SC (front only), place ear-leg, 5 SC, 3 SC (front only), place second ear-leg, 4 SC, 2 SC to corner.
  • When you reach the bottom edge work 6 SC through both parts' stitches and repeat the insertion sequence for ear-leg pieces; stuff the body after closing the bottom sequence.
  • Work the side edges by crocheting 24 SC through both parts' stitches and then 2 SC to the corner stitch; stuff the body as you close the edges for an even shape.
  • Sew the eyes on between rows 17-20 centered across the face panel, and embroider the nose with pink yarn in the center below the eyes.
  • Attach the arms to the back panel between rows 14-17, pin them first to ensure symmetry and sew securely using a whipstitch or mattress stitch.

Important Notes

  • πŸ’‘Use stitch markers to keep track of the beginning of rounds and long straight sections for accurate stitch counts.
  • πŸ’‘Stuff the lilac foot/ear pieces as instructed but do not stuff the long white leg shafts until instructed, this preserves stretch functionality.
  • πŸ’‘Pin all attachments including ear-legs and arms before sewing to ensure correct placement and symmetry.
  • πŸ’‘Maintain even tension when switching between 2 mm and 3 mm hooks to keep edges flat and the body square.

This adorable Tick the Rabbit pattern is designed to charm both makers and little ones with its stretchy limbs and sweet face. 🧢 The clever construction lets you insert ear-leg pieces while joining panels for a tidy finish. ✨ Give one as a gift or keep it as a cozy handmade companion β€” every stitch brings joy! 😊

You ask,

we answer.

FAQs

What size will the finished piece be?

The finished toy size from the recommended materials is approximately 30 cm from ears to feet.

Can I use different yarn weights for this pattern?

Yes, you can use different yarn weights, but this will affect the final size and texture; choose a suitable hook size to match your yarn.

Do I need prior crochet experience for this pattern?

This pattern is rated intermediate, so basic amigurumi experience and familiarity with increases, decreases, and working in rounds is recommended.

How long does this project typically take to complete?

Most crocheters complete this project in 5-7 hours, though time may vary depending on experience and how much finishing and assembly you do.