🧶 Beautiful ✨ Detailed 💝 Adorable

Stripy Shell Stitches Crochet Hat Pattern

Stripy Shell Stitches Crochet Hat Pattern
4.0★ Rating
2-3 Hours Time Needed
2.9K Made This
✂️

Beginner Friendly Level

Perfect for those just starting their crochet journey, with clear instructions and simple techniques

⏱️

Bite-Sized Project

Finishes in 2-4 hours—perfect for an afternoon of creative relaxation.

🧣

Snug Essential

Everyday comfort with practical charm, designed for both functionality and style through changing seasons.

About This Stripy Shell Stitches Crochet Hat Pattern

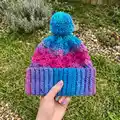
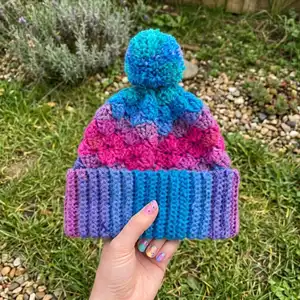
This pattern creates a colorful adult-sized crochet hat featuring a stretchy ribbed brim and a shell stitch body for bold texture. The striped yarn makes color changes simple while creating eye-catching bands. A classic pompom finishes the hat with playful flair and personality.

Stripy Shell Stitches Crochet Hat Pattern crochet pattern - detailed view of completed project

The pattern includes full row and round instructions, a stitch key, and pompom directions for a polished finish. Follow the gauge and hook recommendation for best fit and stitch definition.

Why You'll Love This Stripy Shell Stitches Crochet Hat Pattern

I absolutely love this pattern because the shell stitch produces such lovely, tactile texture with minimal effort. I enjoy how the striped yarn creates instant color changes without switching skeins. The ribbed brim is forgiving and fits a range of head sizes, which I find very practical. Making the pompom is a fun finishing touch that always feels rewarding, and the whole hat works up quickly for satisfying results.

Stripy Shell Stitches Crochet Hat Pattern step 1 - construction progress Stripy Shell Stitches Crochet Hat Pattern step 2 - assembly progress Stripy Shell Stitches Crochet Hat Pattern step 3 - details and accessories Stripy Shell Stitches Crochet Hat Pattern step 4 - final assembly and finishing

Switch Things Up

I love swapping colors in this hat to create different moods; try ombre or high-contrast stripes for a bold statement.

I often change yarn weight and hook size to make a chunky winter beanie or a tiny keychain version; remember to check gauge when you do.

I sometimes omit the pompom for a sleeker look or replace it with a leather tassel for a modern touch.

You can make a child-sized hat by reducing the foundation ribbing length and working fewer shell pattern repeats before shaping.

I like to embroider a small initial or attach a decorative button to the brim for personalization.

For extra warmth, I line the hat with a soft fleece circle sewn into the crown for a cozy finish that blocks wind.

Try using a solid color for the ribbing and a striped yarn for the body to highlight the shell texture more clearly.

I sometimes add contrasting slip-stitch rows between shell repeats to create a defined banding effect that accentuates color changes.

If I want more drape, I use a lighter yarn and a slightly larger hook, which softens the shell stitches and creates a slouchy beanie.

I enjoy making matching accessories like fingerless mitts using the same shell pattern so the set coordinates beautifully.

Common Mistakes & How to Fix Them

✗ Skipping the stitch that forms the turning chain as a double crochet; always treat the beginning ch-3 as a dc when counting rounds to avoid mismatched stitch counts. ✗ Joining the ribbing incorrectly through only one layer; work through both thicknesses of foundation chain and last row so the brim joins securely and lays flat. ✗ Not stretching the ribbing to measure length before proceeding; gently stretch to 19½" [49.5 cm] to ensure correct circumference before joining and working shells. ✗ Rushing shell pattern repeats and miscounting skipped stitches; mark the first sc of each shell repeat and count between shells to maintain the correct 28/50 stitch counts during shaping.

Stripy Shell Stitches Crochet Hat Pattern

Make a vibrant, textured beanie with this Stripy Shell Stitches Crochet Hat pattern. Youll enjoy a stretchy ribbed brim, bold shell stitch body, and a playful pompom on top. Clear step-by-step rounds and a stitch diagram help you follow along with confidence. Perfect for gifting or brightening your winter wardrobe.

Beginner Friendly 2-3 Hours

Materials Needed for Stripy Shell Stitches Crochet Hat Pattern

— Main Fabric

  • 01
    Red Heart® Super Saver® Stripes™ (5 oz/141 g; 236 yds/215 m) Polo Stripe (4960) 2 balls or 299 yds/273.5 m

— Tools Required

  • 01
    Size U.S. H/8 (5 mm) Susan Bates® Silvalume® crochet hook or size needed to obtain gauge
  • 02
    Susan Bates® yarn needle

Progress Tracker

0% Complete

— Materials :

Materials :

Red Heart® Super Saver® Stripes™ (5 oz/141 g; 236 yds/215 m) Polo Stripe (4960) 2 balls or 299 yds/273.5 m. Size U.S. H/8 (5 mm) Susan Bates® Silvalume® crochet hook or size needed to obtain gauge. Susan Bates® yarn needle.

— Abbreviations :

Infos :

Approx = Approximately. Beg = Beginning. Ch = Chain(s). Dc = Double crochet. Hdc = Half double crochet. Pat = Pattern. Rem = Remaining. Rep = Repeat. Rnd(s) = Round(s). RS = Right side. Sc = Single crochet. Scbl = Single crochet through back loop. Sl st = Slip stitch. Sp(s) = Space(s). St(s) = Stitch(es). WS = Wrong side.

— Size :

Info :

One size to fit Adult.

— Gauge :

Info :

13 sc and 16 rows = 4" [10 cm].

— Instructions :

Info :

Note: Ch 3 at beg of rnd counts as dc.

— Ribbing :

Info :

Ch 21.

1st row :

(RS). 1 sc in 2nd ch from hook and each ch to end of chain. Turn. 20 sc.

2nd row :

Ch 1. 1 scbl in each st to end of row. Turn.

Info :

Rep last row until work, when slightly stretched, measures 19½" [49.5 cm], ending on a RS row. Do not fasten off.

— Join ribbing :

Info :

With WS facing, working through both thicknesses of foundation ch and last row of ribbing, work 1 sc in each sc to end of row. Do not fasten off. Turn Ribbing sideways and work 72 sc evenly around long edge of Ribbing. Join with sl st to first sc.

— Shell Pattern :

Info :

Proceed in Shell Pat as follows: (see diagram on page 2)

1st rnd :

Ch 1. 1 sc in same sp as sl st. *Skip next 2 sc. 5 dc in next sc. Skip next 2 sc. 1 sc in next dc. Rep from * to last sc and 2 dc. Skip next 2 dc. 5 dc in next sc. Skip next 2 dc. Join with sl st to first sc.

2nd rnd :

Ch 3. 2 dc in same sp as sl st. *Skip next 2 dc. 1 sc in next dc. Skip next 2 dc. 5 dc in next sc. Skip next 2 sc. 1 sc in next dc. Skip next 2 dc. 2 dc in first sc. Join with sl st to top of ch 3.

3rd rnd :

Ch 1. 1 sc in same sp as sl st. *Skip next 2 dc. 5 dc in next sc. Skip next 2 dc. 1 sc in next dc. Rep from * to last sc and 2 dc. Skip next 2 dc. 5 dc in next sc. Skip next 2 dc. Join with sl st to first sc.

Info :

Rep 2nd and 3rd rnds for Shell St Pat until work from first rnd of sc after Ribbing measures approx 6½" [16.5 cm], ending on 2nd rnd.

— Shape top :

1st rnd :

Ch 1. 1 sc in same sp as sl st. *Skip next 2 dc. 3 dc in next sc. Skip next 2 dc. 1 sc in next dc. Rep from * to last sc and 2 dc. Skip next 2 dc. 3 dc in next sc. Skip next 2 dc. Join with sl st to first sc. 50 sts.

2nd rnd :

Ch 3. 1 dc in same sp as sl st. *Skip next dc. 1 sc in next dc. Skip next dc. 3 dc in next sc. Rep from * to last 3 dc. Skip next dc. 1 sc in next dc. Skip next dc. 1 dc in first sc. Join with sl st to top of ch 3.

3rd rnd :

Ch 1. 1 sc in same sp as sl st. *Skip next 2 dc. 5 dc in next sc. Skip next 2 dc. 1 hdc in next sc. Skip next dc. 1 sc in next dc. Rep from * to last sc and dc. Skip next dc. 1 hdc in next sc. Skip next dc. Join with sl st to first sc. 28 sts.

4th rnd :

Ch 1. 1 sc in each st around. Join with sl st to first sc. Fasten off, leaving long end. Thread end through front loops of rem sts. Pull tightly. Fasten securely. Fold Ribbing in half to RS.

— Pompom :

Info :

Wind yarn around 3 fingers 100 times. Tie tightly in the middle and leave a long end for attaching to Hat. Cut loops at both ends and trim to smooth round shape. Sew securely to top of Hat.

— Stitch Key :

Info :

Stitch Key: O = chain (ch). + = single crochet (sc). T = double crochet (dc).

Assembly Instructions

  • Fold Ribbing in half to RS and position so the short edge meets the long edge before sewing.
  • Join Ribbing by working 1 sc through both thicknesses of foundation chain and last row, then turn and work 72 sc evenly around the long edge before joining with a slip stitch.
  • After completing Shell Pattern and shaping rounds, thread yarn end through front loops of remaining stitches, pull tightly to close the top, and fasten securely.
  • Sew pompom to top center of hat using the long tail left from tying the pompom, securing with several passes and knotting inside the hat.

Important Notes

  • 💡Note that the beginning ch-3 at the start of rounds counts as a double crochet for stitch counts and shaping purposes.
  • 💡Do not fasten off after completing the ribbing rows; you will join the ribbing through both thicknesses before proceeding to the shell pattern.
  • 💡Stretch the ribbing slightly to the indicated measurement (19½" [49.5 cm]) before joining to ensure correct circumference and fit.
  • 💡Thread the final yarn end through the front loops of the remaining stitches and pull tightly to shape and close the crown securely.

This Stripy Shell Stitches Crochet Hat brings bright, striped color and classic shell texture to your winter wardrobe. Make one for yourself or whip up a few as thoughtful, handmade gifts that everyone will adore. The ribbed brim and pompom make it cozy and fun to wear—happy crocheting! 🧶✨

You ask,

we answer.

FAQs

What size will the finished piece be?

The finished hat is one size to fit an adult; gauge is 13 sc and 16 rows = 4" [10 cm] and ribbing is worked to approximately 19½" [49.5 cm] before joining.

Can I use different yarn weights for this pattern?

Yes, you can substitute yarn weights but the finished size will change; ensure you adjust hook size and check gauge to achieve the desired fit.

Do I need prior crochet experience for this pattern?

This pattern is rated beginner friendly (Easy) and uses basic stitches such as single crochet and double crochet, but familiarity with working in the round and reading simple stitch repeats is helpful.

How long does this project typically take to complete?

Most crocheters finish this hat in about 2-3 hours, depending on experience and pace, though time may vary for shaping and pompom finishing.