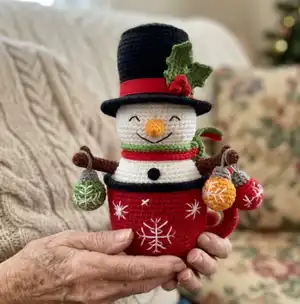
Create a joyful snowman sitting inside a festive mug with this complete crochet pattern. You will follow step-by-step rounds to crochet the mug, snowman body, hat, arms, leaves, berries and small details. The pattern combines simple amigurumi shaping with small embroidery details to give your snowman personality. Clear photos and instructions help you assemble and finish a charming holiday decoration or heartfelt gift.
Progress Tracker
0% Complete
— MUG :
Rnd 3 :
(1 sc, inc)*8 (24)
Rnd 4 :
(2 sc, inc)*8 (32)
Rnd 5 :
(3 sc, inc)*8 (40)
Rnd 6 :
(4 sc, inc)*8 (48)
Rnd 7 :
(5 sc, inc)*8 (56)
Rnd 8 :
(6 sc, inc)*8 (64)
Rnd 9 :
(7 sc, inc)*8 (72)
Rnd 10 :
(8 sc, inc)*8 (80)
Rnd 11-28 :
80 sc (18 rounds)
Info :
* Crochet the next round through front loops only.
Info :
* Crochet the next round through both loops.
Info :
Trace the bottom of the mug on the cardboard and cut it out. Put the template inside.
Info :
Attach dark grey or black yarn.
Info :
* Crochet the next round through front loops only.
— SNOWMAN :
Info :
Attach white yarn to round 29. (Alize Cotton Gold No. 62)
Rnds 1-5 :
80 sc (5 rounds)
Rnd 6 :
(8 sc, dec)*8 (72)
Rnd 7 :
(7 sc, dec)*8 (64)
Rnd 9 :
(6 sc, dec)*8 (56)
Rnd 10 :
(5 sc, dec)*8 (48)
Rnd 12 :
(4 sc, dec)*8 (40)
Info :
Stuff it with fiberfill.
Rnd 14 :
(4 sc, inc)*8 (48)
Rnd 15 :
(5 sc, inc)*8 (56)
Rnd 16 :
(6 sc, inc)*8 (64)
Rnd 18 :
(7 sc, inc)*8 (72)
Rnds 19-26 :
72 sc (8 rounds)
Rnd 27 :
(7 sc, dec)*8 (64)
Rnds 28-29 :
64 sc (2 rounds)
Rnd 30 :
(6 sc, dec)*8 (56)
Rnd 31 :
(5 sc, dec)*8 (48)
Rnd 33 :
(4 sc, dec)*8 (40)
Info :
Stuff with fiberfill.
Rnd 35 :
(3 sc, dec)*8 (32)
Rnd 37 :
(2 sc, dec)*8 (24)
Rnd 38 :
(1 sc, dec)*8 (16)
Rnd 39 :
(2 sc, dec)*4 (12)
Info :
Break yarn, leaving a long tail for tightening the hole. Stuff it with fiberfill. Do not tighten the hole!
— NOSE :
Rnds 3-4 :
8 sc (2 rounds)
Rnd 5 :
(1 sc, inc)*4 (12)
Info :
Break yarn, tighten the hole, and hide the tail inside. Stuff the nose with fiberfill.
— ARMS :
Info :
INSERT THE WIREFRAME. Mark the position on the sides symmetrically using pins. 1. Insert the wireframe into the pinned points. 2. Bend the edge of the wire using the pliers. 3. Secure the ends with adhesive tape. 4. Curl the ends of the wireframe. Secure it with adhesive tape. 5. Stuff with fiberfill.
Yarn :
Yarn Art Jeans No. 70 - (dark brown) (make 2)
Rnds 3-5 :
9 sc (3 rounds)
Rnd 6 :
4 sc, (DC5tog cluster), 4 sc (9)
Rnds 7-20 :
9 sc (14 rounds), 2 sl st
Info :
NOTE! Try on the arm onto the wireframe. Crochet more or fewer rounds if needed. Break yarn, leaving a long tail for sewing.
— BUTTON :
Yarn :
Yarn Art Jeans No. 28 - (dark grey)
Rnd 1 :
6 into MR, 1 sl st
— ASSEMBLY :
Step 1 :
Sew the nose. (Insert the needle and draw it out in the hole on the top of the head). Pin the nose. Split yellow yarn in half and sew it on.
Step 2 :
Embroider the eyes and mouth. Pin the position of the eyes. (I mark between rounds 22-23 from the mug. The distance between the eyes is 8 sc, the length is 4 sc and the height of the eye is 1 sc). Embroider the eyes using black thread.
Step 3 :
Sew a button. Pin and stitch the dark grey button to the front of the snowman body.
Step 4 :
Embroider snowflakes. Mark the borders of the snowflake. Embroider the snowflakes using a white yarn strand. Previously, split it in half.
Step 5 :
Stuff with fiberfill. Tighten the hole using a tapestry needle. Tighten the hole, weaving through each of the 12 front loops of the last round, and pull tight. Once you weaved through 12 loops, weave through 2-3 loops at once with a tapestry needle. Do not forget to tighten. Repeat 3 times. Cut the excess yarn and hide the yarn tail inside the snowman.
Step 6 :
Sew the arms to the body. Secure the wireframe with adhesive tape additionally. Put the ready arms onto the wireframe and sew them to the snowman.
— MUG HANDLES :
Yarn :
Yarn Art Jeans No. 51 - (cherry)
Instructions :
Chain 12 and form a circle. Crochet in a circle:
Rnds 1-4 :
12 sc (4 rounds)
Rnd 5 :
3 sc, 3 dec, 3 sc (9)
Rnds 6-21 :
9 sc (16 rounds), 1 sl st
Info :
Prepare a wireframe with the same length as the handle. Bend the ends, and secure them with adhesive tape. Insert wireframe into the handle and stuff with fiberfill. Bend the handle and sew it to the mug.
— LEAF (make 2) :
Yarn :
Yarn Art Jeans No. 69 (green)
Rnd 1 :
Chain 12, start working in the second chain from a hook in the back direction - 10 sc, 3 sc in 1 stitch.
Info :
Continue crocheting on the other side of the chain foundation - 9 sc, 3 sc in 1 stitch. (25)
Rnd 2 :
(3 sc, chain 3, 1 sc in the previous stitch)*3, 3 sc, chain 3, 1 sc in the previous stitch, (3 sc, chain 3, 1 sc in the previous stitch)*3, 2 sc, 2 sl st.
Info :
Break yarn, leaving a long tail for sewing. Iron the leaves with steam through a damp cloth for a few seconds to make them flat.
— BERRIES (make 3) :
Yarn :
Yarn Art Jeans No. 90 (red)
Instructions :
Chain 7. Start working in the second chain from a hook 3 Bobble stitches similar to the thumb for the arm of our snowman.
Instruction :
Crochet in the second chain – ((dc4tog cluster), 1 sc)*3
Info :
Turn all bobbles inside out. Make 1 sl st in the first bobble. Tie the yarn tails together.
— HAT :
Yarn :
Yarn Art Jeans No. 28 - (dark grey)
Rnd 3 :
(1 sc, inc)*8 (24)
Rnd 4 :
(2 sc, inc)*8 (32)
Rnd 5 :
(3 sc, inc)*8 (40)
Rnd 6 :
(4 sc, inc)*8 (48)
Rnd 7 :
(5 sc, inc)*8 (56)
Rnd 8 :
(6 sc, inc)*8 (64)
Rnd 9 :
(7 sc, inc)*8 (72)
Info :
* In the next round, crochet through front posts.
Rnd 10 :
72 sc (through front posts)
Rnds 11-20 :
72 sc (10 rounds)
Rnd 21 :
(7 sc, dec)*8 (64)
Rnds 22-24 :
64 sc (3 rounds)
This snowman mug makes a delightful holiday display or a handcrafted gift to warm someone�s season. It combines small-amigurumi techniques with embroidery details to create a polished finished toy. Enjoy making each tiny accessory and watching your snowman come together! 🧶🎁