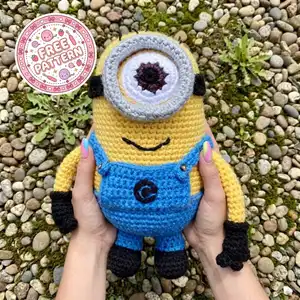
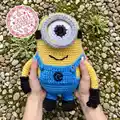
This charming plush amigurumi is a bright yellow, banana-inspired character wearing blue overalls, a single large crocheted eye with a gray goggle, black gloves and boots, and a stitched smile. The design is compact and playful, featuring rounded shaping and clear color-block sections for the body, clothing, and details. Perfect for gifting or displaying, this pattern walks you through each part with careful shaping and assembly notes to recreate the look shown in the photo.
Progress Tracker
0% Complete
— Head :
Round 1 :
6 sc in magic ring (6)
Round 3 :
(1 sc, inc) x 6 (18)
Round 4 :
(2 sc, inc) x 6 (24)
Round 5 :
(3 sc, inc) x 6 (30)
Round 6 :
(4 sc, inc) x 6 (36)
Round 7 :
(5 sc, inc) x 6 (42)
Round 8 :
(6 sc, inc) x 6 (48)
Round 9-14 :
1 sc in each st around (48)
Info :
Place single eye feature between rounds 12-13. For a centered large eye, measure from top center and place eye approximately 8-10 stitches down from the top crown; mark with pins. Keep safety eye or eye applique placement consistent across the width (eye center aligned with center front).
Round 15 :
(6 sc, dec) x 6 (42)
Round 16 :
(5 sc, dec) x 6 (36)
Info :
Begin light stuffing now, filling the crown area slightly to maintain a round top. Use small amounts of fiberfill so you can continue shaping easily during decreases.
Round 17 :
(4 sc, dec) x 6 (30)
Round 18 :
(3 sc, dec) x 6 (24)
Round 19 :
(2 sc, dec) x 6 (18)
Info :
Stuff head more firmly at this stage to reach desired squish. Focus stuffing on cheeks and eye area to prevent sagging under the heavy goggle piece later.
Round 20 :
(1 sc, dec) x 6 (12)
Round 22-24 :
1 sc in each st around (6) — work in continuous rounds to create a short neck tube (3 rounds)
Info :
Neck tube: keep tension even and do not stuff the neck tube; leave this opening for attaching to the body. Fasten off leaving a long tail for sewing. The neck should fit snugly into the body top opening; adjust rounds if necessary to match body circumference (we will add more precise body rounds to accommodate).
— Single Eye (crocheted eyeball and iris) :
Round 1 :
With black yarn: mr, 6 sc in ring (6)
Round 3 :
(1 sc, inc) x 6 (18)
Round 4 :
Join brown/dark iris color; (2 sc, inc) x 6 (24)
Info :
Change to dark brown or deep purple for the iris. Work tight stitches so the eye sits flat and neat. Fasten off after Round 4 and weave in small tail, leaving a long tail if you prefer to embroider additional details.
Round 5 :
With white yarn, mr, 6 sc in ring (6) — create outer eyeball circle worked flat in spiral
Round 7 :
(1 sc, inc) x 6 (18) — place centered over iris by sewing the small iris piece to the center of this white round
Info :
When sewing iris to eyeball, use short stitches around the center so the seam is tidy and the iris is centered. Position any tiny highlight stitch (1-2 stitch of white on iris) for character.
— Goggle Rim :
Round 1 :
With gray yarn: mr, 8 sc in ring (8)
Round 3 :
(1 sc, inc) x 8 (24)
Round 4 :
(2 sc, inc) x 8 (32)
Round 5 :
1 sc in each st around (32) — this forms a flat but slightly domed rim that will surround the white eyeball
Info :
Goggle rim: after Round 5, flatten rim and test seat over the head where the eye will be placed. You can also work one round BLO to create a raised inner ridge that helps the rim sit proud of the head slightly. Fasten off leaving a long tail for sewing to head.
— Goggle Strap :
Round 1 :
With black yarn: ch 40 (or measure to fit head circumference) — for a snug strap, use a chain that reaches around the head just behind the goggle placement
Round 2 :
Turn, sc in 2nd ch from hook and across (39) — create a narrow strap
Info :
Work strap in continuous rows until it reaches desired width (2-3 rows). Join ends by sewing inside the goggle rim to form a circular strap or sew ends to the rim sides after positioning on the head.
— Body :
Round 1 :
6 sc in magic ring using yellow yarn (6)
Round 3 :
(1 sc, inc) x 6 (18)
Round 4 :
(2 sc, inc) x 6 (24)
Round 5 :
(3 sc, inc) x 6 (30)
Round 6 :
(4 sc, inc) x 6 (36)
Round 7 :
(5 sc, inc) x 6 (42)
Round 8 :
(6 sc, inc) x 6 (48)
Round 9-14 :
1 sc in each st around (48)
Info :
This is the widest body point. Check that the head neck opening (6 sts tube) will fit snugly into this body's top. If the neck is too small for the body top, add an extra round of increases to the body before continuing even rounds. Keep the fabric tight enough so stuffing doesn't peek through.
Round 15 :
(6 sc, dec) x 6 (42)
Round 16 :
1 sc in each st around (42)
Round 17 :
1 sc in each st BLO (42) — work a ridge to help the overalls line sit nicely
Info :
Change to blue yarn now to start the overall top edge. Carry yellow yarn inside if you will later reuse it for the back or head-to-body join.
Round 18 :
Change to blue yarn. 1 sc in each st around (42)
Round 19-22 :
1 sc in each st around (42) — build overall torso height evenly
Round 23 :
(3 sc, dec) x 10 + 2 sc (36) — begin shaping toward the bottom/front curve
Round 24 :
1 sc in each st around (36)
Info :
Begin stuffing the body moderately from the bottom up while you continue shaping. Stuff firmly enough to make the body stable but not overly hard so the head can be sewn on smoothly.
Round 25 :
(2 sc, dec) x 9 + 2 sc (27) — a slight recalculation keeps shape even; check math and adjust to maintain symmetry
Round 26 :
(1 sc, dec) x 9 + 0 sc (18)
Info :
At this point, the bottom is mostly closed. Stuff well through the opening before final closure. Fasten off leaving a long tail, then use the tail to sew the bottom closed with an invisible stitch.
— Overalls Front Pocket & Details :
Round 1 :
With blue yarn: ch 12, join to form a loop or work in rows: sc in 12 (12)
Round 2 :
1 sc in each st around (12) — join in the round to make a small square/oval pocket base
Round 3 :
Inc evenly across: (1 sc, inc) x 6 (18)
Round 4 :
1 sc in each st around (18)
Round 5 :
Fold and sc through both layers across top edge to create a flap (or 1 sc in next 6 sts to mimic pocket rim) (18)
Info :
Sew pocket to the front of the overall chest between the lower third of the torso and the top of the legs. Add a black 'C' embroidery using black yarn and a simple chain stitch to mimic a logo; secure and hide ends inside the pocket or behind the piece.
Round 6-10 :
Work two small strap pieces: ch 14, sc in each ch back (13), work 2-3 rows to make strap width then sew to top corners of pocket and attach to the front of the body across the shoulders. Add small button or bead for fastener.
— Left Arm (Make 2) :
Round 1 :
With yellow: 6 sc in magic ring (6)
Round 3 :
1 sc in each st around (12)
Round 4 :
Work 2 rounds even (12) — forming the hand base
Info :
Stuff the hand base firmly now to define the glove shape. Leave a small opening to insert the black glove top pieces later.
Round 5 :
Change to black yarn. 1 sc in each st around (12) — begin glove cuff
Round 6-8 :
1 sc in each st around (12) — build cuff and simple glove tube
Round 9 :
(2 sc, inc) x 3 + 6 sc (15) — a small flare for the glove hand (if adding thumb detail)
Round 10 :
1 sc in each st around (15)
Info :
Optional thumb: leave a short tail and embroider a thumb bump later, or create a small 6-sc magic ring thumb piece and sew to the glove side. Sew arm opening onto body between rounds 18-20 of the body, spacing approximately 6-8 stitches from the side seam for natural arm placement.
Round 11-16 :
Switch back to yellow. 1 sc in each st around for 6 rounds (15) — upper arm length
Round 17 :
(2 sc, dec) x 3 + 3 sc (12) — narrower toward shoulder
Round 18 :
1 sc in each st around (12)
Round 19 :
Fasten off leaving long tail for sewing; do not fully stuff the arm—stuff hand firmly and arm lightly (12)
Info :
Sew arms to body at the blue/yellow seam area so the gloves sit just below the side of the chest. Pin both arms symmetrically and check length before sewing. Use ladder stitch or whip stitch for a secure invisible seam.
— Right Arm (Make 2) :
Info :
Repeat the left arm instructions to create the second arm. Ensure you mirror thumb placement if you added one, and keep stuffing consistency the same between both arms so they hang evenly.
— Left Leg (Make 2) :
Round 1 :
With blue yarn: 6 sc in magic ring (6)
Round 3 :
(1 sc, inc) x 6 (18)
Round 4 :
(2 sc, inc) x 6 (24)
Round 5 :
1 sc in each st around (24) — begin foot shaping
Round 6 :
Change to black for the shoe. (3 sc, dec) x 4 + 4 sc (20) — place decrease to form toe curve
Round 7-9 :
1 sc in each st around (20) — shoe body
Round 10 :
(2 sc, dec) x 5 + 0 sc (15)
Info :
Stuff the foot firmly focusing on the toe area to keep it round. Use a small wooden dowel or stuffing tool to push fiberfill into the toe area neatly.
Round 11 :
(1 sc, dec) x 5 (10)
Round 12-16 :
Switch back to blue yarn. 1 sc in each st around for 5 rounds (10) — calf and leg section
Round 17 :
(1 sc, inc) x 5 (15) — flare for hip connection
Round 18 :
1 sc in each st around (15)
Round 19 :
Fasten off leaving long tail for sewing. Stuff leg from toe up, firm at foot, less firm in leg (15)
Info :
Sew legs to bottom of body, spacing about 8-10 stitches apart depending on how wide you want the stance. For the pictured slight standing position, place legs close together with about 3-4 stitches between them on the bottom center.
— Right Leg (Make 2) :
Info :
Repeat left leg instructions to create the second leg. Match stuffing and length for balance. Pin both legs symmetrically and sew securely to the body's bottom rounds.
— Gloves (Optional Thumb Detail) :
Round 1 :
Small thumb: With black yarn: mr, 6 sc in ring (6)
Round 2 :
1 sc in each st around (6)
Round 3 :
Fasten off leaving a tail to sew to glove side (6)
Info :
Sew thumb to the side of glove at approx. round 2-3 of glove to create a cute little bump. Alternatively, embroider a thumb line on the glove using black yarn.
— Hair Details :
Info :
Cut 6-10 short strands of black yarn, fold in half and use a latch hook method to attach to crown area (rounds 9-11 of head). Trim to a uniform short length (~6-10 mm) to create tiny hair bits that stand up. Alternatively, use short embroidered stitches with black yarn to create sparse hair.
— Assembly & Finishing Touches :
Info :
Before final assembly, weave in and secure all loose ends and tuck tails inside pieces to avoid lumps. Use pins to position head, goggle, straps, arms, legs, pocket, and other details, checking symmetry from multiple angles.
Step :
Sew goggle rim to the head at the marked eye position. Center the white eyeball inside the goggle and sew or glue the iris/pupil in place. Sew the goggle strap around the head and attach its ends to the goggle rim sides for a neat look.
Step :
Sew head neck tube into the top opening of the body using the long tail left on the head. Use whip stitch or mattress stitch and work around the neck multiple times for a secure join. Make sure head sits straight and centered.
Info :
Embroider the mouth using black yarn and a yarn needle; a simple curved backstitch across 8-10 stitches creates the smiling expression. Add small embroidered lines or blush to cheeks if desired. Attach arms at the blue seam area and legs at bottom as described above.
Final :
Weave in all remaining ends and hide tails inside the body by pulling them into stuffed areas. Add small safety washers to any eyes or small beads if needed. Final blocking is unnecessary, but gently shaping the goggle rim and pocket by hand will help them sit neatly.
Info :
For extra stability, you can add a small disk of felt inside the base of the feet and sew it in before final closure to help the toy stand. Glue is optional but sew major seams for durability if the toy is for a child.
This adorable yellow banana amigurumi brings a dash of playful personality to any shelf or nursery with its oversized eye and comfy overalls. Each step of the pattern is crafted to guide you clearly from the first magic ring to the final stitch, ensuring a satisfying finish. Share your handmade friend with loved ones or keep it as a cheerful keepsake—either way, you'll enjoy every stitch of the process! 🧶😊🍌