🧶 Beautiful ✨ Detailed 💝 Adorable

Succulent Potted Plant Pattern

Succulent Potted Plant Pattern
4.7★ Rating
2-3 Hours Time Needed
2.2K Made This
✂️

Beginner Friendly Level

Perfect for those just starting their crochet journey, with clear instructions and simple techniques

⏱️

Bite-Sized Project

Finishes in 2-4 hours—perfect for an afternoon of creative relaxation.

🏡

Cozy Accent

A warm touch for your space that transforms ordinary corners into inviting nooks filled with handmade charm.

About This Succulent Potted Plant Pattern

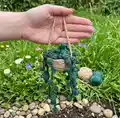
This pattern shows how to crochet a miniature hanging succulent planter with a small pot, a circle base, and multiple succulent ropes. You will learn simple increases, half-double crochet rounds, and puff stitch chains to create textured foliage. The finished piece makes a sweet shelf or windowsill accent and a lovely handmade gift.

Succulent Potted Plant Pattern crochet pattern - detailed view of completed project

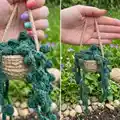
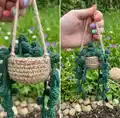
Clear step-by-step rows and photographed assembly steps help you sew and arrange the succulents neatly. Suitable for small yarn amounts and quick makes.

Why You'll Love This Succulent Potted Plant Pattern

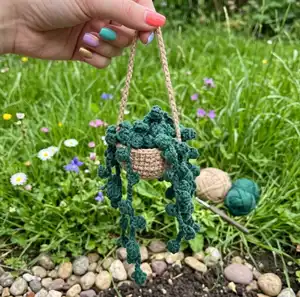
I absolutely love this pattern because it takes just a few basic stitches and turns them into a delightful miniature planter that brightens any space. I enjoy the texture created by the puff stitches — they give the succulents a playful, lifelike look. The project is quick to make, so I can whip up several in an afternoon for gifts or decorations. Sewing the pieces together and arranging the ropes is one of my favorite relaxing finishing steps.

Succulent Potted Plant Pattern step 1 - construction progress Succulent Potted Plant Pattern step 2 - assembly progress Succulent Potted Plant Pattern step 3 - details and accessories Succulent Potted Plant Pattern step 4 - final assembly and finishing

Switch Things Up

I love customizing the colors to fit my home — try soft pastels for a gentle look or deep greens for a realistic vibe.

I often make the pot with two tones by changing yarn color for the last round to add a rim detail.

Change the length of the succulent ropes by repeating the chain-and-puff sequence until you get the desired drape.

Use a slightly thicker yarn and larger hook to create a chunky, statement planter instead of a delicate mini.

For a keychain version, use thinner yarn and shorten the hanging chain to about 8-12 chains.

I sometimes add tiny beads or embroidery to simulate blooms among the succulent ropes for extra interest.

Try felting the pot slightly (if using wool) to create a sturdier, felted base that holds stuffing better.

Mix different green shades for the succulent ropes to give a multi-tonal, natural look to the trailing leaves.

Attach multiple shorter hangers to create a macrame-style cluster instead of a single long chain for a different hanging effect.

I recommend experimenting with placement before sewing — pin each rope and step back to ensure you like the overall arrangement.

Common Mistakes & How to Fix Them

✗ Skipping the chain-1 at the start of rounds will change row height and distort edges; always chain 1 at the beginning of each round as noted. ✗ Forgetting to slip stitch at the end of rows causes uneven edges and misaligned rounds; slip stitch at the end of each row consistently. ✗ Not stuffing the pot before attaching the circle base can make sewing difficult and cause lumps; stuff the pot lightly and evenly before sewing the base. ✗ Placing succulent ropes without pinning can lead to uneven spacing and a lopsided look; pin or mark positions before sewing each rope into place. ✗ Using a much larger hook than recommended will produce a loose fabric and floppy succulents; use the suggested 2.5-3.0 mm hook for the correct scale.

Succulent Potted Plant Pattern

Create a charming hanging succulent planter for your home with this easy-to-follow crochet pattern. You will make a tiny pot, a circular base, and several puff-stitch succulent ropes to fill it. This pattern is compact and satisfying — perfect for gifting or decorating small spaces.

Beginner Friendly 2-3 Hours

Materials Needed for Succulent Potted Plant Pattern

— Main Fabric

  • 01
    Super fine yarn, 1.8 oz (50 g) per skein
  • 02
    Beige brown yarn for pot — approximately 50 g (or scraps)
  • 03
    Pine green yarn for succulent ropes — approximately 50 g (or scraps)

— Tools Required

  • 01
    Crochet hook size 2.5-3.0 mm
  • 02
    Stitch marker
  • 03
    Sewing needle
  • 04
    Scissors
  • 05
    Cotton filling (polyester stuffing)

Progress Tracker

0% Complete

— Pots :

Infos :

*chain-1 at beginning of row, slip stitch in every time the end of the row*

Round 1 :

Magic ring, chain 1, 10 Single Crochet.

Round 2 :

chain 1, (1 Single Crochet, 1 increase ) 5 times (15 stitches)

Round 3 :

chain 1 (2 Single Crochet, 1 increase) 5 times. (20 stitches)

Round 4 :

chain 1 (3 Single Crochet, 1 increase) 5 times. (25 stitches)

Round 5 :

chain 1 (4 Single Crochet, 1 increase) 5 times. (30 stitches)

Round 6 :

chain 1 (5 Single Crochet, 1 increase) 5 times. (35 stitches)

Round 7-10 :

chain 1, 35 Single Crochet (35 stitches)

— Circle Base : (green) :

Round 1 :

Magic Ring, chain 1, 10 half double crochet (10 stitch)

Round 2 :

10 half double crochet increase (20 stitch)

Round 3 :

chain 1, (1 half double Crochet, 1 increase ) 10 times (30 stitch)

Round 4 :

chain 1 (5 Single Crochet, 1 increase) 5 times. (35 stitches)

— Succulent :

Infos :

Chain 4, 1 Puff stitch in 3rd sts, 1slip stitch in next sts. Chain 8, 1 Puff stitch in 3rd sts, 1slip stitch in next sts *this step crochet (8ch, 1PS in 3rd,1 SL ST) until the length you want*

— Sewing Step :

Info :

sew the circle inside the pot and dont forget stuffing ^_^

Info :

next step is sew every succulent rope on the midle of pots

— Hanging rope :

Info :

Hanging rope : chain 60 in the sides of the pots

Assembly Instructions

  • Sew the green circle base inside the pot and stuff the pot lightly before closing to ensure a smooth interior.
  • Arrange succulent ropes around the middle/top edge of the pot and sew each rope securely in place, spacing them evenly.
  • Create a hanging rope by chaining 60 and attach the ends to opposite sides of the pot for a balanced hanger.
  • Trim and weave in all yarn ends after sewing the succulents and hanger so the piece looks neat and finished.
  • Pin parts in place before sewing to check placement and symmetry, adjusting succulent lengths as desired.

Important Notes

  • 💡Use a stitch marker to mark the first stitch of each round, especially when working continuous rounds without joining.
  • 💡Stuff the pot gradually and evenly — overstuffing can distort the shape and make sewing the base difficult.
  • 💡Pin or hold succulent ropes in place before sewing to ensure even spacing and a balanced final appearance.

This cozy hanging succulent planter pattern is a tiny burst of handmade greenery for your home or gifts. It combines simple rounds and puff-stitch ropes for charming texture and personality. Make several in different colorways and hang them around your space for instant botanical cheer. 🪴✨

You ask,

we answer.

FAQs

What size will the finished piece be?

The finished hanging succulent planter measures a few inches across—about the size of a small palm—when using super fine yarn and a 2.5-3.0 mm hook.

Can I use different yarn weights for this pattern?

Yes, but changing yarn weight and hook size will alter the finished scale; use thicker yarn and a larger hook for a chunkier planter or thinner yarn for a mini keychain version.

Do I need prior crochet experience for this pattern?

This pattern is beginner friendly, so basic knowledge of magic ring, single crochet, and half double crochet is recommended for best results.

How long does this project typically take to complete?

Most crocheters complete this bite-sized project in about 2-3 hours depending on experience and how many succulents you make.

How many succulent ropes should I make?

The pattern suggests making 7-9 succulent ropes, but you can adjust the number to fit the fullness you want in your pot.