About This Butterfly Pattern
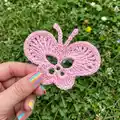
This pattern creates a flat, decorative crochet butterfly ideal for appliques, brooches, or small decorations. It uses a combination of basic and taller stitches to form textured wings and a slender body. The finished motif is lightweight and quick to make with a fine yarn and a small hook. Perfect for personalizing garments, accessories, or home decor with a handmade accent.

Detailed round-by-round instructions are provided for accurate shaping and consistent results. The pattern includes the stitch key and a diagram reference to help you follow along more easily.
Why You'll Love This Butterfly Pattern
I absolutely love this pattern because it transforms simple stitches into a delicate butterfly full of texture and charm. I enjoy how quickly one butterfly can be made, making it satisfying for both small projects and batches for gifts. I appreciate the combination of stitch heights that create a lacy, sculpted wing effect without complicated shaping. I also love that it works well with scrap yarn, so you can experiment with color combinations and finishes.
Switch Things Up
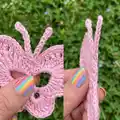
I love customizing this butterfly by changing yarn colors for each wing section to create ombre or rainbow effects.
I sometimes use metallic or sparkly thread for the outer rounds to give a subtle shimmer to the wings.
I often make a mini version by using a thinner thread and a smaller hook for tiny keychain-sized butterflies.
I also try a chunky yarn and larger hook to produce a bold, textured butterfly suitable as a coaster or decor piece.
I will stitch beads or French knots at the wing base to add eyes or decorative texture for a more embellished look.
I sometimes applique these onto baby blankets or hats, spacing them evenly for a playful pattern.
I recommend experimenting with different antenna styles: a short chain with a knot, a twisted cord, or an embroidered stem.
I occasionally combine two motifs back-to-back with a thin lining of felt to create a sturdier brooch or ornament.
I also convert the pattern into layered wings by making two sizes and stitching the smaller one on top for a 3D effect.
I find that adding a tiny crocheted body or ribbon between the wings can change the style from delicate to whimsical.
Common Mistakes & How to Fix Them
✗ Skipping the initial slip stitch round can leave an uneven center; start with the 5 chain and close with a slip stitch to form a neat ring.
✗ Missing increases in the wing rounds will make the wings lopsided; count stitches carefully each round and mark your starting point with a stitch marker.
✗ Pulling stitches too tight on the tall trebles and quadruple trebles will distort wing shape; maintain relaxed tension for elongated stitches to bloom correctly.
✗ Failing to follow the repeat marks (*) in Round 2 will change stitch counts; copy the sequence exactly and repeat the section the indicated number of times.
✗ Not checking spacing between small petal rings and larger rings can create gaps; check alignment against the diagram and adjust your placement before final slip stitching.