๐Ÿงถ Beautiful โœจ Detailed ๐Ÿ’ Adorable

Blue the Dumbo Octopus Amigurumi Pattern

Blue the Dumbo Octopus Amigurumi Pattern
4.3โ˜… Rating
5-7 Hours Time Needed
3.8K Made This
โœ‚๏ธ

Intermediate Level

Ideal for those with basic crochet experience, featuring slightly more advanced stitches and techniques to expand your skills.

โฑ๏ธ

Weekend Treat

Takes 5-7 hours, making it an enjoyable project to finish over a couple of days.

๐Ÿงธ

Cute Companion

An adorable friend to cherish, handcrafted with love to bring comfort and joy for years to come.

About This Blue the Dumbo Octopus Amigurumi Pattern

This pattern teaches you how to crochet a sweet dumbo-style octopus with big ears and a frilly skirt of tentacles. It uses bulky weight yarn and easy shaping to create a soft, squishy toy with personality. The instructions include eye placement tips, ear assembly, and clear finishing steps to get professional results.

Blue the Dumbo Octopus Amigurumi Pattern crochet pattern - detailed view of completed project

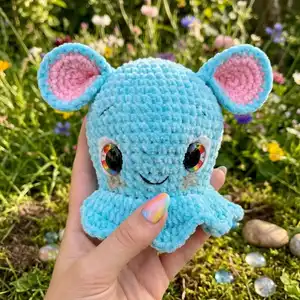
You will assemble and embroider facial features, and there are helpful photo steps showing eye installation and ear placement. The pattern is photographed throughout to guide you as you work.

Why You'll Love This Blue the Dumbo Octopus Amigurumi Pattern

I absolutely love this pattern because it transforms simple stitches into a character full of personality and charm. I enjoy how quickly the bulky yarn builds up into a soft, cuddly shape that feels impressive in just a few hours. The Dumbo-style ears and the frilly tentacles add a playful silhouette that always brings smiles. I also love teaching techniques for sunken eyes and subtle facial embroidery because those small details bring the octopus to life.

Blue the Dumbo Octopus Amigurumi Pattern step 1 - construction progress Blue the Dumbo Octopus Amigurumi Pattern step 2 - assembly progress Blue the Dumbo Octopus Amigurumi Pattern step 3 - details and accessories Blue the Dumbo Octopus Amigurumi Pattern step 4 - final assembly and finishing

Switch Things Up

I love how easily you can customize this octopus by changing yarn color combinations; try pastel shades for a nursery-friendly look or bold neons for a playful toy.

If you want a smaller version, use a lighter weight yarn and a smaller hook; conversely, bulky yarn and a bigger hook make a large, huggable octopus.

I sometimes embroider freckles or simple patterns on the head to add character โ€” little stitched dots can change the personality instantly.

You can replace safety eyes with embroidered eyes for a child-safe toy; use French knots or satin stitch to create adorable eye shapes.

For a poseable version, add thin craft wire to tentacles or inside the body before finishing to allow gentle posing.

Try adding accessories like a tiny crochet hat, bow, or scarf to give each octopus its own style and story.

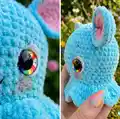
Use felt or fabric scraps behind the safety eyes (as shown) to change eye color and make them pop; glue or sew the felt in place before attaching the eye front.

I like to experiment with different stuffing amounts: lighter stuffing gives a floppy, cuddly toy while firmer stuffing makes a sturdier figure.

Swap the frill pattern for separate tentacles if you prefer distinct limbs โ€” crochet individual tubes and sew them around the base instead of the continuous frill.

Embroider small details like eyelashes, blush, or a tiny nose to make each octopus uniquely expressive and heartwarming.

Common Mistakes & How to Fix Them

โœ— Skipping the stitch marker at the start of rounds can cause lost stitch counts and shaping errors; always place a marker and move it each round. โœ— Overstuffing the head makes shaping and eye placement difficult and can distort the frill; stuff gradually and test shape frequently while stuffing. โœ— Placing safety eyes too early or too close together can look unbalanced; follow the placement instructions and leave the eye backs off if you want a sunken look. โœ— Not weaving in tails as you go means many loose ends at the end of the project; weave in yarn tails during assembly to keep parts tidy and secure. โœ— Pulling stitches too tight when sewing ears can warp the ear shape and make attachment uneven; use gentle, even tension and pin ears to check placement first.

Blue the Dumbo Octopus Amigurumi Pattern

Make your own adorable Blue the Dumbo Octopus with this complete crochet pattern. You'll follow step-by-step instructions from the head to the frilly tentacles, plus clear assembly and finishing tips. This pattern uses bulky weight yarn and large safety eyes to create a plush, cuddly octopus with charming Dumbo-style ears. Perfect for gifting or keeping as a whimsical handmade friend.

Intermediate 5-7 Hours

Materials Needed for Blue the Dumbo Octopus Amigurumi Pattern

โ€” Main Fabric

  • 01
    Bulky yarn Weight #6, approximately 100g of main color (Color A: Blue - Premier Parfait Chunky Turquoise)
  • 02
    Color B: Pink - approximately 25g (Premier Parfait Chunky Bubblegum)
  • 03
    30 mm safety eyes (2 pieces)
  • 04
    White felt circle approximately 4 cm diameter for eye backing (optional)

โ€” Tools Required

  • 01
    Crochet hook size J / 6.00 mm
  • 02
    Scissors
  • 03
    Sewing needle
  • 04
    Stitch marker
  • 05
    Polyester stuffing (fiberfill)
  • 06
    Embroidery thread (black) for facial details
  • 07
    Pins for assembly (optional)

Progress Tracker

0% Complete

โ€” Head and Body :

Info :

Crocheted from top of head to bottom of body Starting with Color A:

Round 1 :

Make 6 sc into a magic ring = 6

Round 2 :

Increase in each st around = 12

Round 3 :

(sc, inc) x 6 = 18

Round 4 :

(2 sc, inc) x 6 = 24

Round 5 :

(3 sc, inc) x 6 = 30

Round 6 :

(4 sc, inc) x 6 = 36

Round 7 :

(5 sc, inc) x 6 = 42

Round 8 :

sc in each st around

Round 9 :

(6 sc, inc) x 6 = 48

Round 10-14 :

sc in each st around

Round 15 :

(6 sc, dec) x 6 = 42

Round 16 :

sc in each st around

Round 17 :

(5 sc, dec) x 6 = 36

Info :

If you want, cut a circle larger than the eye in white felt, approximately 4 cm in diameter. Cut a hole on the outer edge of the circle to put the eye inside.

Info :

Place eyes between rounds 15 and 16, leaving 11 holes between them. If you want the sunken eye look, do not place the backs of the eyes on until round 20.

Info :

TIP! You may have to adjust the eye placement depending on yarn and hook size you use.

Round 18-20 :

sc in each st around

Info :

Start stuffing the head and body

Info :

Now for the eyes. Cut a long piece of yarn and remove the eyes. Place the needle in the hole where the first eye was and insert the needle into a hole next to the eye hole. Go back and forth between each eye hole repeating the process from the first eye. Pull slightly on the yarn after going through each hole. Do this about 3 times on each side until you reach the look you want. Follow the pictures for help. There is also a youtube video I have for extra help on this process. https://www.youtube.com/watch?v=9XoBnTY6k70&t=55s

Info :

To place the backs of the eyes you will need to remove most of the stuffing to place the washers on the eyes then re stuff it.

Round 21 :

BLO (4 sc, dec) x 6 = 30

Round 22 :

(3 sc, dec) x 6 = 24

Round 23 :

(2 sc, dec) x 6 = 18

Round 24 :

(sc, dec) x 6 = 12

Round 25 :

Dec x 6 = 6

Info :

F/O and sew the hole closed

โ€” Tentacles or Frill :

Info :

Turn the body upside down. Attach Color A yarn on round 21 with a sl st. Ch 2

Round 1 :

hdc-inc in each st around, join with a sl st to top of ch 2

Round 2 :

Ch 2, hdc in each st around, join with a sl st to top of ch 2

Round 3 :

Ch 2, (hdc, dc, tr, ch 1, tr, dc, hdc, 3 sl) x 8, sl st to top of ch 2 to fasten off

Info :

Weave in the tail ends.

โ€” Ears (Make 2 Color A, 2 in Color B) :

Info :

Starting with Color B:

Round 1 :

Make 6 sc into a magic ring = 6

Round 2 :

Increase in each st around = 12

Round 3 :

(sc, inc) x 6 = 18

Round 4 :

(2 sc, inc) x 6 = 24

Info :

Do not F/O the Color A ears! Place the back sides of Color A and Color B ears together. sc around the ears with the Color A yarn. F/O and leave a long tail for sewing.

โ€” Assembly :

Item Name (Head and Body) :

1. Thread your needle with a strand of black embroidery thread. Insert the needle into a hole on the head. Bring the needle above the eye. Embroider an eyebrow. Repeat for the 2nd eye. Weave in the tail ends.

Item Name (Head and Body) :

2. Thread your needle with a long strand of black embroidery thread. Insert the needle into a hole in the head. Bring the needle up to a spot between the eyes. Embroider a smile. Weave in the tail ends.

Item Name (Head and Body) :

3. If you want, you can glue down your white felt circle to make it flat against the body.

Item Name (Ears) :

1. Pinch the ears at the bottom. Sew about 3 stitches together at the bottom to give the ear a pinched look.

Item Name (Ears) :

2. Pin the ears onto the top of the head.

Item Name (Ears) :

3. Sew the ears onto the head.

Item Name (Face) :

1. If you want you can add some blush to the cheeks with actual blush or pink crayon.

Info :

You now have your finished octopus! Thank you for your purchase! If you have any questions or concerns please email me at sweetoddityart@gmail.com or etsy convo me. I will get back to you asap. Please share your finished octopus with me as often as you want! I love seeing them!

Assembly Instructions

  • Thread a needle with black embroidery thread and insert the needle into a hole on the head to embroider an eyebrow above each eye, then weave in the tail ends.
  • Thread a needle with a long strand of black embroidery thread and bring the needle up between the eyes to embroider a smile, then weave in the tails securely.
  • Pinch each ear at the bottom and sew about three stitches together to create a pinched ear shape, then pin the ears onto the top of the head and sew them in place.
  • To create the sunken eye look, place eyes between rounds 15 and 16 and do not attach the backs until round 20; remove stuffing to fit washers when attaching eye backs and then re-stuff.
  • Glue the white felt circle behind eyes if desired to make it lay flat against the body, and weave in all ends after assembly for a neat finish.

Important Notes

  • ๐Ÿ’กDo not join rounds unless stated; work in a continuous spiral for seamless shaping.
  • ๐Ÿ’กUse a stitch marker to mark the beginning of each round to keep consistent stitch counts and shaping.
  • ๐Ÿ’กAll stitches are worked in both loops unless stated otherwise in the pattern.

Thank you for choosing this Blue the Dumbo Octopus pattern โ€” I hope it brings a smile to your day! ๐Ÿ™ Use the step-by-step photos and notes to guide your assembly and finishing touches. ๐Ÿงต Share your finished octopus with me โ€” I love seeing your creations and celebrate every handmade friend! ๐Ÿงถ

You ask,

we answer.

FAQs

What size will the finished piece be?

The finished amigurumi measures approximately 12 inches from bottom to top of head when using bulky weight #6 yarn and a 6.00 mm hook.

Can I use different yarn weights for this pattern?

Yes, you can use different yarn weights but the final size will change. Adjust hook size and eye placement if you change yarn weight to maintain proportions.

Do I need prior crochet experience for this pattern?

This pattern is rated intermediate, so basic crochet skills and experience working in continuous rounds are recommended for best results.

How long does this project typically take to complete?

Most crocheters complete this project in 5-7 hours, though time may vary depending on experience level and working pace.

How do I get the sunken eye look?

Place the eyes between rounds 15 and 16 and delay attaching the eye backs until round 20, removing some stuffing to add the washers and then re-stuffing to secure them in a sunken position.