🧶 Beautiful ✨ Detailed 💝 Adorable

Stitch Amigurumi Pattern

Stitch Amigurumi Pattern
4.3★ Rating
5-7 Hours Time Needed
2.8K Made This
✂️

Intermediate Level

Ideal for those with basic crochet experience, featuring slightly more advanced stitches and techniques to expand your skills.

⏱️

Weekend Treat

Takes 5-7 hours, making it an enjoyable project to finish over a couple of days.

🧸

Cute Companion

An adorable friend to cherish, handcrafted with love to bring comfort and joy for years to come.

About This Stitch Amigurumi Pattern

This pattern creates a small Stitch-inspired amigurumi toy with separate pieces for head, body, ears, arms, legs, claws and tail. It features color changes between medium and light blues and a soft pink for inner ears. The instructions are written round-by-round and include finishing and placement tips to make assembly easy.

Stitch Amigurumi Pattern crochet pattern - detailed view of completed project

You'll crochet each piece in the round and sew them together using mattress stitch for a neat finish. Felt pieces are used for the eyes with a small embroidered white dot for the sparkle.

Why You'll Love This Stitch Amigurumi Pattern

I absolutely love this pattern because it brings a beloved character to life with simple shapes and charming proportions. I enjoy the mix of color changes and small pieces that let me practice shaping and assembly skills. The finished toy is cuddly and makes a lovely handmade gift that always gets compliments. I love how customizable it is — you can change colors or scale easily for different looks.

Stitch Amigurumi Pattern step 1 - construction progress Stitch Amigurumi Pattern step 2 - assembly progress Stitch Amigurumi Pattern step 3 - details and accessories Stitch Amigurumi Pattern step 4 - final assembly and finishing

Switch Things Up

I love how easy it is to customize this pattern by simply changing the colors; try pastels for a soft baby version or bold neons for a playful modern twist.

You can scale the size by switching yarn weight and hook size: a bulkier yarn with a larger hook creates a chunky, cuddly toy while finer yarn makes a tiny keychain-friendly version.

I often add embroidered eyebrows or tiny accessories like a scarf or hat to personalize each doll and add character and story to the piece.

Try adding wire inside the limbs for posability if you want your amigurumi to hold poses or be display-ready on a shelf.

For a safer toy for small children, replace felt eyes with embroidered eyes or securely sew the felt pieces and reinforce them with extra stitching behind the head.

Mix textures by using a fluffy or boucle yarn for inner ear accents or the belly area to make tactile contrast and extra visual interest.

If you prefer a different facial expression, alter the nose shape or the position of the eyes slightly—small changes dramatically change the personality.

Make a family set by varying sizes and colors, creating matching friends or siblings to display together as a cozy collection.

I sometimes add tiny crocheted props like a mini heart or flower that can be sewn on or held by the amigurumi for gift-ready charm.

Experiment with stitch tension and stuffing levels to get different silhouettes—softer stuffing gives a floppy look while firm stuffing gives a more sculpted form.

Common Mistakes & How to Fix Them

✗ Skipping stitch markers during rounds with increases and decreases can lead to miscounted stitches; use a marker at the start of every round and move it each round to maintain accurate counts. ✗ Not stuffing gradually often results in lumps or a misshapen head; stuff a little at a time and shape as you go to keep an even, rounded form. ✗ Cutting yarn too short after color changes makes sewing and weaving ends difficult; leave longer tails when changing colors so you can secure and weave them neatly later. ✗ Sewing parts without pinning first may cause misaligned limbs; pin and check placement against the photos before permanently sewing the pieces in place.

Stitch Amigurumi Pattern

Create a cute Stitch-inspired amigurumi with this detailed crochet pattern. You will make a cuddly alien toy with clear round-by-round instructions, color changes, and assembly tips. Perfect for gifting or decorating, this pattern walks you through every piece from head to tail. Enjoy stitching this charming little companion at your own pace.

Intermediate 5-7 Hours

Materials Needed for Stitch Amigurumi Pattern

— Main Fabric

  • 01
    Medium blue yarn - 100-150 g (main color)
  • 02
    Dark blue yarn - less than 50 g (accent edges, claws)
  • 03
    Light blue yarn - less than 50 g (belly and color changes)
  • 04
    Pink yarn - less than 50 g (inner ears)
  • 05
    Yarn weight: 50 g / 133 m

— Tools Required

  • 01
    Crochet hook size 2.5 mm
  • 02
    Pins (stecknadeln) for positioning
  • 03
    Stitch markers
  • 04
    Tapestry/sewing needle
  • 05
    Darning/stopfnadel and sewing needle
  • 06
    Felt: light blue (or white), black for eyes
  • 07
    Sewing thread: light blue, white (or embroidery thread for the white dot), and black
  • 08
    Optional: embroidery needle
  • 09
    Scissors
  • 10
    Polyester stuffing (Füllwatte)

Progress Tracker

0% Complete

— Kopf :

R1 :

6 FM in den MR (6)

R2 :

2 FM in jede Masche (12)

R3 :

(1 FM, Zun.) x6 (18)

R4 :

(2 FM, Zun.) x6 (24)

R5 :

(3 FM, Zun.) x6 (30)

R6 :

(4 FM, Zun.) x6 (36)

R7 :

(5 FM, Zun.) x6 (42)

R8 :

(6 FM, Zun.) x6 (48)

R9 :

(7 FM, Zun.) x6 (54)

R10-19 :

1 FM in jede Masche (54) Farbwechsel zu Hellblau.

R20 :

(7 FM, uns. Abn.) x6 (48)

R21 :

(6 FM, uns. Abn.) x6 (42)

R22 :

(5 FM, uns. Abn.) x6 (36)

R23 :

(4 FM, uns. Abn.) x6 (30)

Info :

Den Kopf fest füllen, ggf. am Ende noch etwas mehr Füllung hinzufügen.

R24 :

(3 FM, uns. Abn.) x6 (24)

R25 :

(2 FM, uns. Abn.) x6 (18)

Info :

Garn abschneiden, dabei ein langes Ende stehen lassen um später den Kopf an den Körper zu nähen.

— Ohren (4x) :

Infos :

in der Runde, ohne Wenden. 2 in mittelblau, 2 in rosa. Zuerst die rosa inneren Ohren häkeln. Garn abschneiden und Fadenende vernähen. Bei den blauen äußeren Ohren ein langes Fadenende stehen lassen.

R1 :

15 LM, von der 2. LM von der Nadel: 13 FM, 5 FM in letzte M, 13 FM (31)

R2 :

1 LM (wird nicht gezählt), 12 FM, (Zun.) x5, 13 FM (35). Die LM überspringen oder mit einem KM Runde beenden.

R3 :

1 LM++, 12 FM, (1 FM, Zun.) x5, 13 FM (40)

R4 :

1 LM, 40 FM (40)

Info :

Am Ende die die beiden Ohrenteile zusammenhäkeln. Dabei sollte die richtige Seite der Ohren nach außen zeigen.

— Körper :

R1 :

6 FM in MR (6)

R2 :

2 FM in jede M (12)

R3 :

(1 FM, Zun.) x6 (18)

R4 :

(2 FM, Zun.) x6 (24)

R5 :

(3 FM, Zun.) x6 (30)

R6 :

(4 FM, Zun.) x6 (36)

R7 :

(5 FM, Zun.) x6 (42)

R8 :

(6 FM, Zun.) x6 (48)

R9 :

1 FM in 46 Maschen. 47. Masche mit mittelblau aufnehmen und mit hellblau abschließen. 1 FM in hellblau (48). Nach jedem Farbwechsel den Faden abschneiden und die Fadenenden zusammenknoten.

R10-15 :

in hellblau: 15 FM. 16. Masche mit mittelblau abschließen. 30 FM mit mittelblau häkeln, die 31. Masche mit hellblau abschließen und die letzte Masche in hellblau häkeln. (48)

R16 :

in hellblau: (3 FM, uns. Abn.), 6 FM, uns. Abn., 2 FM, Farbwechsel (1 FM). in mittelblau: 3 FM, uns. Abn, (6 FM, uns. Abn) x3, 1 FM, Farbwechsel, 1 FM (42)

R17-18 :

in hellblau: 14 FM, 15. Masche mit mittelblau abschliessen. in mittelblau: FM in jede M, letzte FM mit hellblau abschliessen (42)

R19 :

in hellblau: (5 FM, uns. Abn) x2, (Masche aufnehmen, mit mittelblau abschliessen) (1 FM). in mittelblau: 4 FM, uns. Abn, (5 FM, uns. Abn) x2, 5 FM, fuer Abnahme Masche mit hellblau aufnehmen und abschliessen (36)

R20 :

in hellblau: 12 FM, Farbwechsel zu mittelblau (1 FM). in mittelblau: 22 FM, Farbwechsel zu hellblau (1 FM) (36)

R21 :

in hellblau: 13 FM, Farbwechsel, (1 FM), 21 FM, Farbwechsel (1 FM) (36)

R22 :

in hellblau: (4 FM, uns. Abn) x2, 1 FM, Farbwechsel (1 FM). in mittelblau: 2 FM, uns. Abn., (4 FM, uns. Abn) x2, 4 FM, uns. Abn, uns. Abn mit hellblau abschliessen (30)

R23 :

1 FM in jede M (Farbwechsel machen) (30)

R24 :

in hellblau: (3 FM, uns. Abn) x2, 1 FM, Farbwechsel (1 FM). in mittelblau: 1 FM, uns. Abn, (3 FM, uns. Abn) x2, 3 FM, durch zwei Maschen mit mittelblau Masche aufnehmen, mit hellblau beenden (24)

R25 :

FM in jede M (Farbwechsel machen) (24)

R26 :

(2 FM, uns. Abn.) x2, 1 FM, Farbwechsel (1 FM), uns. Abn., (2 FM, uns. Abn) x3 (18). Garn abschneiden und vernähen.

Info :

Kopf und Körper mit dem Matratzenstich zusammennähen.
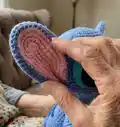
— Beine (2x) :

R1 :

6 FM in MR (6)

R2 :

2 FM in jede M (12)

Info :

Farbwechsel zu mittelblau.

R3 :

(1 FM, Zun.) x6 (18)

R4 :

(2 FM, Zun.) x6 (24)

R5-7 :

1 FM in jede M (24)

R8 :

(2 FM, uns. Abn.) x6 (18)

R9 :

1 FM in jede M (18)

R10 :

(2 FM, Zun.) x6 (24)

R11-14 :

1 FM in jede M (24)

R15 :

(2 FM, uns. Abn.) x6 (18)

R16-17 :

1 FM in jede M (18)

Info :

Bein füllen, den Rand zusammenhalten und entlang häkeln um ihn zu schliessen. Garn abschneiden und Fadenende zum Nähen stehen lassen.

Info :

Jetzt werden wir zwischen Runde 4 und 5 also auf der 5. Masche entlang häkeln. Es ist wichtig, dass sich die Krallen dort befinden, wo sich das Ende des zugehäkelten Randes befindet.

— Krallen :

Kralle 1 :

1 LM, in nächste M: 1 Stb, 1 LM, in nächste M 1 FM

Kralle 2 :

in nächste M 1 KM und 2 LM, in nächste M: 1 Stb, 1 LM, FM in nächste M

Kralle 3 :

KM in nächste M, 2 LM, 1 Stb, 1 LM, KM

Info :

Garn abschneiden und vernähen.

— Arme (2x) :

R1 :

6 FM in MR (6)

R2 :

2 FM in jede M (12)

Info :

Farbwechsel zu mittelblau.

R3 :

(1 FM, Zun.) x6 (18)

R4 :

(2 FM, Zun.) x6 (24)

R5-7 :

1 FM in jede M (24)

R8 :

(2 FM, uns. Abn.) x6 (18)

R9 :

1 FM in jede M (18)

R10 :

(2 FM, Zun.) x6 (24)

R11-15 :

1 FM in jede M (24)

R16 :

(2 FM, uns. Abn.) x6 (18)

R17-18 :

1 FM in jede M (18)

Info :

Bein füllen. (Arme ebenfalls füllen.)

R19 :

(1 FM, uns. Abn.) x6 (12)

R20 :

1 FM in jede M (12). Entlang der Kante häkeln um sie zu schliessen.

Info :

Die Krallen werden genauso gehäkelt wie bei den Beinen.

— Schwänzchen :

R1 :

6 FM in MR

R2 :

2 FM in jede M (12)

R3 :

1 FM in jede M (12)

R4 :

(1 FM, Zun.) x6 (18)

R5 :

(1 FM, uns. Abn.) x6 (12)

Info :

Garn abschneiden und ein Ende zum Nähen lassen.

— Arme und Beine annähen :

Info :

Den oberen Teil der Arme zwischen Runde 23 und 24, eine Masche ins hellblau hinein annähen. Den unteren Teil zwischen Runde 19 und 20, ca 1-3 Maschen vom hellblauen Bereich entfernt annähen. Die Unterseite der Beine beginnt ca. zwischen Runde 7 und 8 und die Oberseite zwischen Runde 15 und 16. Die Beine sind 3 Maschen vom hellblauen Bereich entfernt.

— Krallen annähen :

Info :

Die Krallen dort befestigen, wo das Ende des zugehäkelten Randes ist, damit sie nach oben zeigen, wenn Beine/Arme angenäht sind. Garn entsprechend anbringen.

— Augen :

Info :

Augen so ausschneiden wie auf den Fotos zu sehen ist. Mit schwarzem Garn den schwarzen Teil auf den hellblauen Teil aufnähen. Mit weißem Näh- oder Stickgarn einen kleinen Punkt auf das Schwarze sticken.

Info :

Die Augen an den Kopf pinnen. So positionieren wie auf den Fotos. Mit der unteren Kante eine Runde oberhalb des Farbwechsels. Mit der unteren Kante zwischen Runde 10 und 11 des Kopfes. Zwischen den Augen ca. 5 Maschen Abstand lassen.

— Nase :

Info :

Mit dunkelblau. Langes Fadenende am Anfang stehen lassen. 5 LM, 1 Wendeluftmasche. KM in nächste LM. HStb in die nächste LM. 2 Stb in nächste LM. HStb in nächste LM. 1 LM, KM in letzte LM. Garn abschneiden und vernähen. Die Nase zwischen die Augen nähen, dabei zeigt die gewölbte Seite nach unten. Augen mit hellblauem Nähgarn annähen.

— Ohren und Schwänzchen annähen :

Info :

Die Ohren an den Kopf nähen. Die obere Seite sollte zwischen Runde 11 und 12 enden. Die untere Seite eine Runde über dem Farbwechsel. Dabei darauf achten, dass sie in einer Linie mit den Armen und Beinen sind.

Info :

Das Schwänzchen füllen und mit der unteren Seite zwischen Runde 5 und 6 des Körpers annähen.

Info :

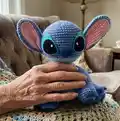
Gratuliere! Du hast jetzt einen niedlichen Stitch gehäkelt. Zeige mir deine Kreation und markiere mich in deinem Foto @rxy_crochet!

Assembly Instructions

  • Sew head to body using mattress stitch: align the head opening to the top of the body and stitch through corresponding rounds to create a neat seam.
  • Attach arms with the upper part between rounds 23 and 24 (one stitch into the light blue) and the lower part between rounds 19 and 20 positioned 1-3 stitches from the light-blue section.
  • Sew legs so the underside begins between rounds 7 and 8 and the top sits between rounds 15 and 16, leaving legs 3 stitches away from the light-blue area for correct spacing.
  • Pin ears in place and sew them to the head so the upper edge ends between rounds 11 and 12 and the lower edge sits one round above the color change; ensure they align with arms and legs.
  • Attach tail between rounds 5 and 6 of the body on the underside and securely sew in place.
  • Position felt eyes so the bottom edge sits one round above the head color change (between rounds 10 and 11) with approximately 5 stitches between eyes, then sew in place and add a small white embroidered dot.

Important Notes

  • 💡Work all pieces in continuous rounds unless the pattern explicitly states otherwise; do not add turning chains unless noted.
  • 💡After each color change, cut the yarn and knot ends as instructed to secure color transitions and prevent unraveling.
  • 💡Use stitch markers to track the start of rounds and maintain correct stitch counts during increases and decreases.
  • 💡Stuff pieces firmly but gradually to keep smooth, even shapes and to allow room for final shaping during assembly.

This adorable Stitch-inspired amigurumi is a joyful little project that brings character and charm to your handmade collection. It uses simple shaping and color changes to create a lively, expressive toy that is both fun to crochet and delightful to gift. Finish it with felt eyes and a tiny embroidered nose for the sweetest results. 🧶✨😊

You ask,

we answer.

FAQs

What size will the finished piece be?

The finished amigurumi measures approximately 18 cm tall when using the recommended yarn weight (50 g / 133 m) and a 2.5 mm hook.

Can I use different yarn weights for this pattern?

Yes, you can substitute yarn weights, but the final size and stitch tension will change; adjust your hook accordingly and expect the toy to become larger or smaller.

Do I need prior crochet experience for this pattern?

This pattern is rated intermediate and assumes familiarity with working in the round, increases, decreases and sewing pieces together.

How long does this project typically take to complete?

Most crocheters complete this project in 5-7 hours, though total time can vary depending on experience and whether you make felt details by hand.

How are the eyes made and attached?

The eyes are cut from felt (light blue and black), sewn together, and pinned to the head so the bottom edge sits one round above the color change; a small white embroidered dot is added for sparkle.