🧢 Beautiful ✨ Detailed πŸ’ Adorable

Checker It Out Crochet Bag Pattern

Checker It Out Crochet Bag Pattern
4.2β˜… Rating
5-7 Hours Time Needed
1.1K Made This
βœ‚οΈ

Beginner Friendly Level

Perfect for those just starting their crochet journey, with clear instructions and simple techniques

⏱️

Weekend Treat

Takes 5-7 hours, making it an enjoyable project to finish over a couple of days.

✨

Stylish Touch

An elegant detail to elevate any look, combining traditional techniques with contemporary design sensibilities.

About This Checker It Out Crochet Bag Pattern

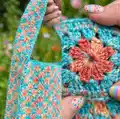
This pattern creates a simple, colorful crochet tote bag worked in a two-color chart pattern using Caron Coconut Cakes. The project includes instructions for the bag base, front and back panels, and a long strap with sides, plus finishing and joining guidance. The checked charted pattern creates a textured, multicolor fabric that is both durable and eye-catching.

Checker It Out Crochet Bag Pattern crochet pattern - detailed view of completed project

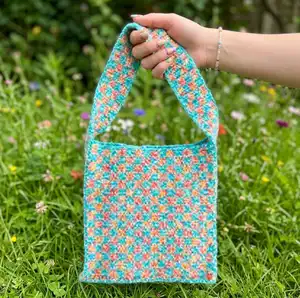
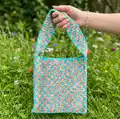
Youll work from a 6-row chart pattern, carrying colors across rows for clean color transitions. The bag finishes approximately 12" x 12" x 3", excluding the strap, and is ideal for everyday use or gifting.

Why You'll Love This Checker It Out Crochet Bag Pattern

I absolutely love this pattern because it turns simple single crochet stitches into a striking checkerboard fabric with minimal effort. I enjoy how the Caron Coconut Cakes yarn blends colors to create a marled, painterly effect that feels modern and handmade. The construction is straightforward yet satisfying β€” the base, panels, and strap are all worked flat from the chart and then joined for a professional finish. I also appreciate that the pattern is forgiving and great for practicing chart reading, color carries, and neat seaming. Finally, the finished bag is durable, roomy, and versatile, making it a piece I reach for again and again.

Checker It Out Crochet Bag Pattern step 1 - construction progress Checker It Out Crochet Bag Pattern step 2 - assembly progress Checker It Out Crochet Bag Pattern step 3 - details and accessories Checker It Out Crochet Bag Pattern step 4 - final assembly and finishing

Switch Things Up

I love customizing this bag by swapping the two contrast colors for a high-contrast look or a subtle tonal version.

You can change yarn weight and hook size to make a larger or smaller bag; for a chunkier tote use a bulkier yarn and a larger hook.

I sometimes work the front and back panels longer to create a deeper bag for more storage capacity.

Try lining the bag with fabric to increase structure and durability, especially if you plan to carry heavier items.

Embellish with a tassel, button flap, or small crocheted pocket sewn to the inside for extra function and flair.

Use a neutral solid for Contrast B and a variegated cake for Contrast A to highlight the marled effect of the Coconut Cakes yarn.

To make a crossbody version, simply increase the strap length by adding extra chart repeats until it reaches your desired drop.

I often add a magnetic snap or zipper at the top for security β€” sew carefully through both layers during finishing.

For a different texture, substitute half double crochet for single crochet in the chart, but be mindful that gauge and size will change.

Consider making a matching set by crocheting a small pouch or wallet using the same chart and color combination for coordinated gifts.

Common Mistakes & How to Fix Them

βœ— Not carrying the unused color across the top of the previous row can create gaps and inconsistent gauge; carry the color across the entire row and work stitches around the carried strand for even tension. βœ— Forgetting to place stitch markers at the ends of the strap when instructed makes alignment difficult; place PMs on each end of the last row to mark corners for joining later. βœ— Stopping before the strap reaches the recommended 48" can make the strap too short for comfortable wear; measure as you go and continue chart repeats until strap measures approx 48" before fastening off. βœ— Not aligning corners when joining panels and base can cause uneven seams; align the corner of the base with the corner of the panel and work evenly through both thicknesses when joining.

Checker It Out Crochet Bag Pattern

Make a stylish, roomy checker-pattern crochet bag using Caron Coconut Cakes yarn. This easy pattern walks you through a charted stitch pattern to create the bag base, front and back panels, and a long strap and sides. Youll love the colorful marled effect and the simple construction that sews together for a polished finish.

Beginner Friendly 5-7 Hours

Materials Needed for Checker It Out Crochet Bag Pattern

β€” Main Fabric

  • 01
    Caron Coconut Cakes (8 oz/227 g; 481 yds/440 m) main cake
  • 02
    Contrast A: Tutti-Frutti (84002) - 1 ball or 335 yds/307 m
  • 03
    Contrast B: Sugar Teal (84005) - 1 ball or 350 yds/320 m

β€” Tools Required

  • 01
    Crochet hook size U.S. 7 (4.5 mm) Susan Bates Silvalume or size needed to obtain gauge
  • 02
    Susan Bates yarn needle
  • 03
    Susan Bates stitch markers
  • 04
    Scissors
  • 05
    Measuring tape

Progress Tracker

0% Complete

β€” Abbreviations :

Infos :

Approx = Approximate(ly). Beg = Beginning. Ch = Chain(s). Cont = Continue(ity). Pat = Pattern. PM = Place marker. Rep = Repeat. RS = Right side. Sc = Single crochet. Sl st = Slip stitch. St(s) = Stitch(es). Tog = Together. WS = Wrong side.

β€” Measurements :

Info :

Approx 12" x 12" x 3" [30.5 x 30.5 x 7.5 cm], excluding Strap.

β€” Gauge :

Info :

16 sc and 16 rows = 4" [10 cm] in Chart Pat.

β€” Instructions Note :

Info :

When working from chart and joining new color, work to last 2 loops on hook of last st. Draw new color through 2 loops, then proceed in new color.

β€” Bag Base :

Info :

With A, ch 13.

Info :

Work Chart, noting each square of chart is equal to 1 sc and reading RS rows from right to left and WS rows from left to right. Carry color not in use across top of entire previous row and work sts around it. This will ensure even gauge as all sts will be worked around an extra strand of yarn held across top of previous row. Carry both colors up side of work. See Chart on page 2.

1st row :

(1st row of Chart - RS). 1 sc in 2nd ch from hook. 1 sc in each ch to end of chain. Turn. 12 sc.

2nd row :

(2nd row of Chart - WS). Ch 1. 1 sc in each sc to end of row. Turn.

Round :

Rep last row until 6th row of chart is complete.

Round :

Rep last 6 rows of Chart Pat until Bag Base measures approx 12" [30.5 cm], ending with either 3rd row or 6th row of chart. Fasten off.

β€” Strap & Sides :

Info :

With A, ch 13. Work Chart as noted for Bag Base.

1st row :

(1st row of Chart - RS). 1 sc in 2nd ch from hook. 1 sc in each ch to end of chain. Turn. 12 sc.

2nd row :

(2nd row of Chart - WS). Ch 1. 1 sc in each sc to end of row. Turn.

Round :

Rep last row until 6th row of chart is complete.

Round :

Rep last 6 rows of Chart Pat until Strap measures approx 12" [30.5 cm], ending with either 3rd row or 6th row of chart. PM on each end of last row.

Round :

Cont in Chart Pat, until Strap measures approx 36" [91.5 cm], ending with either 3rd row or 6th row of chart. PM on each end of last row.

Round :

Cont in Chart Pat until Strap measures approx 48" [122 cm], ending with 3rd row or 6th row of chart. Fasten off.

β€” Front & Back Panels :

Info :

With A, ch 49. Work Chart as noted for Bag Base.

1st row :

(1st row of Chart - RS). 1 sc in 2nd ch from hook. 1 sc in each ch to end of chain. Turn. 48 sc.

2nd row :

(2nd row of Chart - WS). Ch 1. 1 sc in each sc to end of row. Turn.

Round :

Rep last row until 6th row of chart is complete.

Round :

Rep last 6 rows of Chart Pat until work from beg measures approx 12" [30.5 cm], ending with either 3rd row or 6th row of chart.

Next row :

With B only, 1 sc in each sc to end of row. Fasten off.

β€” Finishing :

Info :

Join Bag Base to Front & Back Panels and Join Strap & Sides to Bag Base. Align edges carefully and work through both thicknesses where indicated.

Join Bag Base to Front & Back Panels :

With RS of Base facing, place lower edge of Front Panel behind long edge of Base with WS of work tog, aligning corner of Base with corner of Front Panel.

1st row :

Join B with sl st. Ch 1. Working through both thicknesses, work sc evenly across edge. Fasten off.

Round :

Rep to join Base to Back Panel.

Join Strap & Sides to Bag Base :

With RS of Base facing, place beg edge of Strap & Sides behind short edge of Base with WS of work tog, aligning corner of Bottom with corner of Strap.

1st row :

Join B with sl st. Ch 1. Working through both thicknesses, work sc evenly across edge. Fasten off.

Round :

Rep to join opposite end of Strap & Sides to Base.

Join Strap & Sides to Front & Back Panels :

Align top corners of Front and Back Panels to rows marked with st markers on Strap & Sides. Pin pieces tog if desired.

1st row :

Beg at bottom right corner of Front Panel, join B with sl st. Ch 1. Working through both thicknesses, work sc evenly up edge of Front Panel, across single edge of Strap, and down opposite edge of Front Panel. Fasten off.

Round :

Rep for other side.

β€” Chart Legend :

Info :

Chart shows a 6 st rep. Dark square = Contrast A. White square = Contrast B. Start at indicated corner and follow RS rows right to left and WS rows left to right.

Assembly Instructions

  • Place lower edge of Front Panel behind long edge of Bag Base with WS of work together, aligning corner of Base with corner of Front Panel; join with B using sl st, ch 1, then work sc evenly across edge.
  • Repeat joining method to attach the Base to the Back Panel so both panels are securely joined to the Base.
  • Align the beginning edge of the Strap & Sides behind the short edge of the Base with WS together, matching corners; join with B using sl st, ch 1 and work sc evenly across the edge; fasten off and repeat for the opposite end.
  • Align top corners of Front and Back Panels with the rows marked by stitch markers on Strap & Sides and pin if desired; join by working sc through the Front Panel edge, across the strap edge, and down the opposite Front Panel edge using B.
  • Ensure all joins are worked through both thicknesses for strength and weave in ends securely after fastening off each joining row.

Important Notes

  • πŸ’‘Use stitch markers on each end of the Strap rows to mark corners for accurate joining later in finishing.
  • πŸ’‘Carry the unused color across the top of the entire previous row and work stitches around it to maintain even gauge and neat color transitions.
  • πŸ’‘Pin pieces together before seaming to ensure correct alignment and check measurements before final joining.

This Checker It Out Crochet Bag pattern creates a colorful, charted tote thats both practical and playful. Make it with Caron Coconut Cakes for effortless color blending and a handmade look that stands out. Perfect as a gift or a go-to market bag youll reach for all season. πŸ§ΆπŸ‘œ

You ask,

we answer.

FAQs

What size will the finished bag be?

The finished bag measures approximately 12" x 12" x 3" [30.5 x 30.5 x 7.5 cm], excluding the strap.

What yarn and how much do I need?

Use Caron Coconut Cakes; you will need the main cake plus Contrast A (Tutti-Frutti) 1 ball (335 yds/307 m) and Contrast B (Sugar Teal) 1 ball (350 yds/320 m).

Can I change the strap length?

Yes, the strap is worked to approx 48" [122 cm]; you can add or subtract chart repeats to shorten or lengthen the strap to your preferred length.

Is this pattern suitable for beginners?

Yes, this pattern is rated Beginner Friendly and uses simple single crochet stitches, but it does require working from a chart and carrying colors.