🧢 Beautiful ✨ Detailed πŸ’ Adorable

Starfish Amigurumi Pattern

Starfish Amigurumi Pattern
4.8β˜… Rating
2-3 Hours Time Needed
1.7K Made This
βœ‚οΈ

Intermediate Level

Ideal for those with basic crochet experience, featuring slightly more advanced stitches and techniques to expand your skills.

⏱️

Bite-Sized Project

Finishes in 2-4 hoursβ€”perfect for an afternoon of creative relaxation.

πŸ₯

Charming Critter

Delightful animal designs with sweet details that capture the essence of your favorite woodland and farmyard friends.

About This Starfish Amigurumi Pattern

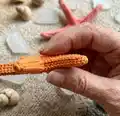
This pattern teaches you how to crochet a small decorative starfish in two sizes: thin and large. It uses 100% cotton yarn with a very small hook for neat, dense stitches and includes shaping instructions using a glue-and-water mixture. The pattern focuses on simple rounds and chains to form the five arms and the textured center.

Starfish Amigurumi Pattern crochet pattern - detailed view of completed project

Complete rounds and shaping steps are written out clearly so you can follow along easily. Photos and tips are included to help you shape and finish your starfish for a professional result.

Why You'll Love This Starfish Amigurumi Pattern

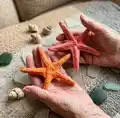
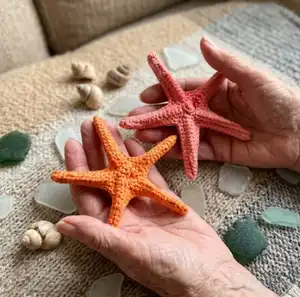
I absolutely love this pattern because it turns a few basic stitches into a charming sea creature with personality. I enjoy the shaping step most β€” it transforms a flat crocheted piece into a sculpted starfish that holds its form. The pattern is compact and satisfying, so I can finish a starfish in one sitting and experiment with color and size. Creating both thin and large versions is fun and gives me options for gift-making or display.

Starfish Amigurumi Pattern step 1 - construction progress Starfish Amigurumi Pattern step 2 - assembly progress Starfish Amigurumi Pattern step 3 - details and accessories Starfish Amigurumi Pattern step 4 - final assembly and finishing

Switch Things Up

I love changing yarn colors to create sets of starfish for a coastal display; try coral, peach, and sand tones for a beachy shelf.

You can make minis for keychains by using a finer thread and smaller hook, then attach a small split ring through a secure loop.

For a plush, chunky starfish use a bulkier cotton yarn and a larger hook to create a softer, squishier version that is cuddly and tactile.

Try embroidering tiny details or adding beads to the center before shaping to give each starfish a unique face or texture.

If you want more rigid shells, increase the glue ratio to 1:1 (water:glue) for a stiffer finish; test on a scrap first.

I sometimes add a light wash of diluted acrylic paint after shaping to accent ridges and create a weathered look; seal with varnish if desired.

For ornaments, insert a loop of thread into the center and shape around it so you can hang them on a string or mobile.

Combine sizes into a mobile or garland by sewing a few together at tips before drying to create a clustered star effect.

If you want a reversible look, try alternating right-side and wrong-side finishes between thin and large versions to play with texture.

I recommend experimenting with the chain length in Round 3 to change arm length proportionally β€” shorter chains make stubby arms, longer chains make elegant arms.

Common Mistakes & How to Fix Them

βœ— Using a hook that is too large will create loose stitches and floppy arms; use the recommended small hook (1.5 mm) or go down a size for tighter stitches. βœ— Skipping stitch markers or counting causes misaligned arms and gaps; place a marker at the start of each round and count stitches after increases to stay accurate. βœ— Not shaping while the piece is wet leads to a limp result; follow the glue-and-water shaping method and shape while the starfish is wet for best hold. βœ— Forgetting to fasten off and weave ends securely can cause unraveling during shaping; fasten off neatly and weave ends before wet shaping to keep everything secure.

Starfish Amigurumi Pattern

Make a delightful crocheted starfish using simple rounds and shaping techniques. This pattern includes both thin and large versions with clear step-by-step rounds, shaping instructions using a glue-and-water mix, and helpful tips for a neat finish. You will love how quickly the starfish takes shape and how customizable the design is with different cotton yarns and hook sizes.

Intermediate 2-3 Hours

Materials Needed for Starfish Amigurumi Pattern

β€” Main Fabric

  • 01
    100% cotton yarn, example: Madame Tricote "Camilla" (100% cotton, 50g = 125m)
  • 02
    Other suitable cotton yarns: Kartopu "Organica", Anchor "Creativa Fino", Schachenmayr "Catania" (50g skeins with similar yardage)
  • 03
    Small amounts of yarn in accent or contrasting colors (optional)
  • 04
    White glue (PVA) for shaping
  • 05
    Water for glue mixture

β€” Tools Required

  • 01
    Crochet hook size 1.5 mm (recommended)
  • 02
    Alternative small hooks: 1.75 mm or 2.00 mm if needed for comfort
  • 03
    Scissors
  • 04
    Needle to weave in ends (tapestry/yarn needle)
  • 05
    Stitch markers (to mark rounds)
  • 06
    Rubber gloves (optional, for shaping with glue)
  • 07
    Small bowl or cup for mixing glue and water
  • 08
    Towel for drying shaped starfish

Progress Tracker

0% Complete

β€” Thin starfish :

Round 1 :

5 sc in a magic ring (5)

Round 2 :

2 sc in each st (10)

Round 3 :

* ch 15, sl st in 2nd ch from hook, sl st in next, sc in next 3 sts, hdc in next 4 sts, dc in last 5 sts; skip next sc of rnd 2 and sl st in next; repeat from * 4 more times;

Round 4 :

sc in each st all around skipping only last and first sts of each arm (see photos below)

Round 5 :

sl st in each st all around.

Info :

Fasten off and weave in yarn ends.

β€” Large starfish :

Round 1 :

5 sc in a magic ring (5)

Round 2 :

2 sc in each st (10)

Round 3 :

* ch 15, sl st in 2nd ch from hook, sl st in next, sc in next 3 sts, hdc in next 4 sts, dc in last 5 sts; skip next sc of rnd 2 and sl st in next; repeat from *4 more times;

Round 4 :

sc in each st all around skipping only last and first sts of each arm

Round 5 :

sc in each st all around

Round 6 :

sl st in each st all around.

Info :

Fasten off and weave in yarn ends.

β€” Shaping the starfish :

Info :

In a cup mix 2 parts of water with 1 part of glue.

Info :

Immerse the crocheted starfish into the glue and water mixture (wear rubber gloves if necessary) until it’s fully wet.

Info :

Carefully squeeze out excess glue-water mix.

Info :

Start shaping it by gently pulling at legs of the starfish and pinching them slightly together and giving it a desired shape.

Info :

For thin starfish I used the β€œwrong” side of crochet as an outside of the fish. For large starfish use β€œright” side.

Info :

Continue until you are satisfied with the shape.

Info :

Leave it to dry on a towel.

Assembly Instructions

  • Fasten off each starfish and weave in all yarn ends before wet shaping to prevent unraveling during handling.
  • Mix 2 parts water with 1 part white glue in a cup, then fully immerse the crocheted starfish until completely wet to prepare for shaping.
  • Gently squeeze out excess glue mixture and begin shaping by pulling and pinching each arm to the desired form; work symmetrically so the arms match.
  • Place shaped starfish on a towel to dry flat; allow it to dry completely before handling further or embellishing.
  • Use the wrong side out for the thin starfish to achieve the desired texture, and the right side out for the large starfish when shaping.

Important Notes

  • πŸ’‘Use a very small hook (1.5 mm recommended) for neat, dense stitches and a tidy final shape.
  • πŸ’‘Work with 100% cotton yarns of similar yardage (50g = ~125m) for best shaping results when using the glue method.
  • πŸ’‘Use stitch markers to mark the beginning of each round; this helps keep arms evenly placed and prevents lost stitches.
  • πŸ’‘Wear rubber gloves if you have sensitive skin when working with the glue-and-water mixture for shaping.

This starfish pattern is a charming and compact crochet project you can finish in an afternoon. 🧢 Experiment with colors and sizes to create a set for beach-themed decor or sweet handmade gifts. 🐚 I hope this pattern brings you as much joy making it as I had designing it! ✨

You ask,

we answer.

FAQs

What size will the finished piece be?

Size depends on yarn and hook: with the recommended 1.5 mm hook and 100% cotton (50g = 125m) the thin starfish is small and the large starfish is slightly bigger; exact dimensions vary by tension.

Can I use different yarn weights for this pattern?

Yes, you can, but switching yarn weight will change the final size and texture; use an appropriately larger hook for thicker yarns and expect a chunkier, less sculpted result.

Do I need prior crochet experience for this pattern?

This pattern is rated intermediate because it involves shaping and very small hooks; basic knowledge of single crochet, half double crochet, double crochet, chains, and slip stitch is recommended.

How do I shape the starfish and make it hold its form?

Mix 2 parts water with 1 part white glue, immerse the starfish, squeeze out excess, then shape the arms by pulling and pinching; leave to dry on a towel until fully set.