About This Stanley the Strawberry Amigurumi Pattern
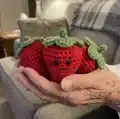
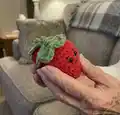
This pattern creates a tiny, hand-held strawberry amigurumi named Stanley, about 2.5" high when completed. It features simple continuous-round shaping, a decorative top with five leaves, an embroidered mouth, and an optional tiny stem. Designed to be quick to make, it uses worsted weight yarn and basic crochet stitches to produce a charming mini gift or keychain-sized friend.

Perfect for beginners who know the basics—magic ring, single crochet, increases and decreases. The pattern includes finishing notes to close the top neatly and positioning tips for safety eyes or embroidery.
Why You'll Love This Stanley the Strawberry Amigurumi Pattern
I absolutely love this pattern because it turns simple stitches into a tiny character full of personality. I enjoy how quickly a finished strawberry comes together, making it perfect for gifting or last-minute handmade presents. The leaf-top detail and tiny stem give you room to add personal flair and color choices. Sewing and finishing are satisfying and quick, so you can make several in different hues to create a sweet collection.
Switch Things Up
I love customizing this tiny strawberry by switching colors; try peach or pink for a sweet pastel version.
I often use thinner yarn and a smaller hook to make an even tinier keychain-friendly strawberry.
If you want a chunkier, cuddlier look I use bulky yarn and a larger hook for a plush version.
I like to replace safety eyes with embroidered eyes for a softer, baby-safe toy.
To add character, I stitch tiny freckles or seeds using a contrasting color and French knots or small embroidered stitches.
I sometimes make a set in varying sizes and arrange them in a small basket as a handmade gift set.
For a festive touch, I change the leaf color to a sparkly yarn or add a small bead to the stem loop for hanging.
I like to experiment with different stitch textures on the body—try alternating BLO and FLO rounds for subtle ribbing.
I also add a thin wire inside the stem when I want it to be posable; wrap the wire in yarn before inserting for safety.
Try making a hybrid fruit by changing the top leaf shape or stitch pattern to resemble a different berry or fruit.
If you want to personalize gifts, embroider initials or tiny motifs onto the back of the strawberry before final assembly.
I recommend testing one idea at a time so you can note what changes affect size and shape most, and enjoy making each strawberry unique.
Common Mistakes & How to Fix Them
✗ Not marking the beginning of rounds can cause missed increases or decreases; place a stitch marker at the start of each round to maintain accurate stitch counts.
✗ Joining rounds with a slip stitch breaks the continuous-round shaping and leaves a visible seam; work in continuous rounds and do not join with a slst as instructed.
✗ Forgetting to stuff as you go results in awkward shaping and lumps; stuff gradually while crocheting to maintain a smooth, even shape.
✗ Placing safety eyes too close or too far apart changes the expression of the strawberry; insert the safety eyes between rounds 8 & 9 approximately 1 stitch apart as suggested.