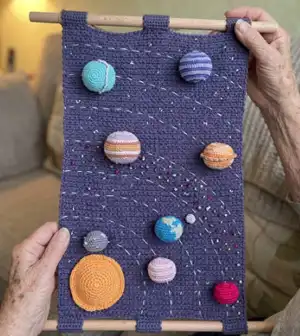
Create a charming solar system wall hanging with crocheted planets and a textured starry background. This pattern guides you step-by-step through crocheting the base, individual planets (circle + hemisphere), and finishing touches like beads, Velcro rings and sewn-on planets. Perfect for a nursery, classroom or science-themed decor, this project combines simple amigurumi techniques with colorwork and assembly for a delightful handmade display.
Progress Tracker
0% Complete
— Terms and abbreviations :
Info :
MR - magic ring. ch - chain. sc - single crochet. sl st - slip stitch. inc- increase (2 stitches in a stitch). dec- decrease (2 stitches crocheted together). t-ch - turning chain. (...) *n – repeat n times (n – number). (number) – number of stitches in the round.
— The base :
Info :
Work in back and forth rows with a 3.0 mm crochet hook. Begin each row with a turning chain.
Round 1 :
Chain 65, start working in the 3rd chain from hook: 63 sc, turn (63)
Round 2-107 :
1 t-ch, 63 sc, turn (63)
Info :
The finished wall hanging using the materials stated in this pattern is 28*42 cm. (The width and size could be different due to the different crochet density.)
Item Name (Loops P1) :
To attach the crocheted piece to your branch/wooden stick, you will need to crochet the loops. Make three loops from above, below, in the center, and on the edges. If you use the wooden stick of a similar diameter, then work as follows: 1. 9 sc, turn (9). 2-11. 1 t-ch, 9 sc, turn (9). Leave a long yarn tail for sewing.
Info :
If you use a branch of a different diameter, then make the required number of rows. Try on if needed. Do not sew now. Complete assembling the base.
— Earth :
Info :
For each planet, you need to crochet two parts - a circle and a hemisphere. Crochet in continuous spirals without a turning chain. Use a 1.5 mm hook.
Round 1 :
8 sc into MR (8)
Round 3 :
(1 sc, inc)*8 (24)
Round 4 :
(3 sc, inc)*6 (30)
Round 5 :
(2 sc, inc, 2 sc)*6 (36)
Round 6 :
(5 sc, inc)*6 (42)
Round 7 :
(3 sc, inc, 3 sc)*6 (48)
Info :
Leave a long tail for sewing.
Item Name (Hemisphere) :
Work the hemisphere in back and forth rows. Begin each row with a turning chain. See how to change colors on page 5. Carry all yarns on the wrong side. Begin with white color yarn.
Round 1 :
4 sc into MR, pull the ring and turn (4)
Round 2 :
1 t-ch, inc*4, turn (8)
Round 3 :
White color: 1 t-ch, (1 sc, inc)*2. Light blue color: (1 sc, inc)*2, turn (12). Break white yarn. Continue crocheting with light blue yarn.
Round 4 :
1 t-ch, (3 sc, inc)*3, turn (15)
Round 5 :
1 t-ch, (2 sc, inc, 2 sc)*3, turn (18)
Round 6 :
Light blue color: 1 t-ch, 5 sc, hold yarn BEHIND the work. Green color: 1 inc, hold the yarn BEHIND the work. Light blue color: (5 sc, inc)*2, turn (21)
Round 7 :
Light blue color: 1 t-ch, (3 sc, inc, 3 sc)*2, 1 sc, hold yarn IN FRONT OF work. Green color: 1 sc, inc, hold yarn IN FRONT OF work. Light blue color: 4 sc, turn (24)
Round 8 :
Light blue color: 1 t-ch, 4 sc, hold yarn BEHIND the work. Green color: 4 sc, hold yarn BEHIND the work. Light blue color: 16 sc, turn (24)
Round 9 :
Light blue color: 1 t-ch, 16 sc, hold yarn IN FRONT OF work. Green color: 4 sc, hold yarn IN FRONT OF work. Light blue color: 4 sc, turn (24)
Round 10 :
Light blue color: 1 T-CH, 3 sc, hold yarn BEHIND work. Green color: 5 sc, hold yarn BEHIND work. Light blue color: 16 sc, turn (24)
Round 11 :
Light blue color: 1 T-CH, 15 sc, hold yarn IN FRONT OF work. Green color: 6 sc, hold yarn IN FRONT OF work. Light blue color: 3 sc, turn (24)
Round 12 :
Light blue color: 1 T-CH, 3 sc, hold yarn BEHIND work. Green color: 8 sc, hold yarn BEHIND work. Light blue color: 13 sc, turn (24)
Round 13 :
Light blue color: 1 T-CH, 13 sc, hold yarn IN FRONT OF work. Green color: 8 sc, hold yarn IN FRONT OF work. Light blue color: 3 sc, turn (24)
Round 14 :
Light blue color: 1 T-CH, 4 sc, hold yarn BEHIND work. Green color: 5 sc, hold yarn BEHIND work. Light blue color: 15 sc, turn (24)
Round 15 :
Light blue color: 1 T-CH, 13 sc, hold yarn IN FRONT OF work. Green color: 2 sc, hold yarn IN FRONT OF work. Light blue color: 2 sc, hold yarn IN FRONT OF work. Green color: 3 sc, hold yarn IN FRONT OF work. Light blue color: 4 sc, turn (24)
Round 16 :
Light blue color: 1 T-CH, 6 sc, dec, 2 sc, hold yarn BEHIND work. Green color: 3 sc, hold yarn BEHIND work. Light blue color: 1 sc, dec, 6 sc, dec, turn (21)
Round 17 :
Light blue color: 1 T-CH, 3 sc, dec, 3 sc, hold yarn IN FRONT OF work. Green color: 5 sc, hold yarn IN FRONT OF work. Light blue color: 1 sc, dec, 2 sc, dec, 1 sc, turn (18)
Round 18 :
Light blue color: 1 T-CH, 4 sc, hold yarn BEHIND work. Green color: 1 sc, dec, 4 sc, dec, 1 sc, hold yarn BEHIND work. Light blue color: 2 sc, dec, turn (15)
Round 19 :
Green color: 1 T-CH, sc, hold yarn IN FRONT OF work. Light blue color: 1 sc, hold yarn IN FRONT OF work. Green color: dec, 2 sc, dec, 3 sc, hold yarn IN FRONT OF work. Light blue color: dec, 2 sc, turn (12)
Round 20 :
Light blue color: 1 T-CH, 2 sc, hold yarn BEHIND work. Green color: dec, (1 sc, dec)*2, dec, turn (8). Break green color yarn.
Round 21 :
1 t-ch, dec*4 (4)
Round 22 :
sc 4 cluster (pull loops). Break yarn, and secure the tail.
Info :
Put some stuffing material in the hemisphere. Sew the parts to each other. Glue / sew Velcro (I glued the soft half, and I will glue the sharp half to the base).
— Mercury :
Info :
The smallest and closest planet to the Sun. Use gray yarn, crochet hook 1.5 mm.
Round 1 :
8 sc into a MR (8)
Round 3 :
(1 sc, inc)*8 (24)
Round 4 :
(3 sc, inc)*6 (30)
Round 5 :
(2 sc, inc, 2 sc)*6 (36)
Info :
Cut yarn. Leave a long tail for sewing.
Item Name (Hemisphere) :
Hemisphere, work in back and forth rows.
Round 1 :
4 sc into a MR, turn (4)
Round 2 :
1 t-ch, inc*4, turn (8)
Round 3 :
1 t-ch, (1 sc, inc)*4, turn (12)
Round 4 :
1 t-ch, (3 sc, inc)*3, turn (15)
Round 5 :
1 t-ch, (2 sc, inc, 2 sc)*3, turn (18)
Round 6-11 :
6 rows: 1 t-ch, 18 sc, turn (18)
Round 12 :
1 t-ch, (4 sc, dec)*3, turn (15)
Round 13 :
1 t-ch, (1 sc, dec, 2 sc)*3, turn (12)
Round 14 :
1 t-ch, (dec, 1 sc)*4, turn (8)
Round 15 :
1 t-ch, dec*4, turn (4)
Round 16 :
sc 4 cluster (pull the loops). Cut off the yarn and secure it. Sew the Velcro to the circle. Stuff with fiberfill. Sew the parts together.
— Venus :
Info :
Venus is the second planet from the Sun. Very hot, with a dense atmosphere. Use VITA cotton COCO Print or variegated yarn.
Round 1 :
8 sc into a MR (8)
Round 3 :
(1 sc, inc)*8 (24)
Round 4 :
(3 sc, inc)*6 (30)
Round 5 :
(2 sc, inc, 2 sc)*6 (36)
Round 6 :
(5 sc, inc)*6 (42)
Round 7 :
(3 sc, inc, 3 sc)*6 (48)
Info :
Cut yarn. Leave a long tail for sewing.
Item Name (Hemisphere) :
Hemisphere, work in back and forth rows.
Round 1 :
4 sc into a MR, turn (4)
Round 2 :
1 t-ch, inc*4, turn (8)
Round 3 :
1 t-ch, (1 sc, inc)*4, turn (12)
Round 4 :
1 t-ch, (3 sc, inc)*3, turn (15)
Round 5 :
1 t-ch, (2 sc, inc, 2 sc)*3, turn (18)
Round 6 :
1 t-ch, (5 sc, inc)*3, turn (21)
Round 7 :
1 t-ch, (3 sc, inc, 3 sc)*3, turn (24)
Round 8-15 :
8 rows: 1 t-ch, 24 sc, turn (24)
Round 16 :
1 t-ch, (6 sc, dec)*3, turn (21)
Round 17 :
1 t-ch, (2 sc, dec, 3 sc)*3, turn (18)
Round 18 :
1 t-ch, (4 sc, dec)*3, turn (15)
Round 19 :
1 t-ch, (1 sc, dec, 2 sc)*3, turn (12)
Round 20 :
1 t-ch, (dec, 1 sc)*4, turn (8)
Round 21 :
1 t-ch, dec*4, turn (4)
Round 22 :
sc 4 cluster (pull the loops). Cut off the yarn and secure. Sew the velcro to the circle. Stuff with fiberfill. Sew the parts together.
— Mars :
Info :
The "red" planet contains a lot of iron. Use red shades; alternate yarn in two shades of red if desired.
Round 1 :
8 sc into a MR (8)
Round 3 :
(1 sc, inc)*8 (24)
Round 4 :
(3 sc, inc)*6 (30)
Round 5 :
(2 sc, inc, 2 sc)*6 (36)
Round 6 :
(5 sc, inc)*6 (42)
Info :
Cut yarn. Leave a long tail for sewing.
Item Name (Hemisphere) :
Hemisphere, work in back and forth rows. Alternate yarn in two shades of red if desired.
Round 1 :
4 sc into a MR, turn (4)
Round 2 :
1 t-ch, inc*4, turn (8)
Round 3 :
1 t-ch, (1 sc, inc)*4, turn (12)
Round 4 :
1 t-ch, (3 sc, inc)*3, turn (15)
Round 5 :
1 t-ch, (2 sc, inc, 2 sc)*3, turn (18)
Round 6 :
1 t-ch, (5 sc, inc)*3, turn (21)
Round 7-13 :
7 rows: 1 t-ch, 21 sc, turn (21)
Round 14 :
1 t-ch, (2 sc, dec, 3 sc)*3, turn (18)
Round 15 :
1 t-ch, (4 sc, dec)*3, turn (15)
Round 16 :
1 t-ch, (1 sc, dec, 2 sc)*3, turn (12)
Round 17 :
1 t-ch, (dec, 1 sc)*4, turn (8)
Round 18 :
1 t-ch, dec*4, turn (4)
Round 19 :
sc 4 cluster (pull the loops). Cut off the yarn and secure it. Sew the velcro to the circle. Stuff with fiberfill. Sew the parts together.
— Jupiter :
Info :
Jupiter is the largest planet in the solar system. Use variegated/banded colors to create stripes.
Round 1 :
8 sc into a MR (8)
Round 3 :
(1 sc, inc)*8 (24)
Round 4 :
(3 sc, inc)*6 (30)
Round 5 :
(2 sc, inc, 2 sc)*6 (36)
Round 6 :
(5 sc, inc)*6 (42)
Round 7 :
(3 sc, inc, 3 sc)*6 (48)
Round 8 :
(7 sc, inc)*6 (54)
Round 9 :
(4 sc, inc, 4 sc)*6 (60)
Info :
Cut yarn. Leave a long tail for sewing.
Item Name (Hemisphere) :
Work in back and forth rows. Gray color and alternating stripes as desired.
Round 1 :
4 sc into a MR, turn (4)
Round 2 :
1 t-ch, inc*4, turn (8)
Round 3 :
1 t-ch, (1 sc, inc)*4, turn (12)
Round 4 :
1 t-ch, (3 sc, inc)*3, turn (15)
Round 5 :
1 t-ch, (2 sc, inc, 2 sc)*3, turn (18)
Round 6 :
1 t-ch, (5 sc, inc)*3, turn (21)
Round 7 :
1 t-ch, (3 sc, inc, 3 sc)*3, turn (24)
Round 8 :
1 t-ch, (7 sc, inc)*3, turn (27)
Round 9 :
White color: 1 t-ch, (4 sc, inc, 4 sc)*3, turn (30)
Round 10-11 :
Brown color: 1 t-ch, 30 sc, turn (30)
Round 12-14 :
Yellow color: 1 t-ch, 30 sc, turn (30)
Round 15 :
Gray color: 1 t-ch, 30 sc, turn (30)
Round 16 :
White color: 1 t-ch, 30 sc, turn (30)
Round 17 :
Yellow color: 1 t-ch, 30 sc, turn (30)
Round 18-19 :
Brown color: 1 t-ch, 30 sc, turn (30)
Round 20 :
Brown color: 1 t-ch, (4 sc, dec, 4 sc)*3, turn (27)
Round 21 :
Gray color: 1 t-ch, (7 sc, dec)*3, turn (24)
Round 22 :
1 t-ch, (6 sc, dec)*3, turn (21)
Round 23 :
1 t-ch, (2 sc, dec, 3 sc)*3, turn (18)
Round 24 :
1 t-ch, (4 sc, dec)*3, turn (15)
Round 25 :
1 t-ch, (1 sc, dec, 2 sc)*3, turn (12)
Round 26 :
1 t-ch, (dec, 1 sc)*4, turn (8)
Round 27 :
1 t-ch, dec*4, turn (4)
Round 28 :
sc 4 cluster (pull the loops). Cut off the yarn and secure. Sew the velcro to the circle. Stuff with fiberfill. Sew the parts together.
— Neptune, Uranus, Saturn :
Info :
Neptune is far and cold, Uranus is icy, Saturn has rings. I crocheted these three giant planets according to one description; colors and ring details vary. For Saturn use melange yellow yarn and beads for rings.
Round 1 :
8 sc into a MR (8)
Round 3 :
(1 sc, inc)*8 (24)
Round 4 :
(3 sc, inc)*6 (30)
Round 5 :
(2 sc, inc, 2 sc)*6 (36)
Round 6 :
(5 sc, inc)*6 (42)
Round 7 :
(3 sc, inc, 3 sc)*6 (48)
Round 8 :
(7 sc, inc)*6 (54). Cut yarn. Leave a long tail for sewing.
Item Name (Hemisphere) :
Work in back and forth rows. Use the sequence below for hemisphere shaping.
Round 1 :
4 sc into a MR, turn (4)
Round 2 :
1 t-ch, inc*4, turn (8)
Round 3 :
1 t-ch, (1 sc, inc)*4, turn (12)
Round 4 :
1 t-ch, (3 sc, inc)*3, turn (15)
Round 5 :
1 t-ch, (2 sc, inc, 2 sc)*3, turn (18)
Round 6 :
1 t-ch, (5 sc, inc)*3, turn (21)
Round 7 :
1 t-ch, (3 sc, inc, 3 sc)*3, turn (24)
Round 8 :
1 t-ch, (7 sc, inc)*3, turn (27)
Round 9-17 :
1 t-ch, 27 sc, turn (27)
Round 18 :
1 t-ch, (7 sc, dec)*3, turn (24)
Round 19 :
1 t-ch, (6 sc, dec)*3, turn (21)
Round 20 :
1 t-ch, (2 sc, dec, 3 sc)*3, turn (18)
Round 21 :
1 t-ch, (4 sc, dec)*3, turn (15)
Round 22 :
1 t-ch, (1 sc, dec, 2 sc)*3, turn (12)
Round 23 :
1 t-ch, (dec, 1 sc)*4, turn (8)
Round 24 :
1 t-ch, dec*4, turn (4)
Round 25 :
sc 4 cluster (pull the loops). Cut off the yarn and secure. Sew the velcro to the circle. Stuff with fiberfill. Sew the parts together.
Info :
For the rings of Uranus and Saturn you will need beads. Put the bead onto the mono-thread using the beading needle (I used light shades beads). Sew the ring to Uranus vertically. For Saturn, sew beads horizontally. You can also use wooden beads and string them around the planet as a ring.
— Moon :
Info :
The Moon is the only natural satellite of the earth. Use gray yarn and a 1.5 mm crochet hook.
Round 1 :
8 sc into a MR (8)
Info :
Cut yarn. Leave a long tail for sewing. Sew velcro to the circle and hemisphere, stuff, and join parts.
This Solar System wall hanging is a joyful handmade accent that brings the planets into your home with yarny charm. It combines amigurumi planets with a textured base and fun details like bead rings for Saturn and embroidered stars. Make it as a gift, classroom project, or cozy nursery decor — it is playful, educational, and full of handmade love. 🪐✨🧶