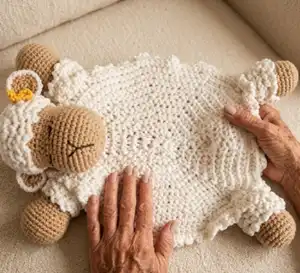
Make a cuddly sheep security blanket that doubles as a soft toy and lovey. This pattern guides you through each round for the blanket body, head, ears, feet, tail and a tiny bow so you can create a charming handmade gift. Clear step-by-step instructions and helpful assembly notes make the process enjoyable whether you are making it for a baby or as a keepsake.
Progress Tracker
0% Complete
— Body or Blanket :
Info :
The whole piece is crocheted on the back loop
Round 1 :
start with a magic ring, ch 1 and 11 hdc, close with sl st (12 hdc)
Round 2 :
ch 2, 1 hdc in the same stitch, hdc inc in the next 11 stitches, close with sl st (24hdc)
Round 3 :
ch 2, 1 inc of hdc, *1hdc, 1inc in the next stitch*, close with sl st (36 hdc)
Round 4 :
ch 2, 1 hdc, 1 inc, *2 hdc, 1 inc in the next stitch*, close with sl st (48 hdc)
Round 5 :
ch 2, 2 hdc, 1 inc, *3 hdc, 1 inc in the next stitch*, close with sl st (60 hdc)
Round 6 :
ch 2, 3 hdc, 1 inc, *4 hdc, 1 inc in the next stitch*, close with sl st (72 hdc)
Round 7 :
ch 2, 4 hdc, 1 inc, *5 hdc, 1 inc in the next stitch*, close with sl st (84 hdc)
Round 8 :
ch 2, 5 hdc, 1 inc, *6 hdc, 1 inc in the next stitch*, close with sl st (96 hdc)
Round 9 :
ch 2, 6 hdc, 1 inc, *7 hdc, 1 inc in the next stitch*, close with sl st (108 hdc)
Round 10 :
ch 2, 7 hdc, 1 inc, *8 hdc, 1 inc in the next stitch*, close with sl st (120 hdc)
Info :
Keep crocheting with this frequency until you have 22cm of diameter.
Info :
On the rounds where the loops remained unworked, keep working below the first free loop, in the center of the beginning, to make the curls. Make 5 ch, 1 sl st in the next stitch and make 5 ch, 1 sl st again in all the loops, all the rounds.
— Head :
Round 1 :
6 sc in a magic ring (6)
Round 3 :
1 sc, 1 inc (18)
Round 4 :
2 sc, 1 inc (24)
Round 5 :
3 sc, 1 inc (30)
Round 6 :
4 sc, 1 inc (36)
Round 7 :
5 sc, 1 inc (42)
Round 8 :
6 sc, 1 inc (48)
Round 9-14 :
48 sc (6 rounds) (48)
Round 15 :
6 sc, 1 dec (42)
Round 16 :
5 sc, 1 dec (36)
Round 18 :
5 sc, 1 inc (42)
Round 19 :
6 sc, 1 inc (48)
Round 21 :
change colour to white and make all the next rounds on BLO, repeat 48 sc
Round 22-26 :
48 sc (5 rounds) (48)
Round 27 :
6 sc, 1 dec (42)
Round 28 :
5 sc, 1 dec (36)
Round 29 :
4 sc, 1 dec (30)
Round 30 :
3 sc, 1 dec (24)
Round 31 :
2 sc, 1 dec (18) Start stuffing
Round 32 :
1 sc, 1 dec (12)
Info :
Close the opening with a tapestry needle.
Info :
On the rounds where the loops remain unworked, make 3 ch, 1 sl st, as you did with the blanket part, working from top to bottom.
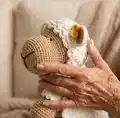
— Embroidering the Eyes and Nose :
Info :
With black embroidery thread, make a V shaped nose with the edges on rnd 8, 4 stitches apart, and the base on rnd 6. Then make a small vertical line of 2 stitches, starting on the base of the nose and going down.
Info :
Embroider the eyes on rnd 14, each eye taking up 3 stitches. The distance between each eye is also 3 stitches. Then embroider the eyelashes as seen in the picture below.
— Ears :
Info :
It's 2 pieces for each ear. 1 piece in white, 1 piece in beige.
Round 1 :
6 sc in a magic ring (6)
Round 3 :
1 sc, 1 inc (18)
Info :
With white yarn, join the 2 pieces, making 2 sc, 1 inc (24)
— Front Feet :
Round 1 :
6 sc in a magic ring (6)
Round 3 :
1 sc, 1 inc (18)
Round 4 :
2 sc, 1 inc (24)
Round 5 :
3 sc, 1 inc (30)
Round 6 :
4 sc, 1 inc (36)
Round 7-10 :
36 sc (4 rounds) (36)
Round 11 :
4 sc, 1 dec (30)
Round 12 :
3 sc, 1 dec (24)
Round 13-15 :
24 sc (3 rounds) (24)
Round 16 :
change to white color, 24 sc BLO (24)
Round 17-18 :
24 sc (2 rounds) (24) Start stuffing
Round 19 :
2 sc, 1 dec (18)
Round 20 :
1 sc, 1 dec (12)
Info :
Close the opening with a tapestry needle.
Info :
On the rounds where the loops remain unworked, make 3 ch, 1 sl st, as you did with the blanket part, working from top to bottom.
— Back Feet :
Round 1 :
6 sc in a magic ring (6)
Round 3 :
1 sc, 1 inc (18)
Round 4 :
2 sc, 1 inc (24)
Round 5-9 :
24 sc (5 rounds) (24)
Round 10 :
change to color white 24 sc BLO
Round 11-12 :
24 sc (2 rounds) (24)
Round 13 :
2 sc, 1 dec (18) Start stuffing
Round 15 :
1 sc, 1 dec (12)
Info :
Close the opening with a tapestry needle.
Info :
On the rounds where the loops remain unworked, make 3 ch, 1 sl st, as you did with the blanket part, working from top to bottom.
— Tail :
Round 1 :
6 sc in a magic ring (6)
Round 3-4 :
12 sc (2 rounds) (12)
Info :
On the rounds where the loops remain unworked, make 3 ch, 1 sl st, as you did with the blanket part, working from top to bottom.
— Little Bow :
Info :
With light cotton yellow yarn, hook size 1mm
Instruction :
Magic ring, ch 4, 3 tr, ch 4, 1 sl st inside the magic ring, ch 4, 3 tr, ch 4, 1 sl st inside the magic ring. Adjust the magic ring and leave a long tail to tie the center of the bow.
— Assembly :
Info :
Sew the head and the 4 legs on the edges of the blanket, on the top side where you made the curls.
Info :
On the 6th round of the blanket, sew the tail.
This adorable Sheep Security Blanket is a thoughtful handmade keepsake that combines a soft lovey with a sweet amigurumi friend. The textured back-loop rounds create a curly edge that looks just like fluffy wool. Perfect as a gift or a comforting companion for little ones. 🐑🧶