🧢 Beautiful ✨ Detailed πŸ’ Adorable

Woof the Dog Amigurumi Pattern

Woof the Dog Amigurumi Pattern
4.7β˜… Rating
5-7 Hours Time Needed
2.8K Made This
βœ‚οΈ

Intermediate Level

Ideal for those with basic crochet experience, featuring slightly more advanced stitches and techniques to expand your skills.

⏱️

Weekend Treat

Takes 5-7 hours, making it an enjoyable project to finish over a couple of days.

🧸

Cute Companion

An adorable friend to cherish, handcrafted with love to bring comfort and joy for years to come.

About This Woof the Dog Amigurumi Pattern

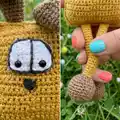
This pattern creates a stretchy little dog with long, elastic arms and legs and a soft square body. It uses simple amigurumi techniques with a clever assembly that lets limbs slide and stretch. The toy measures approximately 30 cm from ears to feet when made with the recommended yarn.

Woof the Dog Amigurumi Pattern crochet pattern - detailed view of completed project

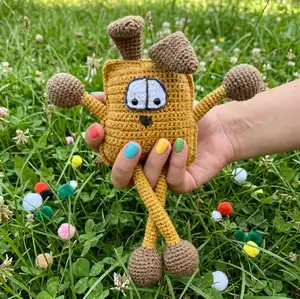
Includes step-by-step rounds for eyes, ears, limbs and the body plus assembly and decoration instructions. Photos in the pattern help you position parts and embroider facial features accurately.

Why You'll Love This Woof the Dog Amigurumi Pattern

I absolutely love this pattern because it turns basic crochet stitches into a playful, tactile toy that kids adore. I enjoy how the stretchy limbs add movement and interactive play to a classic amigurumi shape. The construction is satisfying β€” you crochet flat body panels and then join them to create a neat, boxy character. The design is versatile so you can easily change colors or facial expressions to create endless personalities.

Woof the Dog Amigurumi Pattern step 1 - construction progress Woof the Dog Amigurumi Pattern step 2 - assembly progress Woof the Dog Amigurumi Pattern step 3 - details and accessories Woof the Dog Amigurumi Pattern step 4 - final assembly and finishing

Switch Things Up

I love how easily this design can be customized by changing yarn colors; try soft pastels for a baby-friendly toy or bright contrasts for a playful look.

I often swap the recommended yarn for a slightly bulkier weight and a larger hook to make a chunkier, cuddlier version of this dog.

For a tiny keychain version, use sport or fingering weight yarn and a 2.0 mm hook and reduce the body rows to make a pocket-sized friend.

I sometimes replace safety eyes with embroidered eyes for a fully baby-safe toy or to give an expressive handmade look.

Try adding tiny crocheted props like a scarf, bow, or small felt patch for personality β€” these little extras make great gifts.

I experiment with ear shapes by elongating or shortening the ear rounds to change the character from perky to floppy.

You can embroider different mouth shapes and nose sizes to create various expressions from surprised to sleepy or silly.

I like to add a loop inside the top seam so the toy can be hung as decor or clipped to a stroller β€” useful and decorative.

To make limbs poseable, consider inserting a thin craft wire inside the limb tube before stuffing; this adds posability but is not recommended for toys intended for very young children.

If you want a plushier body, add an inner lining of fleece or an extra layer of stitches before stuffing to change the texture and firmness.

Swap the brown and gold color placement to invert the palette and give your dog a whole new personality with the exact same pattern instructions.

Common Mistakes & How to Fix Them

βœ— Skipping stitch markers at the start of each row can cause lost stitch counts; place a marker to mark your first stitch and move it every row to stay accurate. βœ— Overstuffing the head or limbs makes the toy look misshapen and stiff; stuff gradually and evenly, adding small amounts until you reach a firm but pliable shape. βœ— Forgetting to insert safety eyes at the specified rows results in relocated features; install safety eyes between the indicated rows before closing or continuing to avoid rework. βœ— Not stitching through both body panels when joining will leave gaps or misaligned edges; hold both panels together carefully and work the specified SC through both parts for a secure seam. βœ— Changing tension between the gold body and brown limbs can produce uneven joins; maintain consistent, moderate tension and check gauge visually as you join parts. βœ— Cutting yarn tails too short when finishing pieces makes sewing difficult; leave long yarn tails for sewing and weaving to secure parts neatly.

Woof the Dog Amigurumi Pattern

Make a playful, stretchy dog toy that delights children and encourages fine motor skills. This amigurumi features unique stretchable limbs and a squishy square body, perfect for hugging and imaginative play. Clear, photo-assisted instructions guide you through each piece so you can enjoy a satisfying crochet build. Ideal for gifting or keeping as a charming handmade companion.

Intermediate 5-7 Hours

Materials Needed for Woof the Dog Amigurumi Pattern

β€” Main Fabric

  • 01
    YarnArt Jeans 50gr/160 m; 55% cotton, 45% acrylic; Shade 40 (brown)
  • 02
    YarnArt Jeans 50gr/160 m; 55% cotton, 45% acrylic; Shade 28 (black)
  • 03
    YarnArt Jeans 50gr/160 m; 55% cotton, 45% acrylic; Shade 84 (gold)
  • 04
    YarnArt Jeans 50gr/160 m; 55% cotton, 45% acrylic; Shade 03 (white)
  • 05
    Small amounts of black and white for eyes and facial details
  • 06
    Fiber filler / polyester stuffing (amount as needed for stuffing limbs and body)

β€” Tools Required

  • 01
    Crochet hook size 2 mm
  • 02
    Crochet hook size 3 mm
  • 03
    Fiber filler / polyester stuffing
  • 04
    Safety eyes 8 mm (2 pieces)
  • 05
    Scissors
  • 06
    Large-eye yarn/sewing needle
  • 07
    Stitch markers
  • 08
    Pins for assembly (optional)

Progress Tracker

0% Complete

β€” Supplies :

Info :

2- and 3-mm hooks. Yarn: YarnArt Jeans 50gr/160 m; 55% cotton; 45% acrylic: shades: 40 (brown), 28 (black), 84 (gold), 03 (white). Fiber filler. 8 mm safety eyes. Scissors, large eye needle, markers if necessary.

β€” Abbreviations :

Infos :

MR – magic/amigurumi ring. CH – (turning) chain. DEC - decrease. INC - increase. SC – single crochet. SL ST – slip stitch. (...) *n - repeat n times the sequence in brackets. (...) – number of stitches in a row/rnd. The finished toy size from the recommended materials is 30 cm from ears to feet. Please note: this pattern does not contain crocheting lessons. You should master basic crocheting skills to create this toy.

β€” Eyes (make 2) :

Info :

Begin crocheting in white with 2 mm hook. Chain 10, and starting into the 2nd stitch from hook work 9 SC. Make 1 turning CH at the end of each row.

Round 1 - 3 :

3 rows straight: 9 SC.

Round 4 :

1 SC, DEC, 3 SC, DEC, 1 SC (7)

Round 5 :

1 SC, DEC, 1 SC, DEC, 1 SC (5)

Info :

Install safety eyes between rows 2 and 3, 1 SC away from the left and right edges. Leave a long yarn tail for sewing.

β€” Arms and Legs (make 2) :

Info :

Arms and legs are crocheted in one piece. Begin crocheting in brown with 2 mm hook.

Round 1 :

6 MR (6)

Round 2 :

INC*6 (12)

Round 3 :

(1 SC, INC)*6 (18)

Round 4 :

(2 SC, INC)*6 (24)

Round 5 :

(3 SC, INC)*6 (30)

Round 6 - 9 :

4 rnds straight: 30 SC

Round 10 :

(DEC, 3 SC)*6 (24)

Round 11 :

(DEC, 2 SC)*6 (18)

Round 12 :

(DEC, 1 SC)*6 (12)

Info :

Stuff tightly.

Round 13 :

(DEC, 4 SC)*2 (10)

Info :

Switch to gold yarn. Go on crocheting. Don’t stuff the gold piece.

Round 14 - 65 :

52 rnds straight: 10 SC

Info :

Switch to black yarn.

Round 66 :

(INC, 4 SC)*2 (12)

Round 67 :

(1 SC, INC)*6 (18)

Round 68 :

(2 SC, INC)*6 (24)

Round 69 :

(3 SC, INC)*6 (30)

Round 70 - 73 :

4 rnds straight: 30 SC

Round 74 :

(DEC, 3 SC)*6 (24)

Round 75 :

(DEC, 2 SC)*6 (18)

Round 76 :

(DEC, 1 SC)*6 (12)

Info :

Stuff the piece.

Round 77 :

DEC*6. Fasten off.

β€” Ears (make 2) :

Info :

Work in brown with 2 mm hook. Don’t stuff.

Round 1 :

6 MR (6)

Round 2 :

(1 SC, INC)*3 (9)

Round 3 :

1 rnd straight: 9 SC (9)

Round 4 :

(2 SC, INC)*3 (12)

Round 5 :

(3 SC, INC)*3 (15)

Round 6 - 11 :

6 rnds straight: 15 SC

Round 12 :

(4 SC, INC)*3 (18)

Round 13 - 20 :

8 rnds straight: 18 SC

Round 21 :

(DEC, 4 SC)*3 (15)

Round 22 - 24 :

3 rnds straight: 15 SC

Round 25 :

(DEC, 3 SC)*3 (12)

Round 26 - 28 :

3 rnds straight: 12 SC

Info :

Fold in half and single crochet 6 through both edges. Leave a long yarn tail for sewing.

β€” Body (make 2) :

Info :

Work in gold with 3 mm hook. Chain 25, and starting into the 2nd stitch from hook work 24 SC. Make 1 turning CH at the end of each row.

Round 1 - 19 :

19 rnds straight: 24 SC.

Round 20 :

1 SC, DEC, 18 SC, DEC, 1 SC (22)

Round 21 :

1 rnd straight: 22 SC

Round 22 :

1 SC, DEC, 16 SC, DEC, 1 SC (20)

Round 23 - 25 :

3 rnds straight: 20 SC.

Info :

Fasten off and cut yarn.

β€” Assembly :

Infos :

Begin joining the body parts together from the right upper corner using 2 mm hook. Put the two parts together and work 19 SC through both parts’ stitches, work 2 SC to the corner stitch.

Info :

Get to the side edge. You are going to insert the arm-leg piece here. It should go between rows 11 and 15. I worked 10 SC through both parts’ stitches, then 3 SC across the front part of the body only (skip 3 stitches on the back body part), put the arm-leg piece and go on crocheting across both body parts 11 SC, 2 SC to the corner stitch.

Info :

Get to the bottom edge. 5 SC through both parts’ stitches, 3 SC across the front part only, put the arm-leg piece, 6 SC across both body parts, 3 SC across the front part only, put the second arm-leg piece, 5 SC, 2 SC to the corner stitch. Stuff the body.

Info :

Work the other side alike (11 SC across both body parts, 3 SC across the front part only, stuff the body, 10 SC through both parts’ stitches).

β€” Decoration :

Info :

Ears: Attach the ears on the back, 4 SC away from the left and right edges. I like the ears bent in the middle slightly.

Info :

Eyes: Sew on between rows 16 - 22 in the middle. Stitch around the eyes contour and in the middle as shown in the photo with black yarn.

Info :

Nose: Embroider a nose between rows 13-15 in black.

Info :

Mouth: Embroider a mouth between rows 7-8 in black.

Assembly Instructions

  • Begin joining the two gold body panels from the right upper corner with a 2 mm hook, working 19 SC through both panels and then 2 SC to the corner stitch to start a neat seam.
  • Insert the arm-leg piece between rows 11 and 15: work 10 SC through both panels, then 3 SC across the front panel only (skipping 3 stitches on the back panel), position the limb, and continue with 11 SC across both panels and 2 SC to the corner stitch.
  • At the bottom edge, work 5 SC through both panels, 3 SC across the front panel, position the second arm-leg piece, continue with 6 SC through both panels, 3 SC across the front panel, then 5 SC and 2 SC to the corner stitch, and stuff the body firmly.
  • Work the opposite side the same: 11 SC through both panels, 3 SC across the front only, stuff the body, then finish with 10 SC through both panels’ stitches to complete the joining.
  • Attach ears to the back panel 4 SC away from left and right edges. Sew eyes between rows 16 and 22, and embroider nose between rows 13-15 and mouth between rows 7-8 using black yarn for facial details.

Important Notes

  • πŸ’‘Use stitch markers to mark the beginning of each round and to keep track of row counts when joining body panels.
  • πŸ’‘Stuff limbs and body gradually and evenly β€” overstuffing can distort the shape while understuffing leaves pieces floppy.
  • πŸ’‘Pin parts in position before sewing to ensure symmetry and correct placement of limbs and ears.
  • πŸ’‘Install safety eyes before closing pieces where indicated to avoid having to reopen seams later.

This cheerful Woof the Dog pattern turns simple stitches into a stretch-and-play friend with personality. Whether you make one for a child or a cozy shelf buddy, this plushie is easy to personalize with color and facial details. Grab your yarn and hooks, and make a playful companion today! 🧢🐢

You ask,

we answer.

FAQs

What size will the finished piece be?

The finished toy measures approximately 30 cm from ears to feet when using the recommended YarnArt Jeans and the specified hook sizes.

Can I use different yarn weights for this pattern?

Yes, you can change yarn weight but the final size and stitch counts will change; adjust hook size accordingly and expect a different finished dimension.

Do I need prior crochet experience for this pattern?

This pattern is rated intermediate; you should be comfortable with magic ring, single crochet, increases and decreases, and sewing pieces together.

How long does this project typically take to complete?

Most crocheters complete this project in about 5-7 hours, though time may vary depending on experience level and how much detailing you add.

Where should I position the eyes and facial features?

Sew the eyes between rows 16 and 22 in the middle. Embroider the nose between rows 13-15 and the mouth between rows 7-8 using black yarn for contrast.