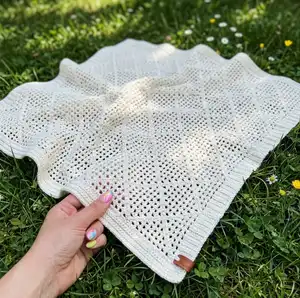
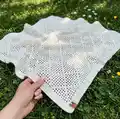
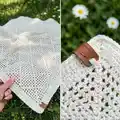
Make a light, airy baby summer blanket crocheted in a reversed filet style that emphasizes holes for a delicate look. This pattern guides you through a chainless foundation, the Pretty Turning technique, and the full filet pattern so your edges stay perfectly straight. Youll get clear swatch instructions, three size options, and blocking tips to finish a professional blanket. Perfect for gifting or keeping your little one cozy on warm days.
Progress Tracker
0% Complete
— Before getting started :
Info :
This type of crochet is called "Filet Crochet". The holes comes because you make a chain and skip 1 stitch.
Info :
In the pattern, it will be written as a filet chain (fch), which means that when you make a chain, you also skip a stitch. When you have to crochet on top of a chain, you just crochet around it.
Info :
FYI: "fch" is just a term I came up with, because it gives a much more manageable pattern. So not a term you can Google your way to :-)
Info :
Parentheses, commas and stars: Parentheses: What is in between parentheses must be multiplied by the number of times, that follows. Comma: What stands between commas, you just do as is. Star: The star is like the paranthedes. To keep the characters a part, a star is used, when there is repetitions inside a parantheses. What is between the two stars, is repeated the number of times, that is stated after the last star.
Info :
Here is an example: (A, B, *C* 2 times) 2 times = A, B, C, C, A, B, C, C
Info :
Chainless foundation with double crochet: Since the blanket is designed with a bottom in only double crochet, you start with a chainless foundation. That makes the edge so pretty, and when you’re done, it’s not possible to tell what is top, and what is bottom.
Info :
Pretty Turning: PT is a specific technique that gives completely straight edges when you turn. You make 2 single crochet on top of each other, and you therefore do not turn with the regular turning chain. This counts as the first double crochet in the row.
Info :
To watch a video on the technique: Search on www.millabilla.dk for "COMPLETELY straight edges without turning chains" or click here :-)
Info :
Diagram: Here you can see a diagram of the pattern, where it's repeated 3 times. It can help understanding the structure.
— Crochet Swatch :
Info :
START Chain 43 + 1 tch (start in 2. stitch from hook).
Round R1 :
2 pt, 2 dc (*1 fch, 1 dc* 9 times, 2 dc) 2 times, turn.
Round R2 :
2 pt, fch, dc (2 dc, *1 fch, 1 dc* 7 times, 2 dc, 1 fch, 1 dc) 2 times, turn.
Round R3 :
2 pt, fch, dc (1 fch, 3 dc, *1 fch, 1 dc* 5 times, 2 dc, *1 fch, 1 dc* 2 times) 2 times, turn.
Round R4 :
2 pt, fch, dc (*1 fch, 1 dc* 2 times, 2 dc, *1 fch, 1 dc* 3 times, 2 dc, *1 fch, 1 dc* 3 times) 2 times, turn.
Round R5 :
2 pt, fch, dc (*1 fch, 1 dc* 3 times, 2 dc, *1 fch, 1 dc* 1 time, 2 dc, *1 fch, 1 dc* 4 times) 2 times, turn.
Round R6 :
2 pt, fch, dc (*1 fch, 1 dc* 4 times, 2 dc, *1 fch, 1 dc* 5 times) 2 times, turn.
Round R7-11 :
Now you have crocheted all the dirrefent rows, there is. From here on it's just repetitions: R7 like R5, R8 like R4, R9 like R3, R10 like R2, R11 like R1.
Info :
Now you have crocheted the pattern in 11 rows, and is ready to measure out the 10 x 10 cm. Count how many rows and stitches you have on the 10 cm. It should be 25 stitches x 11 rows. Do you have too many stitches pr. 10 cm, go up in hook size (too few = go down). Do you have too many or too few rows, you can adjust "The Golden Loop".
— Pattern for blanket 1 : 70 x 100 cm
Round R1 :
Use the technique Chainless Foundation and make 173 stitches (the first 3 ch counts as the first stitch, so when they are done, you crochet 172 double crochets after).
Round R2-3 :
2 pt, 172 double crochet, turn.
Round R4 :
2 pt, 4 dc, 3 dc (*1 fch, 1 dc* 9 times, 2 dc) 8 times, 5 dc, turn.
Round R5 :
2 pt, 4 dc, dc, fch, dc (2 dc, *1 fch, 1 dc* 7 times, 2 dc, 1 fch, 1 dc) 8 times, 5 dc, turn.
Round R6 :
2 pt, 4 dc, dc, fch, dc (1 fch, 3 dc, *1 fch, 1 dc* 5 times, 2 dc, *1 fch, 1 dc* 2 times) 8 times, 5 dc, turn.
Round R7 :
2 pt, 4 dc, dc, fch, dc (*1 fch, 1 dc* 2 times, 2 dc, *1 fch, 1 dc* 3 times, 2 dc, *1 fch, 1 dc* 3 times) 8 times, 5 dc, turn.
Round R8 :
2 pt, 4 dc, dc, fch, dc (*1 fch, 1 dc* 3 times, 2 dc, *1 fch, 1 dc* 1 time, 2 dc, *1 fch, 1 dc* 4 times) 8 times, 5 dc, turn.
Round R9 :
2 pt, 4 dc, dc, fch, dc (*1 fch, 1 dc* 4 times, 2 dc, *1 fch, 1 dc* 5 times) 8 times, 5 dc, turn.
Info :
Now you have crocheted all the dirrefent rows, there is. From here on it's just repetitions: Row 10 like row 8, row 11 like row 7, row 12 like row 6, row 13 like row 5, row 14 like row 4.
Info :
Now you crochet row 5,6,7,8,9, and again 8,7,6,5,4 and so on, till you reach 101 rows of the pattern. Finish with 3 rows in dc, so your top will be like your bottom.
— Pattern for blanket 2 : 100 x 100 cm
Round R1 :
Use the technique Chainless Foundation and make 233 stitches (the first 3 ch counts as the first stitch, so when they are done, you crochet 232 double crochets after)
Round R2-3 :
2 pt, 232 double crochet, turn.
Round R4 :
2 pt, 4 dc, 3 dc (*1 fch, 1 dc* 9 times, 2 dc) 11 times, 5 dc, turn.
Round R5 :
2 pt, 4 dc, dc, fch, dc (2 dc, *1 fch, 1 dc* 7 times, 2 dc, 1 fch, 1 dc) 11 times, 5 dc, turn.
Round R6 :
2 pt, 4 dc, dc, fch, dc (1 fch, 3 dc, *1 fch, 1 dc* 5 times, 2 dc, *1 fch, 1 dc* 2 times) 11 times, 5 dc, turn.
Round R7 :
2 pt, 4 dc, dc, fch, dc (*1 fch, 1 dc* 2 times, 2 dc, *1 fch, 1 dc* 3 times, 2 dc, *1 fch, 1 dc* 3 times) 11 times, 5 dc, turn.
Round R8 :
2 pt, 4 dc, dc, fch, dc (*1 fch, 1 dc* 3 times, 2 dc, *1 fch, 1 dc* 1 time, 2 dc, *1 fch, 1 dc* 4 times) 11 times, 5 dc, turn.
Round R9 :
2 pt, 4 dc, dc, fch, dc (*1 fch, 1 dc* 4 times, 2 dc, *1 fch, 1 dc* 5 times) 11 times, 5 dc, turn.
Info :
Now you have crocheted all the dirrefent rows, there is. From here on it's just repetitions: Row 10 like row 8, row 11 like row 7, row 12 like row 6, row 13 like row 5, row 14 like row 4.
Info :
Now you crochet row 5,6,7,8,9, and again 8,7,6,5,4 and so on, till you reach 101 rows of the pattern. Finish with 3 rows in dc, so your top will be like your bottom.
— Pattern for blanket 3 : 110 x 110 cm
Round R1 :
Use the technique Chainless Foundation and make 273 stitches (the first 3 ch counts as the first stitch, so when they are done, you crochet 272 double crochets after)
Round R2-3 :
2 pt, 272 double crochet, turn.
Round R4 :
2 pt, 4 dc, 3 dc (*1 fch, 1 dc* 9 times, 2 dc) 13 times, 5 dc, turn.
Round R5 :
2 pt, 4 dc, dc, fch, dc (2 dc, *1 fch, 1 dc* 7 times, 2 dc, 1 fch, 1 dc) 13 times, 5 dc, turn.
Round R6 :
2 pt, 4 dc, dc, fch, dc (1 fch, 3 dc, *1 fch, 1 dc* 5 times, 2 dc, *1 fch, 1 dc* 2 times) 13 times, 5 dc, turn.
Round R7 :
2 pt, 4 dc, dc, fch, dc (*1 fch, 1 dc* 2 times, 2 dc, *1 fch, 1 dc* 3 times, 2 dc, *1 fch, 1 dc* 3 times) 13 times, 5 dc, turn.
Round R8 :
2 pt, 4 dc, dc, fch, dc (*1 fch, 1 dc* 3 times, 2 dc, *1 fch, 1 dc* 1 time, 2 dc, *1 fch, 1 dc* 4 times) 13 times, 5 dc, turn.
Round R9 :
2 pt, 4 dc, dc, fch, dc (*1 fch, 1 dc* 4 times, 2 dc, *1 fch, 1 dc* 5 times) 13 times, 5 dc, turn.
Info :
Now you have crocheted all the dirrefent rows, there is. From here on it's just repetitions: Row 10 like row 8, row 11 like row 7, row 12 like row 6, row 13 like row 5, row 14 like row 4.
Info :
Now you crochet row 5,6,7,8,9, and again 8,7,6,5,4 and so on, till you reach 121 rows of the pattern. Finish with 3 rows in dc, so your top will be like your bottom.
— Blocking :
Info :
It's a really good idea to block this blanket before using it. Blocking makes it more even and the edges becomes completely straight.
Info :
You wash it as indicated on the yarn's label, and stretch it out with needles on either blocking mats, a carpet with towels on or whatever you have. Tighten it well. It will shrink a bit again, when it's taken off the board again.
Info :
Here you leave it until it is dry, and it will just look nice sharp :-) Here you can find blocking mats and needles*: Blocking mats. Needles.
This Baby Summer Blanket pattern is designed for warm-weather comfort and delicate charm. It uses an airy reversed-filet look for soft breathability and beautiful texture. With a chainless foundation and Pretty Turning method, your finished blanket will have neat, straight edges ready for gifting. 🧶🤍