๐Ÿงถ Beautiful โœจ Detailed ๐Ÿ’ Adorable

Mini Pumpkin Man Amigurumi Pattern

Mini Pumpkin Man Amigurumi Pattern
4.8โ˜… Rating
2-3 Hours Time Needed
4.1K Made This
โœ‚๏ธ

Intermediate Level

Ideal for those with basic crochet experience, featuring slightly more advanced stitches and techniques to expand your skills.

โฑ๏ธ

Bite-Sized Project

Finishes in 2-4 hoursโ€”perfect for an afternoon of creative relaxation.

๐ŸŽ

Tiny Treasure

Small, sweet, and gift-worthy creations that fit perfectly in the palm of your hand with detailed charm.

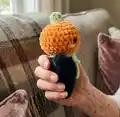
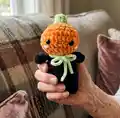
About This Mini Pumpkin Man Amigurumi Pattern

This pattern creates an adorable Mini Pumpkin Man amigurumi featuring a round pumpkin head, tiny body, two arms, two legs and a little stem. The design is worked in continuous rounds using velvet/chenille yarn for a plush finished texture and sport weight for facial details. You will shape pumpkin dents and add embroidered lines and a bow to personalize your little friend. The instructions are detailed so you can make this miniature character in just a few hours.

Mini Pumpkin Man Amigurumi Pattern crochet pattern - detailed view of completed project

Perfect for intermediate crocheters who enjoy small projects with characterful finishing details. Uses basic stitches, magic ring start, increases/decreases and simple sewing for assembly.

Why You'll Love This Mini Pumpkin Man Amigurumi Pattern

I absolutely love this pattern because it turns simple stitches into a charming, squeezable character that is perfect for gifting. I enjoy the tactile feel of the velvet yarn which gives the pumpkin head a luxurious, plush look. The denting technique to form pumpkin ridges is a small detail that really transforms the piece and is satisfying to sew. I also love that it is quick to makeโ€”so you can create multiples in an afternoon and customize colors and accessories to suit every mood.

Mini Pumpkin Man Amigurumi Pattern step 1 - construction progress Mini Pumpkin Man Amigurumi Pattern step 2 - assembly progress Mini Pumpkin Man Amigurumi Pattern step 3 - details and accessories Mini Pumpkin Man Amigurumi Pattern step 4 - final assembly and finishing

Switch Things Up

I love customizing this Mini Pumpkin Man by changing yarn colors; try pastel shades for a soft nursery version or bold orange and green for classic Halloween charm.

I sometimes substitute velvet yarn with regular worsted or sport weight yarn to create a firmer, less plush finishโ€”adjust the hook size accordingly.

I also experiment with eye sizes: 6mm safety eyes give a cuter, smaller look while 10mm adds more personality to the face.

I like adding small accessories like a tiny crocheted hat, scarf, or a bow to make each pumpkin unique and gift-ready.

You can make this pattern larger by using bulky yarn and a bigger hook, or make mini keychain versions using thin yarn and a 2.5โ€“3.5mm hook.

I sometimes embroider different mouth shapes and brow lines to change the expression from happy to surprised or sleepy.

For a posable version, I add thin wire to the limbs before stuffing, which lets me pose the arms slightly for display.

Try using yarn scraps for stripes or a two-tone head to create playful variations and practice color changes.

I often sew felt cheeks or tiny beads for blush instead of yarn to add texture and contrast on the face.

When gifting, I create a little set by making multiple pumpkins in varying sizes and colors to form a seasonal display or a charming gift bundle.

Common Mistakes & How to Fix Them

โœ— Not placing safety eyes at the correct rounds can make the face look off-center; insert the eyes between R7-R8, five stitches apart as instructed to ensure proper placement. โœ— Skipping stuffing until later causes uneven shaping and lumps; begin stuffing at the point indicated and stuff gradually while shaping the head and body for smooth contours. โœ— Failing to create the pumpkin dents correctly will flatten the pumpkin effect; follow the dent instructions closely by pulling the yarn from top to bottom and tightening each dent before moving on. โœ— Cutting the yarn and fastening off the first leg incorrectly will prevent joining the second leg seamlessly; do not fasten off the second leg and attach it by crocheting one sc into the stitches of the first leg as described. โœ— Using inconsistent tension when working continuous rounds leads to size and shape differences; keep an even tension throughout and use the same hook size to maintain consistent stitch size.

Mini Pumpkin Man Amigurumi Pattern

Make a delightful Mini Pumpkin Man amigurumi using soft velvet/chenille yarn and simple crochet techniques. This pattern walks you through a sweet pumpkin head, tiny body, arms, legs and a little stem so you can create a charming pocket-sized friend. Perfect for quick handmade gifts or seasonal decor, the design uses continuous rounds and basic stitches you likely already know. Follow the clear assembly steps to add pumpkin dents, facial details and a tiny bow to finish your creation.

Intermediate 2-3 Hours

Materials Needed for Mini Pumpkin Man Amigurumi Pattern

โ€” Main Fabric

  • 01
    Velvet/chenille yarn in orange - small amount for head (main color)
  • 02
    Velvet/chenille yarn in black - small amount for body, legs and arms
  • 03
    Velvet/chenille yarn in light green - small amount for stem and neck bow
  • 04
    Velvet/chenille yarn in light pink - small amount for cheeks
  • 05
    Sport weight yarn in black and light brown - small amounts for facial lines and dent detailing
  • 06
    Fiber filling (polyester stuffing) - small amount to fill head, body and limbs

โ€” Tools Required

  • 01
    Crochet hook size 4.5mm (or hook matching your yarn's weight)
  • 02
    8mm safety eyes (2 pieces)
  • 03
    Scissors
  • 04
    Yarn needle for sewing
  • 05
    Fiber filling (polyester stuffing)
  • 06
    Pins for assembly (optional)

Progress Tracker

0% Complete

โ€” Abbreviations :

Info :

R = row. dec = decrease. ch = chain. MR = magic ring. Sc= single crochet. (x) = number of stitches. sl st = slip stitch. inc = increase.

โ€” Materials :

Info :

Velvet yarn in orange, black, light green, light pink (cheeks). 4.5mm crochet hook/hook matching your yarnโ€™s weight. 8mm safety eyes. Recomended: sport weight yarn in black and light brown. Fiber Filling, scissors, yarn needle. Important: the pattern is worked in continuous rounds.

โ€” Head :

Round 1 :

6ch, begin in 2nd chain from hook 4sc, inc in last chain, 4sc on the other side of the chain, inc (12)

Round 2 :

(sc, inc) x6 (18)

Round 3 :

(sc, inc, sc) x6 (24)

Round 4 :

sc around (24)

Round 5 :

(2sc, inc, sc) x6 (30)

Round 6 :

(2sc, inc, 2sc) x6 (36)

Round 7 :

sc around (36)

Round 8 :

(2sc, dec, 2sc) x6 (30)

Round 9 :

(2sc, dec, sc) x6 (24)

Info :

Insert eyes between R7-R8, 5 stitches apart, while looking from the top, place them on the long side of the R1 oval. Begin stuffing

Round 10 :

(sc, dec, sc) x6 (18)

Round 11 :

(sc, dec) x6 (12)

Info :

Finish stuffing the head, sl st and fasten off, leave a long tail for sewing.

โ€” Legs- make 2 (in black) + Body :

Round 1 :

6sc in MR (6)

Round 2 :

sc around (6)

Round 3 :

(sc, inc) x3 (9)

Info :

After finishing the first leg, cut off the yarn. When making the second leg, do not fasten off and attach it to the first leg by doing 1 sc on any of the stitches of leg 1.

Round 4 :

counting the previous sc, sc around both legs (18)

Round 5 :

(sc, inc, sc) x6 (24)

Round 6-7 :

sc around (24 x2)

Round 8 :

(4sc, dec) x4 (20)

Round 9 :

(8sc, dec) x2 (18)

Info :

Stuff the legs and body

Round 10-11 :

sc around (18 x2)

Round 12 :

(sc, dec) x6 (12)

Info :

Finish stuffing, sl st and fasten off.

โ€” Arms- make 2 (in black) :

Round 1 :

6sc in MR (6)

Round 2-4 :

sc around (6 x3)

Info :

Do not stuff the arms

Round 5 :

fold the arms in half and 3sc through both sides of the stitches (3)

Info :

Sl st and fasten off. Leave a long tail for sewing.

โ€” Little stem โ€“ (in light green) :

Round 1 :

6sc in MR (6)

Round 2-3 :

sc around (6x2)

Info :

Sl st and fasten off. Leave a long tail for sewing.

โ€” Assembly :

Infos :

Before sewing the head to the body, make sure to create the dents of the pumpkin as so: first look at your pumpkin manโ€™s head from the top, you should have an oval at the top where R1 is. The face should be located on one of the long sides of the pumpkin. Drag a long piece of orange velvet yarn through the head, and begin making the dents. There should be 5 dents as shown in the diagram on the next page. To create the dents in the head, drag the orange velvet yarn from the top to the bottom of the head, alternating between sewing under and above the Rows. when reaching the bottom of the head, make sure to pull on the yarn to form the dent before moving on to the next dent.

Infos :

Start sewing the dents from the coloured dots shown in the diagram. The front part should be wider than the rest, about 2 stitches from the eyes to each side. After you have finished sewing the head dents, drag brown sporting weight yarn through the head and over each of the dents to create lines. Next, place the head onto the body, make sure to align the eyes to the legs properly, and sew them together with the yarn tail from the head. Next, position the arms right under the head and sew the to the last row of the body, on both sides of the body.

Infos :

Sew the little sprout right on top of the head, on R1. Add a little V shaped mouth to the pumpkin (images on the next page) using the black sporting weight yarn. Also add to little lines for blush one row under and one stitch to the side of each eye. If you want, you may also give your pumpkin a little bow.

Assembly Instructions

  • Create the pumpkin dents before sewing the head to the body by dragging a long piece of orange velvet yarn from the top to the bottom of the head and pulling to form 5 dents as shown in the diagram.
  • After denting the head, drag brown sport weight yarn over each dent to create pumpkin lines, then place the head onto the body aligning the eyes with the legs and sew together using the yarn tail from the head.
  • Position each arm under the head and sew them to the last row of the body on both sides so they sit just beneath the neck area.
  • Sew the little sprout (stem) on top of the head at R1, securely attaching it with the long tail left from fastening off.
  • Embroider a small V-shaped mouth with black sport weight yarn and add two small blush lines one row under and one stitch to the side of each eye; optionally add a small bow at the neck.

Important Notes

  • ๐Ÿ’กThe pattern is worked in continuous rounds, so do not join rounds with slip stitches unless instructed.
  • ๐Ÿ’กUse 8mm safety eyes and place them between R7-R8, five stitches apart and centered on the long side of the R1 oval for correct facial placement.
  • ๐Ÿ’กStuff the head and body gradually while shaping, and finish stuffing before final decreases and closing to avoid lumps.
  • ๐Ÿ’กWhen joining the two legs, attach the second leg to the first by crocheting one sc into any stitch of leg one to create a seamless body base.
  • ๐Ÿ’กLeave long tails when fastening off pieces so you have enough yarn for secure sewing and assembly.

This adorable Mini Pumpkin Man is a cozy, small amigurumi perfect for gifts and seasonal decor. Make it with plush velvet yarn for a squishy finish and add a tiny bow for extra charm. Quick to make and full of personalityโ€”happy crocheting! ๐ŸŽƒ๐Ÿงถ

You ask,

we answer.

FAQs

What size will the finished piece be?

The finished amigurumi size will depend on your yarn and hook choice; using velvet/chenille and 4.5mm hook it will be a small, palm-sized figure suitable for decoration or gifting.

Can I use different yarn weights for this pattern?

Yes, you can use different yarn weights, but the final size and texture will change; choose an appropriate hook for your yarn and expect the piece to be larger with bulkier yarn or smaller with finer yarn.

Do I need prior crochet experience for this pattern?

This pattern is rated intermediate because it uses magic ring, increases, decreases, continuous rounds and some sewing detail; basic amigurumi experience is recommended for best results.

How long does this project typically take to complete?

Most crocheters complete this mini pumpkin in 2-3 hours, though time may vary based on experience and how much time you spend on detailing and assembly.