About This Christmas Hoop Embroidery Pattern
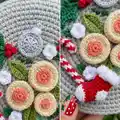
This pattern creates a 15 cm hoop embroidery with a festive Christmas arrangement of woven wheel flowers, holly leaves, candy cane and stocking. It includes a printable transfer pattern, a color & stitch guide labeled with DMC thread numbers, and illustrated stitch instructions. The design is ideal for gifting or seasonal decor and works well on cotton or linen canvas.

You will learn satin stitch, fishbone stitch, backstitch, chain stitch, French knots and the woven wheel technique. Detailed finishing instructions show how to mount your embroidered fabric into the hoop for a neat, professional result.
Why You'll Love This Christmas Hoop Embroidery Pattern
I absolutely love this pattern because it combines a classic holiday motif with simple, elegant embroidery techniques that anyone can learn. I love teaching the woven wheel flowers because they add depth and texture with a satisfying, meditative weaving process. I enjoy choosing thread colors and watching the piece come together—each stitch makes the composition more festive and alive. I think this design makes a lovely handmade gift and a beautiful seasonal accent that will brighten any room.
Switch Things Up
I love how easy it is to customize this pattern by changing thread colors; try pastel tones for a spring look or metallics for a glamorous holiday version.
You can make the hoop larger or smaller by printing the template at a different scale and using a different hoop size—use thicker fabric or more thread for a larger piece.
I often swap the woven wheel flowers for small embroidered roses using layered satin stitches to vary texture and visual interest.
Try adding tiny beads or sequins to the center of the woven wheel flowers for subtle sparkle and extra dimension.
If you prefer a flatter look, replace the woven wheel stitch with French knot clusters or petit point elements.
I sometimes stitch the design on natural linen for a rustic finish or on black fabric for a bold, modern contrast with bright DMC threads.
For ornaments, make the pattern smaller, finish with felt back, and attach a ribbon loop for hanging on the tree.
Try combining two or three different greens for leaves using graduated fishbone stitches to create shading and a more lifelike effect.
I recommend experimenting with 2-strand vs 3-strand floss to change how dense your satin fills appear; fewer strands give a more delicate texture.
Consider framing the finished hoop inside a shadowbox or mounting multiple small hoops together for striking wall art—each change makes the design uniquely yours.
Common Mistakes & How to Fix Them
✗ Transferring the pattern inaccurately will throw off placement of motifs; use carbon paper or tape the printed scheme to a window and trace carefully to ensure accurate placement.
✗ Using synthetic or very slippery threads can make stitches look uneven; choose 100% cotton DMC threads and keep tension consistent to achieve smooth satin fills.
✗ Not securing the woven wheel center properly can cause unraveling; weave neatly under and over spokes and secure your thread at the back before continuing.
✗ Overstuffing the hoop or leaving fabric too loose will distort the design; tighten the fabric evenly in the hoop and gather neatly before overstitching the backing to finish.
✗ Placing elements without checking scale can overcrowd the hoop; print the template at full size first and transfer it to see how each element fits before stitching.