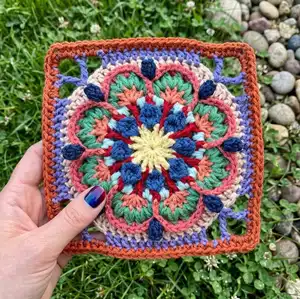
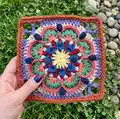
Create a stunning floral crochet square that celebrates the bloom of nature. This pattern guides you through layered textures, split-puffs and clusters to create a beautiful centerpiece square you can use alone or combine into blankets. You will enjoy the thoughtful colorways and detailed step-by-step instructions to achieve a professional finished piece.
Progress Tracker
0% Complete
— Stitches Used :
Infos :
double magic circle; standing stitch; invisible Join (Join); st(s) (Stitch/stitches); sp (Space); ch (Chain); yo (Yarn over); rnd (Round); slst (Slip stitch); sc (Single crochet); FPsc (Front post single crochet); shallow FPsc (Shallow front post single crochet); long sc (Long single crochet); hdc (Half double crochet); dc (Double crochet); BPdc (Back post double crochet); ext-dc (Extended double crochet); FPdc (Front post double crochet); dc3tog (Double crochet three together); tr (Treble crochet); FPtr (Front post treble crochet); 4tr-cluster (Four treble crochet cluster); ext-tr (Extended treble crochet); PC (Popcorn stitch); 2loop-puff; split-puff; 3LP.
Info :
double magic circle: Video: Right-Handed / Left-Handed. standing stitch: Start with a slip knot on your hook; Insert your hook into designated st or ch sp and finish the st as normal. Video: Right-Handed / Left-Handed. invisible join: Do not join after completing last st of the rnd; cut yarn; pull yarn tail through st; insert hook from back-to-front of the 2nd st of the rnd; grab yarn and gently pull through. insert hook from back-to-front and bottom-to-top of the center of the last st of rnd; grab yarn and gently pull through. anchor on backside by drawing through any loops of first and last sts of rnd, and weave in ends. Video: Right-Handed / Left-Handed.
Infos :
slst: Insert hook into designated st; yo, pull yarn through the st and the loop on hook. sc: Insert hook into designated st, yo and pull up a loop; yo, pull through 2 loops on hook. FPsc: Insert hook from front-to-back-to front around post, so post is in front of hook; yo and pull up a loop; yo, pull through 2 loops on hook. long sc: Insert hook in designated st, yo, and pull up a loop almost to the length of the previous st; yo, pull through 2 loops on hook.
Infos :
hdc: Yo, insert hook into st; yo, pull up a loop; yo, pull through 3 loops on hook. dc: Yo, insert hook into st; yo, pull up a loop; [yo, pull through 2 loops on hook] 2 times. BPdc: Yo, insert hook from back-to-front-to-back around the post, so post is in back of hook; yo, pull up a loop; [yo, pull through 2 loops on hook] 2 times. ext-dc: Yo, insert hook into st; yo, pull up a loop; yo, pull through 1 loop on hook; [yo, pull through 2 loops on hook] 2 times.
Infos :
FPdc: Yo, insert hook from front-to-back-to front around post, so post is in front of hook; yo, pull up a loop; [yo, pull through 2 loops on hook] 2 times. dc3tog: Yo, insert hook into designated st; yo, pull up a loop; yo and pull through 2 loops on hook; [yo, insert hook into next designated st; yo, pull up a loop; yo and pull through 2 loops on hook] 2 times; yo, pull through all 4 loops on hook.
Infos :
tr: Yo 2 times; insert hook into designated st; yo, pull up a loop; [yo, pull through 2 loops] 3 times. FPtr: Yo 2 times, insert hook from front to-back-to front around post, so post is in front of hook; yo, pull up a loop; [yo, pull through 2 loops on hook] 3 times. 4tr-cluster: Yo 2 times, insert hook into designated st; yo, pull up a loop; [yo, pull through 2 loops on hook] 2 times; repeat 3 more times in same st; yo pull through all 5 loops on hook.
— Symbol Guide :
Info :
ASTERISKS: * to* repeat instructions between two single asterisks as directed. PARENTHESES: ( ) indicates a group of sts that are worked together in or around the same st. BRACKETS: [ ] repeat instructions within brackets as directed. COUNT TOTALS: Total chain spaces are included in the st count; corner chain spaces are not included in the total.
— Special Instructions :
Info :
All rnds begin with a standing stitch and end with an invisible join unless another option is available. Some rnds may include instructions for a slst join and if not changing colors, how to start the next rnd. When used, the ch(s) replaces the 1st st shown in the instructions of the rnd.
Info :
To avoid ending a rnd with a ch sp, some rnds will begin with the 2nd st of a group (ex. 5 tr), and the repeat will end with the 1st st of that group. Example: *(4 tr) in ch-3 sp, ch 1; sk to next ch-3 sp, tr in next ch-3 sp*.
Info :
To condense written instructions, the st to use is written 1st; location of st(s) are written 2nd; 'AND' is used to show location of last st(s). Example: dc in 3LP of dc, 13 FPdc AND next dc.
— Rounds :
Round 1 :
Start in double magic circle. ch 5 (as a dc AND ch 2); [dc, ch 1; dc, ch 2] 7 times; dc, ch 1; Join: invisible join to 4th ch of rnd, fasten off. Counts: 16 dc, 8 ch-1 sp, 8 ch-2 sp (40 total)
Round 2 :
Start in any ch-2 sp, *4tr-cluster in ch-2 sp; ch 5, sk dc, ch-1 sp AND dc*; REPEAT FROM * TO * 7 MORE TIMES; Join: invisible join to 1st ch of rnd, fasten off. Counts: 8 4tr-cluster, 8 ch-5 sp (48 total)
Round 3 :
Start in any ch-1 sp of rnd 1, *fold ch-5 to the back, tr in ch-1 sp of rnd 1; ch 2, sk ch-5 sp; shallow FPsc around 4tr-cluster, ch 2*; REPEAT FROM * TO * 7 MORE TIMES; Join: invisible join to 1st ch of rnd, fasten off. Counts: 8 shallow FPsc, 8 tr, 16 ch-2 sp (48 total)
Round 4 :
Start in ch-2 sp after any shallow FPsc, *sc in ch-2 sp; long sc around same ch-2 sp AND ch-5 sp of rnd 2 as one; sc in previously worked ch-2 sp of rnd 3; ch 2, sk tr; sc in ch-2 sp; long sc around same ch-2 sp AND ch-5 sp of rnd 2 as one; sc in previously worked ch-2 sp; ch 2, sk shallow FPsc*; REPEAT FROM * TO * 7 MORE TIMES; Join: invisible join to 1st long sc of rnd, fasten off. Counts: 32 sc, 16 long sc, 16 ch-2 sp (80 total)
Round 5 :
Note: work in rnd 3 only and in front of ch-2 sps of rnd 4. Start in any tr of rnd 3, *([dc, ch 1] 4 times, dc) in tr of rnd 3; sk to next shallow FPsc of rnd 3, sc in shallow FPsc; sk to next tr of rnd 3*; REPEAT FROM * TO * 7 MORE TIMES; Join: invisible join to 1st ch of rnd, fasten off. Counts: 8 sc, 40 dc, 32 ch-1 sp (80 total)
Round 6 :
Note: read instructions for split-puff before starting this rnd. Start between any sc and dc, *split-puff - between sc and dc, and next ch-1 sp, place st marker in 1st st; [ch 1, split-puff – using previously worked ch-1 sp, and next ch-1 sp] 3 times; ch 1, split-puff - using previously worked ch-1 sp, and between next dc and sc; sk sc*; REPEAT FROM * TO * 7 MORE TIMES; Join: invisible join to 1st ch of rnd, fasten off. Counts: 40 split-puff, 32 ch-1 sp (72 total)
Round 7 :
Start in ch-1 sp after marked st of rnd 6, *[(2 hdc) in ch-1 sp, sk split-puff] 4 times-remove marker; ch 1, FPdc around sc of rnd 5 that sits between 2 split-puffs; ch 1, sk split-puff*; REPEAT FROM * TO * 7 MORE TIMES; Join: invisible join to 2nd hdc of rnd, fasten off. Counts: 64 hdc, 8 FPdc, 16 ch-1 sp (88 total)
Round 8 :
Start in any FPdc, *PC in FPdc, ch 4; sk to 3rd split-puff of rnd 6, slst in BL and 3LP of split-puff as one; ch 4, sk to next FPdc of rnd 7*; REPEAT FROM * TO * 7 MORE TIMES; Join: invisible join to 1st ch of rnd, fasten off. Counts: 8 slst, 8 PC, 16 ch-4 sp (80 total)
Round 9 :
Note: Before starting, read the information about slst join and starting the next rnd. Start in hdc of rnd 7 immediately before any PC and always in front of ch-4 sps of rnd 8, *dc in 3LP of hdc; FPsc around PC; dc in 3LP of hdc; hdc in 3LP of 3 hdc; dc in 3LP of 2 hdc; ext-dc in 3LP of hdc; tr in 3LP of hdc; FPsc around PC; tr in 3LP of hdc; ext-dc in 3LP of hdc; dc in 3LP of 2 hdc; hdc in 3LP of 3 hdc*; REPEAT FROM * TO * 3 MORE TIMES; Join: slst to dc OR invisible join to 1st FPsc of rnd, fasten off. Counts: 8 FPsc, 24 hdc, 24 dc, 8 ext-dc, 8 tr (72 total)
Round 10 :
Start in any FPsc between 2 dc OR slst into FPsc and ch 2 (as 1st hdc of rnd), *hdc in FPsc, ch AND 2 hdc; dc in hdc AND 2 dc; ch 3, sk ext-dc AND tr; (ext-tr, ch 5 as a corner; ext-tr) in FPsc; ch 3, sk tr AND ext-dc; dc in 2 dc AND hdc; hdc in 2 hdc AND dc*; REPEAT FROM * TO * 3 MORE TIMES; Join: invisible join to 2nd hdc of rnd, fasten off. Counts: 28 hdc, 24 dc, 8 ext-tr, 8 ch-3 sp, 4 ch-5 corner sp (84 total/21 per side)
Round 11 :
Start in any ch-5 corner sp, * (3 hdc, ch 2, 3 hdc) in ch-5 corner sp; hdc in ext-tr; (2 hdc) in ch-3 sp; hdc in 3 dc, 7 hdc AND next 3 dc; (2 hdc) in ch-3 sp; hdc in ext-tr*; REPEAT FROM * TO * 3 MORE TIMES; Join: invisible join to 2nd hdc of rnd, fasten off. Counts: 100 hdc, 4 ch-2 corner sp (100 total/25 per side)
Round 12 :
Start in any ch-2 corner sp, *[(2loop-puff, ch 1) 3 times; BPdc around 25 hdc, ch 1]*; REPEAT FROM * TO * 3 MORE TIMES; Join: invisible join to 1st ch of rnd, fasten off. Counts: 100 BPdc, 12 2loop-puff, 16 ch-1 sp (128 total/32 per side)
Round 13 :
Start in ch-1 sp after 1st 2loop-puff of any corner, * (2loop-puff, ch 1, 2loop-puff) in ch-1 sp; ch 3 as a corner, sk 2loop-puff; (2loop-puff, ch 1, 2loop-puff) in ch-1 sp; ch 1, sk 2loop-puff; dc3tog, using ch-1 sp and next 2 BPdc, ch 2; [dc3tog using next 3 BPdc, ch 2] 7 times; dc3tog using next 2 BPdc and ch-1 sp; ch 1 sk 2loop-puff*; REPEAT FROM * TO * 3 MORE TIMES; Join: invisible join to 1st ch of rnd, fasten off. Counts: 36 dc3tog, 16 2loop-puff, 16 ch-1 sp, 32 ch-2 sp, 4 ch-3 corner sp (132 total/33 per side)
Round 14 :
Start in any ch-3 corner sp, *(2 ext-dc, ch 2, 2 ext-dc) in ch-3 corner sp; sk 2loop-puff, 2 ext-dc in ch-1 sp; sk 2loop-puff; ext-dc in ch-1 sp; [FPtr around 2nd partial dc of dc3tog; (2 ext-dc) in ch-2 sp] 8 times; FPtr around 2nd partial dc of dc3tog; ext-dc in ch-1 sp; sk 2loop-puff; 2 ext-dc in ch-1 sp; sk 2loop-puff*; REPEAT FROM * TO * 3 MORE TIMES; Join: invisible join to 2nd dc of rnd, fasten off. Counts: 104 ext-dc, 36 FPtr, 4 ch-2 corner sp (140 total/35 per side)
Round 15 :
Start in any ch-2 corner sp, *(2 dc, ch 2, 2 dc) in ch-2 corner sp; dc in 35 sts*; REPEAT FROM * TO * 3 MORE TIMES; Join: invisible join to 2nd dc of rnd, fasten off. Counts: 156 dc, 4 ch-2 corner sp (156 total/39 per side)
This beautiful Efflorescent Square pattern brings floral texture and modern color to your crochet projects. Whether you make a single cushion square or a full blanket, the layered stitches create irresistible depth and detail. Enjoy experimenting with colorways to create a collection of unique, handmade squares. 🧶🌸✨