🧢 Beautiful ✨ Detailed πŸ’ Adorable

Mel The Snowman Amigurumi Pattern

Mel The Snowman Amigurumi Pattern
4.8β˜… Rating
2-3 Hours Time Needed
1.8K Made This
βœ‚οΈ

Beginner Friendly Level

Perfect for those just starting their crochet journey, with clear instructions and simple techniques

⏱️

Bite-Sized Project

Finishes in 2-4 hoursβ€”perfect for an afternoon of creative relaxation.

🧸

Cute Companion

An adorable friend to cherish, handcrafted with love to bring comfort and joy for years to come.

About This Mel The Snowman Amigurumi Pattern

This pattern creates Mel, a small, cuddly snowman worked in Cotton Aran yarn using US terminology with UK equivalents in brackets. Youll make the head and body in one piece and then sew on a hat, nose, arms, buttons and a scarf for personality. The instructions are clear and ideal if you want a quick handmade decoration or a sweet gift.

Mel The Snowman Amigurumi Pattern crochet pattern - detailed view of completed project

Designed for straightforward assembly, each piece is small and fast to crochet. Full materials, stitch counts and finishing steps are included to guide you from start to finish.

Why You'll Love This Mel The Snowman Amigurumi Pattern

I absolutely love this pattern because it captures so much charm with such simple techniques. I enjoy how quick it is to make β€” you can finish Mel in a few focused hours and have a delightful handmade gift ready. The design balances cute details like the tiny hat and scarf with beginner-friendly shaping, which makes it satisfying to stitch. I also love that the head and body are worked in one piece, simplifying assembly and creating a seamless finish.

Mel The Snowman Amigurumi Pattern step 1 - construction progress Mel The Snowman Amigurumi Pattern step 2 - assembly progress Mel The Snowman Amigurumi Pattern step 3 - details and accessories Mel The Snowman Amigurumi Pattern step 4 - final assembly and finishing

Switch Things Up

I love experimenting with colors on this pattern β€” try pastels for a nursery-friendly version or bright, bold shades for a playful look.

You can change yarn weight and hook size to create different sizes: chunky yarn and a larger hook makes a cuddly giant, while thinner yarn creates a tiny keyring-friendly mini.

I often swap the scarf stitch for a tiny bobble or add stripes using simple colour changes to make each Mel unique.

Try swapping the safety eyes for embroidered eyes or buttons for a different handmade aesthetic that is child-safe.

For extra personality, embroider eyebrows or a smile, or add tiny crocheted mittens and a matching hat to build a character set.

If you want posable arms, insert thin wire inside the arm pieces before stuffing to allow gentle posing and shaping.

Consider using felt for the carrot nose instead of crocheting it for a flatter, applique look that sews on quickly.

I sometimes use a bit of sparkly or metallic yarn for the hat band to add a festive shine for holiday decorations.

To make a family of snowmen, vary the scarf colours and hat styles, and display them together for a charming seasonal vignette.

Dont be afraid to combine techniques: Tunisian crochet strips for a textured scarf or surface embroidery for button details can really elevate the finished piece.

Common Mistakes & How to Fix Them

βœ— Skipping stitch markers during rounds can lead to losing the start of round and uneven counts; place a marker at the beginning of each round to maintain accurate stitch placement. βœ— Forgetting to add stuffing as you go causes lumpy shaping and gaps; stuff gradually throughout shaping to create an even, smooth silhouette. βœ— Pulling your tension too tight when working in blo or blo rounds makes the fabric too stiff; relax your tension slightly and practice the stitch a few times on a swatch first. βœ— Not checking safety eye placement before sewing can make facial features misaligned; place and pin the eyes between the recommended rounds then step back to confirm spacing before securing.

Mel The Snowman Amigurumi Pattern

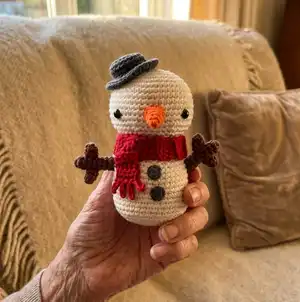
Make a charming, pocket-sized snowman with this easy-to-follow crochet pattern. Youll create Mel from top of head to base in one seamless piece, then add a cosy scarf, twiggy arms, a tiny hat and button details. The pattern uses simple stitches and clear shaping so you can enjoy a quick, satisfying project. Perfect as a handmade gift or seasonal decoration to brighten your home.

Beginner Friendly 2-3 Hours

Materials Needed for Mel The Snowman Amigurumi Pattern

β€” Main Fabric

  • 01
    Paintbox Yarns Cotton Aran (1.8oz/50g balls) - 1 ball Champagne White (A) for main body
  • 02
    Paintbox Yarns Cotton Aran - 1 ball Granite Grey (B) for hat and buttons
  • 03
    Paintbox Yarns Cotton Aran - 1 ball Blood Orange (C) for nose
  • 04
    Paintbox Yarns Cotton Aran - 1 ball Coffee Bean (D) for arms
  • 05
    Paintbox Yarns Cotton Aran - 1 ball Red Wine (E) for scarf

β€” Tools Required

  • 01
    Crochet hook size US E/4 (3.5mm)
  • 02
    Pair of 3/8in (9mm) safety eyes
  • 03
    Tapestry needle
  • 04
    Pins for assembly
  • 05
    Stitch markers
  • 06
    Polyester toy stuffing
  • 07
    Scissors

Progress Tracker

0% Complete

β€” Head and Body :

Round 1 :

6 sc (dc) in ring (6 sts)

Round 2 :

Inc in each st around (12 sts)

Round 3 :

[Inc in next st, 1 sc (dc)] 6 times (18 sts)

Round 4 :

[Inc in next st, 2 sc (dc)] 6 times (24 sts)

Round 5 :

[Inc in next st, 3 sc (dc)] 6 times (30 sts)

Round 6 :

[Inc in next st, 4 sc (dc)] 6 times (36 sts)

Round 7 :

[Inc in next st, 5 sc (dc)] 6 times (42 sts)

Round 8 :

[Inc in next st, 6 sc (dc)] 6 times (48 sts)

Round 9-15 :

Sc (dc) around (48 sts)

Round 16 :

[Dec, 6 sc (dc)] 6 times (42 sts)

Round 17 :

[Dec, 5 sc (dc)] 6 times (36 sts)

Round 18 :

[Dec, 1 sc (dc)] 12 times (24 sts)

Info :

Add safety eyes between rounds 13 and 14, approx 12 sts apart. Add body stuffing to head and continue as you go.

Round 19 :

Sc (dc) around (24 sts)

Round 20 :

[Inc in next st, 7 sc (dc)] 3 times (27 sts)

Round 21 :

[Inc in next st, 8 sc (dc)] 3 times (30 sts)

Round 22 :

[Inc in next st, 9 sc (dc)] 3 times (33 sts)

Round 23 :

[Inc in next st, 10 sc (dc)] 3 times (36 sts)

Round 24 :

[Inc in next st, 11 sc (dc)] 3 times (39 sts)

Round 25 :

[Inc in next st, 12 sc (dc)] 3 times (42 sts)

Round 26-35 :

Sc (dc) around (42 sts)

Round 36 :

[Dec, 5 sc (dc)] 6 times (36 sts)

Round 37 :

Sl st in each st around (36 sts)

Round 38 :

Sc (dc) blo around (36 sts)

Round 39 :

[Dec] 18 times (18 sts)

Round 40 :

[Dec, 1 sc (dc)] 6 times (12 sts)

Round 41 :

Dec 6 times (6 sts)

Info :

Fasten off, leave a tail. Use a tapestry needle to pick up all front loops from the last round and pull tight to close. Weave in end.

β€” Hat :

Round 1 :

6 sc (dc) in ring (6 sts)

Round 2 :

Inc in each st around (12 sts)

Round 3 :

[Inc in next st, 1 sc (dc)] 6 times (18 sts)

Round 4 :

Sc (dc) blo around (18 sts)

Round 5-7 :

Sc (dc) around (18 sts)

Round 8 :

Working in blo, inc in each st around (36 sts)

Round 9 :

Sc (dc) around (36 sts)

Info :

Fasten off, leave a tail for sewing.

β€” Nose :

Round 1 :

4 sc (dc) in ring (4 sts)

Round 2 :

[Inc in next st, 3 sc (dc)] (5 sts)

Round 3 :

[Inc in next st, 4 sc (dc)] (6 sts)

Round 4 :

[Inc in next st, 5 sc (dc)] (7 sts)

Round 5 :

[Inc in next st, 6 sc (dc)] (8 sts)

Info :

Fasten off, leave a tail for sewing. Add a little bit of toy stuffing.

β€” Arms (Make 2) :

Item Name (Main part P1) :

Using yarn D make an adjustable ring. 1st round 6 sc (dc) in ring (6 sts)

Round 2-8 :

Sc (dc) around (6 sts)

Info :

Fasten off, leave a tail for sewing.

Item Name (Short pieces P1) :

Using yarn D make an adjustable ring. 1st round 6 sc (dc) in ring (6 sts)

Round 2-3 :

Sc (dc) around (6 sts)

Info :

Fasten off, leave a tail for sewing 2 short pieces on to main part of each arm.

β€” Buttons (Make 2) :

Round 1 :

5 sc (dc) in ring (5 sts)

Info :

Fasten off, leave a tail for sewing.

β€” Scarf :

Info :

Using yarn E leave a long tail before starting, that will be used for sewing, ch 6.

Row 1 :

Skip 2 ch from hook, hdc (htr) in each of next 4 ch, turn (4 sts)

Row 2-28 :

Ch 2, 4 hdc (htr) blo, turn (4 sts)

Info :

Next row creates fringe.

Row 29 :

[Ch 4, skip first ch from hook, sl st in each of next 3 ch, sl st in next st of row] 4 times (4 fringes)

Info :

Fasten off and weave in ends.

β€” To Make Up :

Info :

Use sewing pins to check position of all pieces before sewing them in place.

Info :

Sew hat on to head in your preferred position.

Info :

Sew nose between eyes.

Info :

Sew arms to sides of body, across rounds 26 and 27.

Info :

Sew buttons to front of body.

Info :

Wrap scarf around neck and fold the side with the fringe, then stitch in place.

Assembly Instructions

  • Use sewing pins to check position of all pieces before sewing them in place to ensure symmetry and preferred placement.
  • Sew the hat onto the head in your preferred position using a tapestry needle and matching yarn, securing with several whipstitches.
  • Sew the nose between the eyes and add a little stuffing before fully closing to keep the nose shape prominent.
  • Sew the arms to the sides of the body across rounds 26 and 27, making sure both arms sit at the same height.
  • Attach the buttons to the front of the body centered vertically and spaced as shown in the photos.
  • Wrap the scarf around the neck, fold the fringed side over and stitch the scarf in place using the long tail left for sewing.

Important Notes

  • πŸ’‘Paintbox Yarns cannot accept responsibility for the finished item if any yarn other than the recommended yarn is used.
  • πŸ’‘Yarn quantities are based on average requirements and are therefore approximate; purchase extra if unsure.
  • πŸ’‘Instructions are written using US terminology with UK terminology given in italics in round brackets afterwards.
  • πŸ’‘Repeat figures in square brackets [ ] the number of times stated afterwards and follow bracketed instructions precisely.
  • πŸ’‘Use stitch markers to keep track of the beginning of rounds, especially during increases and decreases.

This sweet Mel the Snowman is a lovely handmade friend that makes a festive gift or a cute shelf buddy. Make one in a cosy afternoon and personalise the scarf and hat for your style. Happy crocheting and enjoy bringing a little winter magic to life! πŸ§Άβ„οΈ

You ask,

we answer.

FAQs

What size will the finished piece be?

The finished snowman measures approximately 6 in / 15 cm tall when using the recommended Cotton Aran yarn and a 3.5mm (US E/4) hook.

Can I use different yarn weights for this pattern?

Yes, different yarn weights can be used but will affect the final size; choose an appropriate hook for your yarn and expect proportional changes to height and stitch counts.

Do I need prior crochet experience for this pattern?

This pattern is beginner friendly and uses basic stitches like single (double) crochet, increases and decreases, so some familiarity with these stitches is helpful.

How long does this project typically take to complete?

Most crocheters finish this bite-sized project in 2-4 hours, though time can vary depending on experience and finishing details.

When should I add stuffing and safety eyes?

Add safety eyes between rounds 13 and 14 and add stuffing gradually as you work the head and body to achieve an even shape.