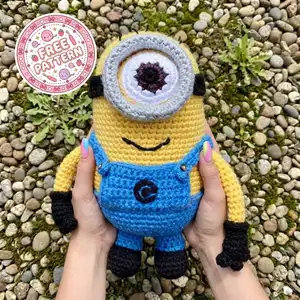
Make a cuddly, palm-sized Minion amigurumi inspired by the classic yellow character. This pattern recreates the rounded body, single big goggled eye, blue overalls with pocket detail, little black gloves and boots, and the cheerful embroidered smile shown in the photo. Detailed round-by-round instructions guide you through shaping the head, body, limbs, overalls, and goggles with tips for stuffing and assembly.
Progress Tracker
0% Complete
— Head :
Round 1 :
6 sc in magic ring (6)
Round 3 :
(1 sc, inc) x 6 (18)
Round 4 :
(2 sc, inc) x 6 (24)
Round 5 :
(3 sc, inc) x 6 (30)
Round 6 :
(4 sc, inc) x 6 (36)
Round 7 :
(5 sc, inc) x 6 (42)
Round 8 :
(6 sc, inc) x 6 (48)
Info :
The head starts larger than a typical small amigurumi because the goggle and single eye need space. Use a stitch marker to mark the first stitch of each round. If you prefer a slightly smaller head, work only to round 8 and proceed with even rounds for fewer rounds.
Round 9 :
(7 sc, inc) x 6 (54)
Round 10 :
(8 sc, inc) x 6 (60)
Round 11-20 :
1 sc in each st (60)
Info :
These even rounds build the height of the head. Place safety eyes or mark eye center between rounds 13-15. The photo shows the single eye centered high on the face; mark a center stitch and count outwards to place goggle strap attachments later. If crocheting the eye rather than using a safety eye, wait to sew it on after finishing the head front.
Round 21 :
(8 sc, dec) x 6 (54)
Round 22 :
(7 sc, dec) x 6 (48)
Info :
Begin stuffing the head firmly at this point. Stuff evenly so the face area stays rounded but not lumpy. Add small amounts of fiberfill and tamp down each time to create a smooth surface. Continue stuffing as you work through the next decreases.
Round 23 :
(6 sc, dec) x 6 (42)
Round 24 :
(5 sc, dec) x 6 (36)
Round 25 :
(4 sc, dec) x 6 (30)
Info :
Sew or embroider the smile before narrowing the neck too much if you prefer easier access. The photo shows a simple stitched curved smile centered about 6-8 rounds below the eye; mark and embroider now if desired. Use black yarn and a yarn needle for the embroidered mouth.
Round 26 :
(3 sc, dec) x 6 (24)
Round 27 :
(2 sc, dec) x 6 (18)
Round 28 :
(1 sc, dec) x 6 (12)
Info :
Fasten off leaving a long tail for sewing the head to the body. Finish stuffing through the neck opening, ensuring the head is firm but not overstuffed so it will join to the body smoothly. The head opening of 6 stitches will be sewn onto the body neck edge with ladder stitch or whip stitch.
— Eye & Goggle (Make 1 big eye + goggle ring) :
Eye Center - Pupil (black) Round 1 :
6 sc in magic ring (6)
Round 3 :
1 sc in each st (12)
Info :
Fasten off and weave tail, leaving a 10-12 cm tail for sewing. This small circle is the pupil. You will crochet a brown iris around it and then a white eye backing and a grey goggle ring. Alternatively, use safety eye if preferred (20mm) and skip the crocheted pupil/iris assembly.
Iris - Brown Round 1 :
6 sc in magic ring (6)
Round 3 :
(1 sc, inc) x 6 (18)
Info :
Stitch the black pupil centrally to the brown iris with the leftover tail, then center both on the white eye disc. The photo shows a dark brown iris with a small black pupil; use embroidery to add radial lines for texture if desired.
White Eye Disc Round 1 :
6 sc in magic ring (6)
Round 3 :
(1 sc, inc) x 6 (18)
Round 4 :
(2 sc, inc) x 6 (24)
Info :
Center and sew the iris+pupil to the white disc. Use short stitches to secure it well. When sewn, you will have a layered eye about 24 stitches across that will sit inside the grey goggle ring. Make sure the white disc is flat by pulling the center slightly inward with your needle while sewing.
Goggle Ring - Light Gray Round 1 :
6 sc in magic ring (6)
Round 3 :
(1 sc, inc) x 6 (18)
Round 4 :
(2 sc, inc) x 6 (24)
Round 5 :
1 sc in each st (24)
Info :
The goggle ring should be slightly larger than the white eye disc so the disc sits recessed. Sew the white eye to the center of the goggle ring using the long tail from the white eye disc. After sewing, you may add a round of slip stitches on the front to create a bevelled goggle edge.
Goggle Straps - Black (Make 2 short oval side attachments) :
Ch 8, turn, sc in 2nd ch from hook and across (7), sl st to join and fasten off leaving a tail for sewing. Make two straps and sew one on each side of the goggle ring at the appropriate row to match the photo.
Info :
If using a safety eye, position it first before sewing the goggle ring. For a crocheted eye, pin the completed eye to the head front centered about 10-12 stitches down from the topmost round of the head to match the look. Use pins to position the goggle ring and straps and ensure symmetry before sewing.
— Head Hair Tufts :
Info :
Use black yarn and surface knots or short rows to add 5-7 small hair tufts on top of the head. The picture shows short straight tufts spaced across the crown. Insert yarn with a yarn needle, pull through a small loop and tie a knot or leave a short loop and trim to create the tiny hair pieces.
— Body :
Round 1 :
6 sc in magic ring (6)
Round 3 :
(1 sc, inc) x 6 (18)
Round 4 :
(2 sc, inc) x 6 (24)
Round 5 :
(3 sc, inc) x 6 (30)
Round 6 :
(4 sc, inc) x 6 (36)
Round 7 :
(5 sc, inc) x 6 (42)
Round 8 :
(6 sc, inc) x 6 (48)
Round 9 :
(7 sc, inc) x 6 (54)
Round 10 :
(8 sc, inc) x 6 (60)
Round 11-14 :
1 sc in each st (60)
Info :
These rounds shape the upper torso; stop and measure the head base against the body upper edge. Leave the body opening at the top wide enough to sew the head onto it. We will later narrow the neck area of the head or the top of the body to connect cleanly.
Round 15 :
(8 sc, dec) x 6 (54)
Round 16 :
(7 sc, dec) x 6 (48)
Round 17 :
(6 sc, dec) x 6 (42)
Info :
At round 17 you should have a slightly narrower neck area; match the finished neck opening circumference to the head opening of 6 stitches (the head will have a few closing rounds left). Do not stuff the body yet — leave room to attach the head and to add stuffing from the neck down later.
Round 18-22 :
1 sc in each st (42)
Round 23 :
(5 sc, dec) x 6 (36)
Round 24 :
1 sc in each st (36)
Round 25 :
(4 sc, dec) x 6 (30)
Round 26 :
(3 sc, dec) x 6 (24)
Info :
Begin stuffing the body from the bottom up once the majority of shaping is complete. Stuff feet and legs before attaching them to the body so the weight distributes naturally. For the body, stuff firmly to help the toy stand and maintain shape but avoid overfilling to keep the top flexible for head attachment.
Round 27 :
(2 sc, dec) x 6 (18)
Round 28 :
(1 sc, dec) x 6 (12)
Info :
Leave a long tail for joining the head. You can either fasten off and sew the head opening to the top of the body opening, or fasten off on the head and continue with a ladder stitch joining. Pin the head first to check placement (center the seam at the back) and ensure the goggle sits centered on the face.
— Overalls - Bib & Pocket (Make bib and pocket then straps) :
Info :
Work overalls in blue yarn. You will crochet the bib pocket as a separate rectangle and sew it to the front of the body so the pocket can have an embroidered emblem. The bib covers approximately rounds 10-18 of the body front.
Pocket Round 1 :
Ch 16, sc in 2nd ch from hook and across (15)
Round 2-6 :
Ch 1, turn, 1 sc in each st (15)
Info :
Sew the pocket centered at the front of the body aligning the bottom of the pocket to approximately body round 12-13. Embroider the small emblem (a hooked 'G' style spiral) using black yarn directly onto the pocket after sewing the pocket in place.
Bib Round 1 (make bib rectangle) :
Ch 26, sc in 2nd ch from hook and across (25)
Bib Round 2-8 :
Ch 1, turn, 1 sc in each st (25)
Info :
Fold the bib rectangle over the body front and sew the lower edge to the body around rounds 12-15. Create two button flap tabs on the bib corners: fold 2-3 stitches at the top corners and stitch small buttonhole loops. Add small metallic studs or small yarn knots to simulate buttons as in the photo.
Straps (Make 2) :
Ch 20, sl st to form a tube strap (or sc along chain and sl st across for a flat strap). Sew straps from the back of the bib over the shoulders and attach to the back body around rounds 14-16. Add small stitches to secure the straps and make sure they are even.
Info :
To create the ribbed look visible on the bib, work the top 2 rows of the bib in BLO (back loops only). This creates a ridge that looks like the top seam of the overalls. You can also add 1-2 rounds of slip stitches at the bib top for a finished edge.
— Arms (Make 2) :
Round 1 :
6 sc in magic ring (6)
Round 3-5 :
1 sc in each st (12)
Info :
These first rounds create a rounded top for the arm where it will be sewn to the body. Stuff the top lightly so that the arm is soft but holds shape. The arms in the photo are somewhat flattened flat-tube style; keep stuffing minimal so the arm lies naturally against the body.
Round 6 :
(2 sc, inc) x 4 (16)
Round 7-9 :
1 sc in each st (16)
Info :
At round 9 change to black yarn for gloves. Carry the yellow inside if you prefer to avoid many ends and pick up the black yarn seamlessly on the next round.
Round 10-12 (Glove - black) :
1 sc in each st (16)
Round 13 :
(3 sc, dec) x 4 (12)
Round 14 :
1 sc in each st (12)
Round 15 :
(2 sc, dec) x 3 (9)
Round 16 :
(1 sc, dec) x 3 (6)
Info :
Stuff the glove portion fairly firmly for definition, and leave the remaining yellow upper arm area only lightly stuffed so the arm can bend against the body. Fasten off leaving a long tail for sewing. Repeat for second arm ensuring gloves align at the same round number on both arms.
— Legs & Boots (Make 2) :
Foot/Boot - Round 1 :
6 sc in magic ring (6)
Round 3 :
(1 sc, inc) x 6 (18)
Round 4 :
1 sc in each st (18)
Round 5 :
Change to black yarn, 1 sc in each st (18)
Round 6 :
(2 sc, inc) x 6 (24)
Round 7-9 :
1 sc in each st (24)
Info :
Switching to black at round 5 gives the look of a defined boot. Stuff the foot region firmly at this point so the toy will sit sturdily. The boot base is slightly wider than the leg tube to create that chunky boot appearance from the photo.
Round 10 :
(3 sc, dec) x 6 (18)
Round 11 :
1 sc in each st (18)
Round 12 (Start leg - change to blue) :
Change to blue yarn, 1 sc in each st (18)
Round 13-18 :
1 sc in each st (18)
Round 19 :
(2 sc, inc) x 6 (24)
Round 20 :
1 sc in each st (24)
Info :
Leg tube attaches to the bottom of the body at rounds 1-3; when attaching, position the legs so the overalls cover the top of the legs and the areas sit slightly apart for stability. Ensure both legs are equal length and mirror each other when sewing on.
Round 21 :
(3 sc, dec) x 6 (18)
Round 22 :
(2 sc, dec) x 6 (12)
Round 23 :
(1 sc, dec) x 6 (6)
Info :
Fasten off leaving a long tail for sewing. Repeat for second leg. For extra stability, reinforce stitching through the top of the leg into the body with multiple passes of the needle. The boots should be stuffed firm; legs lightly stuffed to keep a natural stance.
— Additional Details (Emblem, Buttons, Facial Embroidery) :
Info :
Sew the pocket center emblem using black yarn: embroider a tight spiral starting from the center and expanding outwards to create the small 'G' motif visible on the pocket. Use small metal studs or tiny safety buttons on the bib corners to simulate overall buttons; position them symmetrically and secure with small stitches or fabric glue.
Smile Embroidery :
Using black yarn and a yarn needle, stitch a curved smile centered about 6 rounds below the eye. Use back stitches or a simple overcast stitch to create a smooth curved line. Make the curve gentle to match the photo.
Goggle Strap Attachment :
Sew the black goggle strap pieces to the head sides aligning with the center of the goggle ring. Use tight stitching to ensure the strap doesn't twist; hide tails inside the head body.
Info :
After sewing eyes and goggle, add 5-7 small short tuft hairs by inserting black yarn into the crown, pulling through a short loop and knotting or trimming to the desired length. This adds character consistent with the picture.
— Assembly :
Info :
Before final sewing, pin all pieces in place. The head attaches to the top of the body opening; arms attach at about body rounds 20-24 to appear to come from the sides slightly below the bib; legs attach to the bottom front of the body, spaced approximately 8-10 stitches apart depending on your tension.
Step 1 :
Attach head to body by inserting the neck portion into the body opening. Pin in place first, then sew securely using whip stitch all around, ensuring even attachment.
Step 2 :
Position arms on sides of body at rounds 18-22 for a natural look. Sew through both arm and body using ladder stitch for an invisible seam. Reinforce with a second pass if arms will be played with often.
Step 3 :
Attach legs to bottom of body at rounds 1-4 of the body base, spacing them evenly. Sew securely, adding extra stitches for stability so the toy can sit upright.
Step 4 :
Sew the pocket to the front of the bib aligning the bottom of the pocket to bib row 2-3. Add the emblem on top of the pocket using black yarn and small embroidery stitches.
Step 5 :
Position and sew the goggle and eye to the head front. Ensure the goggle sits centered and straight. Sew the goggle strap pieces to the sides of the head so they meet the goggle ring flush and do not cross over the face area.
Step 6 :
Sew bib straps to the back of the body at around body rounds 14-16. Add small button stitches at bib ends. Weave in all tails securely and trim.
Info :
Use spare yarn or a yarn needle to weave through the inside seams and hide tails. If the head feels loose after sewing, add a felt disc inside the neck opening and stitch through it for reinforcement before final closure.
— Finishing Touches :
Info :
Add small highlights to the eye with a tiny white embroidery stitch or small white yarn loop to mimic reflected light. Add slight blush to cheeks with a tiny dab of fabric-safe paint if desired. Double-check all seams, tighten any loose joins, and trim stray yarn ends.
Care Instructions :
Spot clean with a damp cloth and mild soap. Remove any small embellishments before rough play. For machine washing, place in a pillowcase on delicate cycle and air dry flat—however handwashing is recommended to preserve shape and details.
This adorable amigurumi pattern combines classic crochet techniques with charming details to create a truly special handmade friend! Each carefully crafted section comes together to form a character full of personality and charm. The detailed instructions ensure your finished piece will be something to treasure for years to come. 🧶 Whether you're making this as a gift or keeping it for yourself, you'll love every stitch of the creative journey. Happy crocheting, and don't forget to share your finished creation! 🎨✨