🧢 Beautiful ✨ Detailed πŸ’ Adorable

Magic Potion Amigurumi Pattern

Magic Potion Amigurumi Pattern
4.7β˜… Rating
1-2 Hours Time Needed
1.8K Made This
βœ‚οΈ

Beginner Friendly Level

Perfect for those just starting their crochet journey, with clear instructions and simple techniques

⏱️

Quick Make

Complete in under 2 hoursβ€”lightning fast fun for instant gratification and quick gifts.

🎁

Tiny Treasure

Small, sweet, and gift-worthy creations that fit perfectly in the palm of your hand with detailed charm.

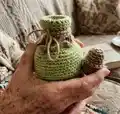
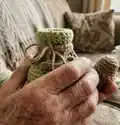
About This Magic Potion Amigurumi Pattern

This pattern makes a small crocheted potion bottle with a fitted cork and decorative tendrils. It uses medium/worsted yarn and a 3.5mm hook for a sturdy, neat finish. Youll work in rounds with simple increases and decreases and finish with charming details.

Magic Potion Amigurumi Pattern crochet pattern - detailed view of completed project

Perfect for gifting or for a magical display, it includes clear row-by-row instructions. The cork is removable and the decoration adds lovely movement and texture.

Why You'll Love This Magic Potion Amigurumi Pattern

I absolutely love this pattern because it transforms simple stitches into a delightful miniature prop that feels magical to make. I enjoy how quickly the bottle grows in the round β€” you get visible progress fast. The cork and decorative tendrils let me add personality with tiny finishing touches. I find it relaxing and satisfying to stitch something so small and giftable, and it makes a perfect quick handmade present.

Magic Potion Amigurumi Pattern step 1 - construction progress Magic Potion Amigurumi Pattern step 2 - assembly progress Magic Potion Amigurumi Pattern step 3 - details and accessories Magic Potion Amigurumi Pattern step 4 - final assembly and finishing

Switch Things Up

I love to customize this pattern by changing the bottle color to match seasons; try deep purple or autumn orange for different moods.

I often make a chunky version by using a bulkier yarn and a larger hook to create a squishier, more tactile bottle.

I sometimes swap the cork color or add metallic thread to the tendrils for a sparkling accent that catches the light.

You can scale the pattern by using thinner yarn and smaller hook to create tiny keychain-sized bottles for gifts.

I like embroidering tiny symbols on the bottle for added character β€” simple stitched stars, moons or initials work beautifully.

If you want posability, try stitching on a small loop and adding a tiny cord to hang the bottle like an ornament.

I recommend experimenting with different stuffing levels in the cork to find the perfect snug fit for your bottle neck.

I sometimes add tiny beads or a charm to the ends of the tendrils for extra weight and decoration.

I will often make a themed set by using coordinated yarns and tying the decoration as a bow, knot or sewn finish depending on the intended look.

For a rustic look, I like natural fibers or linen-effect yarn and leaving longer tails to tie into loose bows that sit casually around the neck of the bottle.

Common Mistakes & How to Fix Them

βœ— Skipping the stitch count checks can cause the bottle to flare or tighten; count your stitches at the end of each round to ensure accuracy. βœ— Forgetting to stuff the cork as you go can make it either too flat or too bulky; stuff gradually and try the cork in the bottle for fit while working. βœ— Working inconsistent tension when switching to BLO or FLO will change your neck shape; keep a consistent tension and practice BLO/FLO on a swatch first. βœ— Not weaving tails in securely after closing the cork can cause gaps at the bottom; use a tapestry needle to weave the tail through front loops and pull tight for a flat finish. βœ— Misplacing the decoration loops or anchoring them unevenly makes the tendrils look lopsided; pin or mark placement before sewing and match each side as you attach.

Magic Potion Amigurumi Pattern

Make a tiny, charming Magic Potion bottle with a removable cork and decorative tendrils β€” perfect as a small gift or shelf accent. This pattern guides you step-by-step through the bottle, cork and decoration using medium/worsted yarn and simple stitches. Youll love the quick construction and the sweet finishing details that bring this little potion to life.

Beginner Friendly 1-2 Hours

Materials Needed for Magic Potion Amigurumi Pattern

β€” Main Fabric

  • 01
    Sheepjes Stonewash XL or any medium/worsted yarn
  • 02
    Canada Jade - main color for the bottle
  • 03
    Boulder Opal - color for cork and decoration

β€” Tools Required

  • 01
    Crochet hook size 3.5mm
  • 02
    Yarn scissors
  • 03
    Polyfill stuffing for cork
  • 04
    Tapestry needle for sewing and weaving ends
  • 05
    Stitch markers
  • 06
    Optional: pins for holding decoration in place while sewing

Progress Tracker

0% Complete

β€” Pattern Details :

Infos :

Yarn: Sheepjes Stonewash XL or any medium/worsted yarn. Bottle: Canada Jade. Cork and Decoration: Boulder Opal. Hook: 3.5mm hook. Size: 6 inches tall, 4 inches wide. Abbreviations: Ch=Chain. HDC=half double crochet. SC=single crochet. Stitch=st. BLO=back loops only. FLO=front loops only. Slip stitch=sl st. Invisible decrease=dec. *numbers in parenthesis at the end of each row is the number of stitches you will have. What you will need: Yarn, scissors, polyfill for cork, tapestry needle, stitch markers, 3.5mm hook.

β€” Bottle :

Round 1 :

6 sc in a magic circle (6)

Round 2 :

Inc in all 6 st (12)

Round 3 :

(inc in next st, sc in next st) repeat 6 times (18)

Round 4 :

(inc in the next st, sc in the next 2 st) repeat 6 times (24)

Round 5 :

(sc in the next 2 st, inc in the next st, sc in the next st) repeat 6 times (30)

Round 6 :

(inc in the next st, sc in the next 4 st) repeat 6 times (36)

Round 7 :

(sc in the next 3 st, inc in the next st, sc in the next 2 st) repeat 6 times (42)

Round 8 :

(inc in the next st, sc in the next 6 st) repeat 6 times (48)

Round 9-19 :

sc in all 48 st (48)

Round 20 :

(dec in the next st, sc in the next 6 st) repeat 6 times (42)

Round 21 :

(sc in the next 3 st, dec in the next st, sc in the next 2 st) repeat 6 times (36)

Round 22 :

(dec in the next st, sc in the next 4 st) repeat 6 times (30)

Round 23 :

(sc in the next st, dec in the next st, sc in the next 2 st) repeat 6 times (24)

Round 24 :

(sc in the next 6 st, dec in the next st) repeat 3 times (21)

Round 25-30 :

sc in all 21 st (21)

Round 31 :

sc in the FLO of all 21 st (21) Ex A&B

Round 32-34 :

sc in all 21 st (21)

Info :

*fasten off and weave in end, roll down top of bottle*

β€” Cork :

Round 1 :

6 sc in a magic circle (6)

Round 2 :

Inc in all 6 st (12)

Round 3-4 :

sc in all 12 st (12)

Round 5 :

(sc in the next 4 st, inc in the next st). repeat 2 times. Sc in the last 2 st (14)

Round 6 :

sc in all 14 st (14)

Round 7-8 :

sc in the BLO in all 14 st (14) Ex A

Round 9 :

sc in all 14 st (14) *stuff, as you go along you can try the cork in the bottle and stuff more or less for a good fit*

Round 10-11 :

repeat rows 7 and 8 (14) Ex B

Round 12 :

dec in all 14 st (7)

Infos :

*fasten off leaving long tail and using a tapestry needle weave in and out through each front loop and pull to close Ex C&D. Pull the tail up through the center of the bottom through the top and pull to get the flat appearance at the bottom of stopper Ex E&F. Fasten off at top to hold shape and hide inside. Decoration (brief): make a slip knot and put your crochet hook in the loops closest to the top that we did the back loop sc in and ch1 to anchor. Sc around in each st and slip st into the st we ch1 into and fasten off.*

β€” Decoration :

Info :

In Boulder Opal. *Leave a long starting tail if you want to use it to tie into a bow*

Round 1 :

ch 26 starting in the second chain from the hook HDC in all 25 st, ch1 and turn (25) Ex A

Round 2 :

we're going to do the following pattern to create the hanging tendrils: sl st in the first st and in the same st ch 10- sl st back along in all 9 st and sl st into the next 4 st repeat until end, 5 times. Ex B&C

Info :

*pull yarn through last sl st and using a needle thread it through to match the other side and either sew ends together around bottle neck or tie them in a bow Ex D*

Assembly Instructions

  • Fasten off the bottle after round 34, weave in ends and roll down the top of the bottle to form the neck opening for the cork.
  • Insert the cork into the bottle opening and adjust the stuffing of the cork as needed for a snug but removable fit while sewing and closing the cork.
  • For the cork closing: leave a long tail, weave the tail in and out through each front loop, pull to close, then pull the tail through the center and up through the top to flatten the bottom of the stopper before securing and tucking the tail inside.
  • Attach the decorative tendrils by matching both sides: thread the long tail through to the other side, sew or tie ends together around the bottle neck, and secure as a bow or sewn knot.

Important Notes

  • πŸ’‘Use stitch markers to mark the beginning of each round and especially when working increases and decreases.
  • πŸ’‘Stuff the cork gradually and test fit inside the bottle as you go to get the best snug, removable fit.
  • πŸ’‘Weave in ends as you finish each piece and hide tails inside the cork or bottle for a neat finish.

This little Magic Potion bottle is a tiny, whimsical project you can finish quickly β€” perfect for gifting or displaying on a shelf. It pairs a soft jade bottle with a textured cork and playful tendrils for charming detail. Make a set in different colors for a magical collection. 🧢✨

You ask,

we answer.

FAQs

What size will the finished piece be?

The finished potion bottle measures approximately 6 inches tall and 4 inches wide using the recommended yarn and 3.5mm hook.

Can I use different yarn weights for this pattern?

Yes, you can use other yarn weights, but the final size will change; adjust your hook size accordingly for best results.

Do I need prior crochet experience for this pattern?

This pattern is Beginner Friendly and uses basic stitches like SC, increases and decreases, but you should be comfortable working in the round and following row instructions.

How long does this project typically take to complete?

Most crafters complete the bottle, cork and decoration in about 1-2 hours, though time may vary based on experience and finishing details.