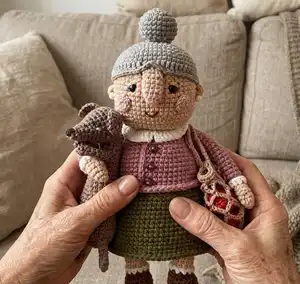
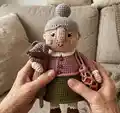
Make a charming handmade grandma amigurumi with detailed step-by-step instructions. This pattern guides you through crocheting the head, hair, body, arms, legs, and sweet facial details to create a cozy, characterful toy. You will enjoy assembling tiny accessories like a bun, ears, cheeks, and a little dachshund companion. Perfect for gifting or keeping as a delightful handmade decor piece.
Progress Tracker
0% Complete
— Head :
Info :
Crochet in beige color.
Round 1 :
ch12, from the second ch from the hook 10 sc, 3 sc into 1 ch, continue crocheting along the second side of the chain 9 sc, inc (24)
Round 2 :
inc, 9 sc, 3 inc, 9 sc, 2 inc (30)
Round 3 :
1 sc, inc, 9 sc, (1 sc, inc)*3, 9 sc, (1 sc, inc)*2 (36)
Round 4 :
(5 sc, inc)*6 (42)
Round 5 :
(6 sc, inc)*6 (48)
Round 6-17 :
48 sc (12 rounds)
Info :
At this stage insert the safety eyes. Mark with pins two points between the rounds 12 and 13. The distance between these points is 9 sts. Insert and secure the eyes.
Round 18 :
(6 sc, dec)*6 (42)
Info :
Stuff the piece firmly as you go.
Round 19 :
(5 sc, dec)*6 (36)
Round 20 :
(4 sc, dec)*6 (30)
Round 21 :
(3 sc, dec)*6 (24)
Round 22 :
(2 sc, dec)*6 (18)
Round 23 :
(1 sc, dec)*6 (12)
Info :
Cut the thread, fasten off, pull the opening closed into the front loops only using a needle. Weave in the thread end inside of the piece.
— Hair :
Info :
Crochet in grey melange color.
Round 3 :
(1 sc, inc)*6 (18)
Round 4 :
(2 sc, inc)*6 (24)
Round 5 :
(3 sc, inc)*6 (30)
Round 6 :
(4 sc, inc)*6 (36)
Round 7 :
(5 sc, inc)*6 (42)
Round 8 :
(6 sc, inc)*6 (48)
Round 9 :
(7 sc, inc)*6 (54)
Round 10-12 :
54 sc (3 rounds)
Round 13 :
ch1, 14 dc, 1 hdc, 1 sc, 1 hdc, 10 dc, 1 hdc, 2 sl st, 1 hdc, 10 dc, 1 hdc, 1 sc, 1 hdc, 10 dc, sl st (54)
Info :
Fasten off the thread, cut, leaving a long tail for sewing.
— Bun :
Info :
Crochet in grey melange color.
Round 3 :
(1 sc, inc)*6 (18)
Round 4 :
(2 sc, inc)*6 (24)
Round 5-7 :
24 sc (3 rounds)
Round 8 :
(2 sc, dec)*6 (18)
Round 9 :
(1 sc, dec)*6 (12)
Info :
Stuff the piece firmly. Fasten off the thread, cut, leaving a long thread tail for sewing.
— Ears (MAKE 2) :
Info :
Crochet in beige color.
Info :
Pull the opening closed, fasten off the thread, cut, leaving a long tail for sewing.
— Nose :
Info :
Start crocheting in powder color.
Info :
Change to beige color.
Round 3-7 :
8 sc (5 rounds)
Info :
Don't stuff the piece. Fold the piece in half and work 4 sc through two layers. Fasten off the thread, cut, leaving a long tail for sewing.
— Cheeks (MAKE 2) :
Info :
Crochet in powder color.
Round 1 :
6 sc in MR, sl st
Info :
Fasten off the thread, cut, leaving a long tail for sewing.
— Head Assembly and Details :
Info :
Start assembling from the nose. Find its location on the face. It should be located between the rounds 8 and 18. We will sew only the beige part of the nose across its edge, inserting the needle throughout. The base of the nose also should be sewn.
Info :
Make two stitches above the eyes in beige color.
Info :
Fix the cheeks leaving 1 stitch down from the eyes and 4 stitches to both sides from the nose. Sew them.
Info :
I embroider the mouth with YarnArt Jeans yarn of brown color divided in two strands. Make a stitch with the wide of 3 sts, leaving 2 rounds down from the nose tip. And embroider the mouth as it's shown in the photos.
Info :
Then we will sew the hair. Fix the hair on the head with pins so that the space where we have made 2 sl sts was above the nose. Sew. Find the bun location. Look at the photo. Sew. Weave in the thread ends inside of the piece.
Info :
Sew the ears to the head sides to the points where we have crocheted hdc sts on the hair. Skip 1 round down from the hair. Make sure the ears are symmetrically located. Weave in the thread ends inside of the piece.
— Arms (MAKE 2) :
Info :
Start crocheting in beige color.
Round 2 :
(1 sc, inc)*3 (9)
Round 4 :
4 sc, puff stitch consisting of three dc, 4 sc (9)
Info :
Stuff slightly this part of the arm, don't stuff other part of the arm.
Info :
Change to blueberry color.
Round 6 :
into back loops only 9 sc
Round 7-22 :
9 sc (16 rounds)
Info :
Fasten off the thread, cut, weave in the thread end inside of the piece.
— Legs and Body :
Info :
Start crocheting in brown color.
Round 1 :
Make ch 6, from the second ch from the hook: 4 sc, 3 sc into 1 ch, continue crocheting along the second side of the chain: 3 sc, inc (12)
Round 2 :
inc, 3 sc, 3 inc, 3 sc, 2 inc (18)
Round 3 :
into back loops only: 18 sc
Round 4-5 :
18 sc (2 rounds)
Info :
Cut 2 identical oval shapes from the thick cardboard or plastic sheet, they should fit the sole shape. Insert into the boot.
Round 6 :
3 sc, 6 dec, 3 sc (12)
Info :
Change to beige color.
Round 7 :
into back loops only: 12 sc
Round 8-15 :
12 sc (8 rounds)
Info :
Stuff the piece firmly. Then stuff as you go.
Info :
Change to white color.
Round 16 :
(3 sc, inc)*3 (15)
Round 17 :
13 sc (leave 2 stitches till the end of the round unworked, so the toes on both legs are facing towards front side)
Info :
Fasten off the thread, cut, leaving a long thread tail for sewing.
Info :
Crochet the second leg in the same way till the round 17. For the second leg in the round 17 work: 15 sc + work 6 sc additionally. Don't cut the thread, continue crocheting the body.
Info :
Make ch 9 and join with the first leg.
Round 1 :
15 sc across the first leg, 9 sc along the chain, 15 sc across the second leg, 9 sc across the second side of the chain (48)
Round 2 :
(7 sc, inc)*6 (54)
Round 4 :
(8 sc, inc)*6 (60)
Round 5-10 :
60 sc (6 rounds)
Info :
Change to green color.
Info :
Change to blueberry color.
Round 12 :
into back loops only: 60 sc
Round 13-18 :
60 sc (6 rounds)
Round 19 :
(8 sc, dec)*6 (54)
Round 21 :
(7 sc, dec)*6 (48)
Round 23 :
(6 sc, dec)*6 (42)
Round 24 :
6 sc, 4 sc together with the arm (check for the arm location), 16 sc, 4 sc together with the second arm, 12 sc (42)
Round 25 :
6 sc, across the stitches left on the arm: 2 sc, dec, 1 sc, continue crocheting across the body: 16 sc, then work across the second arm 1 sc, dec, 2 sc, continue crocheting across the body 12 sc (42)
Info :
Now we are going to make a wireframe for the arms. Cut two pieces of wire, each piece should have 17-18 cm length approximately. Bend one wire end and wrap it with an adhesive tape. Insert the wire into the arm with the wrapped end inside.
Info :
Twist the other ends of wire and cut extra length. Wrap with an adhesive tape, bend it into the body piece.
Round 26 :
(5 sc, dec)*6 (36)
Round 27 :
(4 sc, dec)*6 (30)
Round 28 :
(3 sc, dec)*6 (24)
Round 29 :
(2 sc, dec)*6 (18)
Round 30 :
(1 sc, dec)*6 (12)
Info :
Fasten off the thread, pull the opening closed, weave in the thread end inside of the piece.
Info :
Twist the other ends of wire and cut extra length. Wrap with an adhesive tape, bend it into the body piece. (This step is shown in photos.)
— Socks and Cuffs Details :
Info :
Then we will make the details for the socks on her legs and cuffs on the arms.
Info :
In the seventh round on the leg crochet 12 sc into free front loops in white color. Fasten off the thread, cut, weave in the thread ends inside of the piece.
Info :
In the sixth round on the arm work 9 dc into free front loops in white color. Fasten off the thread, cut, weave in the thread ends.
— Skirt :
Info :
Then crochet the skirt. Hold the toy with the legs facing up when working at the skirt. Crochet in green color.
Info :
In the 12th round of the body crochet into free front loops:
Round 1 :
(9 sc, inc)*6 (66)
Round 2-15 :
66 sc (14 rounds)
Info :
Crochet 1 sl st additionally, fasten off the thread, cut, weave in the thread end at the wrong side.
— Cardigan Vertical Chain :
Info :
Then we are going to make a vertical chain consisting of slip stitches. This chain will imitate the cardigan wrap. Mark a straight vertical line slightly to the left from the middle. Start crocheting up from down. Insert the hook under the stitch of the cardigan's first round, pull up the loop and start crocheting a chain of sl sts up. Insert the hook under the stitch in every round. Crochet the chain till the body's top part. Fasten off the thread, cut, weave in the thread ends inside of the piece.
This sweet Grandma amigurumi brings cozy charm to your handmade collection and makes a perfect heartfelt gift. The pattern includes step-by-step rounds, assembly photos, and small accessory ideas to personalize your doll. Have fun stitching every little detail and enjoy a warm crafting experience. 🧶🧵