🧶 Beautiful ✨ Detailed 💝 Adorable

Field of Daisies Crochet Blanket Pattern

Field of Daisies Crochet Blanket Pattern
4.4★ Rating
12-15 Hours Time Needed
3.9K Made This
✂️

Beginner Friendly Level

Perfect for those just starting their crochet journey, with clear instructions and simple techniques

⏱️

Multi-Day Project

A rewarding 12+ hour journey—perfect for dedicated crafters who love detailed work.

🤗

Soft Hug

Gentle, plush, and full of warmth, creating a sense of comfort and coziness wherever they find a home.

About This Field of Daisies Crochet Blanket Pattern

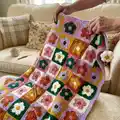
This pattern creates a colorful daisy patchwork blanket built from 5 1/2" square floral motifs joined into a full-size throw. It uses Red Heart Super Saver yarn in six contrasting colors and a simple 5mm hook for a soft, durable finish. The blanket is finished with a neat hdc edging and decorative flower pompoms at each corner.

Field of Daisies Crochet Blanket Pattern crochet pattern - detailed view of completed project

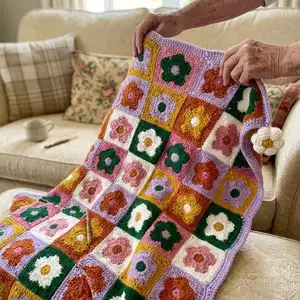
You will make 120 motifs (20 of each colorway) then sew them together through the back loops only following the assembly diagram. Full round-by-round motif instructions, edging steps and flower pompom assembly are provided.

Why You'll Love This Field of Daisies Crochet Blanket Pattern

I absolutely love this pattern because the repeating daisy motifs are both meditative and rewarding to make. I enjoy the color-play—swapping the three colors for each motif keeps the project interesting without being complicated. The joining through the back loops gives the blanket a lovely framed look that really elevates the finished piece. The corner flower pompoms are a charming, quick finishing touch that adds personality and whimsy.

Field of Daisies Crochet Blanket Pattern step 1 - construction progress Field of Daisies Crochet Blanket Pattern step 2 - assembly progress Field of Daisies Crochet Blanket Pattern step 3 - details and accessories Field of Daisies Crochet Blanket Pattern step 4 - final assembly and finishing

Switch Things Up

I love to customize the color placement of the Field of Daisies blanket to suit different rooms or recipients.

Try swapping the palette for pastels for a nursery-friendly version or deep jewel tones for a cozy adult throw.

You can change yarn weight and hook size to create a larger or smaller blanket; use bulky yarn with a larger hook for a faster, chunky version.

Mix and match the three colors per motif to create new contrast effects — swap the center, petal and background colors for endless variety.

I often embroider a small initial or motif onto one square to personalize a gift blanket.

For a boho look, add tassels or longer pompoms to each corner instead of the flower pompoms.

Try joining motifs with a contrasting join color for a grid effect, or use the back-loop join as written for a framed look.

I sometimes change the edging: a scalloped shell border or a simple dc round can totally change the finish.

If you want a modern vibe, use neutrals for the border and bright colors for the motifs only.

To make a bed-sized blanket, plan additional motif rows and calculate yarn needs by making a small section and measuring motif count per length.

Common Mistakes & How to Fix Them

✗ Skipping the assembly diagram and random sewing can lead to mismatched colors and imbalance; follow the provided assembly diagram on page 3 and sew motifs in the exact order shown. ✗ Not breaking and changing colors as instructed can make joins bulky and messy; break Color 1 where indicated and join Color 2 with a slip stitch to the top of the beginning chain to keep color transitions neat. ✗ Failing to work through back loops only when joining motifs will obscure the framed edge effect; sew motifs together through back loops only as directed for the clean join. ✗ Overstuffing the Flower Pompoms during assembly can distort petals and make finishing difficult; stuff lightly before completing the fifth petal to keep pompoms soft and neat.

Field of Daisies Crochet Blanket Pattern

Bright, cheerful and full of floral charm, this Field of Daisies blanket uses easy crochet motifs assembled into a cozy throw. You will make colorful daisy square motifs and join them together for a 57 x 68 inch blanket. The pattern includes full motif instructions, edging details, assembly diagram and pretty flower pompoms for the corners.

Beginner Friendly 12-15 Hours

Materials Needed for Field of Daisies Crochet Blanket Pattern

— Main Fabric

  • 01
    Red Heart Super Saver (7 oz/198 g; 364 yds/333 m) - base yarn
  • 02
    Contrast A Carrot (0256) - 2 balls or 545 yds/498.5 m
  • 03
    Contrast B Gold (0321) - 2 balls or 545 yds/498.5 m
  • 04
    Contrast C Paddy Green (0368) - 2 balls or 545 yds/498.5 m
  • 05
    Contrast D Pale Plum (0579) - 2 balls or 665 yds/608 m
  • 06
    Contrast E Soft White (0316) - 2 balls or 620 yds/567 m
  • 07
    Contrast F Light Raspberry (0774) - 2 balls or 545 yds/498.5 m

— Tools Required

  • 01
    Crochet hook size U.S. H/8 (5 mm) Susan Bates Silvalume or size needed to obtain gauge
  • 02
    Susan Bates yarn needle
  • 03
    Fiberfill stuffing for corner Flower Pompoms

Progress Tracker

0% Complete

— Motifs :

Infos :

Motif 1: With A as Color 1, F as Color 2, and E as Color 3 - make 20 Motifs. Motif 2: With B as Color 1, E as Color 2, and C as Color 3 - make 20 Motifs. Motif 3: With C as Color 1, D as Color 2, and B as Color 3 - make 20 Motifs. Motif 4: With D as Color 1, C as Color 2, and F as Color 3 - make 20 Motifs. Motif 5: With E as Color 1, B as Color 2, and A as Color 3 - make 20 Motifs. Motif 6: With F as Color 1, A as Color 2, and D as Color 3 - make 20 Motifs.

Info :

Measurements: Approx 57" x 68" [145 x 173 cm]. Gauges: 12 sc and 15 rows = 4" [10 cm]. Motif = 5 1/2" [14 cm] square.

Info :

Notes: Ch 2 at beg of rnd does not count as st. Ch 3 at beg of rnd counts as dc.

Info :

See Diagram.

Info :

With Color 1, ch 4. Join with sl st to first ch to form ring.

Round 1 :

Ch 3. 9 dc in ring. Join Color 2 with sl st to top of beg ch 3. Break Color 1. 10 dc.

Round 2 :

With Color 2, ch 3. 1 dc in first dc. *2 dc in next dc. Rep from * around. Join with sl st to beg of ch 3. 20 dc.

Round 3 :

Skip first dc. *(1 dc, 1 tr) in next dc. 3 tr in next dc. (1 tr, 1 dc) in next dc. Sl st in next dc. Rep from * around, ending by joining with sl st to top of ch-3. Fasten off.

Round 4 :

Join Color 3 with sl st to any centre tr of 3-tr group. Ch 1. 1 sc in same sp as sl st. *1 hdc in next tr. 1 dc in each of next 2 sts. 1 tr in same st as sl st from previous (3rd) rnd. 1 dc in each of next 2 sts. 1 hdc next tr. 1 sc in next tr. Rep from * around, omitting last sc and joining with sl st to first sc.

Round 5 :

Ch 1. 1 sc in same sp as sl st. *1 hdc in next st. 1 dc in next st. 2 dc in next st. (1 tr, ch 1, 1 tr) in next st (corner made). 2 dc in next st. 1 dc in next st. 1 hdc in next st. 1 sc in each of next 3 sts. Rep from * around, ending with 1 sc in each of last 2 sts. Join with sl st to first sc. Fasten off.

— Flower "POMPOMS" :

Infos :

Flower "Pompoms" (make 4). Flowers (make 2 for each Pompom).

Info :

With B, ch 4. Join with sl st to first ch to form ring.

Round 1 :

Ch 3. 9 dc in ring. Join E with sl st to top of beg ch 3. Break B. 10 dc.

Round 2 :

With Color 2, ch 3. 1 dc in first dc. *2 dc in next dc. Rep from * around. Join with sl st to beg of ch 3. 20 dc.

Round 3 :

Skip first dc. *(1 dc, 1 tr) in next dc. 3 tr in next dc. (1 tr, 1 dc) in next dc. Sl st in next dc. Rep from * around, ending by joining with sl st to top of ch-3. Fasten off.

— Assembly :

Info :

Sew Motifs tog through back loops only as shown in Assembly diagram on page 3.

— Edging :

Round 1 :

(RS). Join D with sl st to any corner. Ch 2. Work 1 rnd of hdc evenly around all sides, working 3 hdc in each corner. Join with sl st to first hdc.

Round 2 :

Ch 2. 1 hdc in each hdc around, working 3 hdc in each corner. Join with sl st to first hdc. Fasten off.

— Flower Pompom Assembly :

Info :

With 2 Flowers held WS tog, join with sl st anywhere around edge.

Round 1 :

Working through both thicknesses and back loops only, sl st around Flowers, stuffing lightly before completing 5th petal. Fasten off.

Info :

Sew one Flower Pompom to each corner of Blanket.

Assembly Instructions

  • Sew motifs together through back loops only following the assembly diagram on page 3 to maintain the framed motif effect.
  • Join yarn D for the edging at any corner with a slip stitch, work 1 round of hdc evenly around all sides, placing 3 hdc in each corner; join with slip stitch.
  • Work a second round of edging with ch 2 and 1 hdc in each hdc around, again placing 3 hdc in each corner; join with slip stitch and fasten off.
  • Make 4 Flower Pompoms by joining pairs of flower motifs WS together with a slip stitch around the edge, stuffing lightly before completing the final petal.
  • Sew one finished Flower Pompom to each corner of the blanket, securing with a yarn needle and matching yarn.

Important Notes

  • 💡Ch 2 at the beginning of a round does not count as a stitch; follow the pattern counts given for each round carefully.
  • 💡Ch 3 at the beginning of a round counts as a double crochet; do not omit or miscount this when tallying stitches.
  • 💡Sew motifs together through the back loops only to create the framed square effect shown in the assembly diagram.
  • 💡Stuff Flower Pompoms lightly before completing the final petal so the flowers keep their shape without becoming bulky.

This Field of Daisies blanket is a joyful, colorful project that brightens any room and warms hands and hearts. 🧶 Make 120 daisy motifs, join them with a neat back-loop seam, and finish with a sweet pompom at each corner for charming detail. 🌸 Enjoy the slow, satisfying rhythm of motif-making and celebrate the vibrant finished throw! ✨

You ask,

we answer.

FAQs

What size will the finished piece be?

The finished blanket measures approximately 57" x 68" (145 x 173 cm) using the recommended yarn and hook size.

Can I use different yarn weights for this pattern?

Yes, you can use different yarn weights, but this will change the final size and gauge; adjust your hook size and make a gauge swatch to match the motif size.

Do I need prior crochet experience for this pattern?

This pattern is rated beginner friendly; familiarity with basic stitches like chain, double crochet, treble, half double crochet and slip stitch is helpful.

How long does this project typically take to complete?

Most crafters will take multiple sessions—approximately 12-15 hours total—depending on speed, assembly time and finishing details.