About This Little Spark Amigurumi Pattern
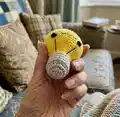
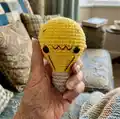
This pattern makes a small, adorable lightbulb amigurumi called Little Spark. You will crochet the bulb in rounds, switch colors for the screw fitting, and add simple embroidered facial details. It is compact and quick to make, perfect for practicing shaping and front/back loop techniques.
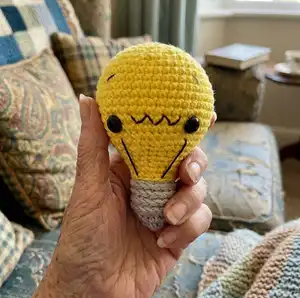
The finished lightbulb measures approximately 8 cm tall using the recommended yarn and hook. It includes clear, step-by-step round instructions and simple assembly notes for a polished finish.
Why You'll Love This Little Spark Amigurumi Pattern
I absolutely love this pattern because it turns a simple object into a tiny character with lots of charm. I enjoy how quickly it comes together, letting you crochet a finished piece in just a few hours. The embroidered face adds personality without complex techniques, which makes it delightful to customize. I also adore the little screw fitting detail — it gives a playful twist that feels very rewarding to complete.
Switch Things Up
I love experimenting with color combinations; try pastel shades for a softer, nursery-friendly bulb or bright neons for a playful look.
I sometimes swap the yellow for a gradient or variegated yarn to create a speckled bulb effect that adds visual interest.
If you want a larger version, I increase the yarn weight and use a bigger hook to create a chunkier, cuddlier bulb.
For a tiny keychain version I use thinner yarn and a smaller hook, then attach a keyring to the top after finishing.
I often embroider different facial expressions — a smile, surprised O, or sleepy eyes — to give each bulb its own personality.
You can replace safety eyes with French knots or small beads for a different eye style; just keep child safety in mind.
To make the bulb posable, I add a short length of florist wire inside the lower neck area before finishing the screw fitting.
I like to attach tiny crocheted accessories like a mini hat or scarf to seasonalize the bulb for holidays or gifts.
Try mixing yarn textures: use a cotton body with a slightly metallic or sparkly yarn for the screw to make it pop.
For a gift set, I crochet several bulbs in coordinating colors and present them in a small hand-sewn bag for a handmade touch.
I also recommend practicing the embroidery on scrap fabric or a swatch first to perfect the zig-zag and eye lines before working on the final piece.
Finally, I sometimes add a small hanging loop at the top of the screw fitting so the bulb can be used as an ornament or decoration.
Common Mistakes & How to Fix Them
✗ Skipping stitch markers when working in continuous rounds causes you to lose track of the beginning of rounds; use a stitch marker and move it each round to stay consistent.
✗ Forgetting to add stuffing gradually results in lumps or flattened areas; stuff a bit at a time and shape as you go so the bulb retains a smooth form.
✗ Not counting stitches during increases or decreases leads to incorrect shaping and an uneven silhouette; count stitches at the end of each round, especially after shaping rounds.
✗ Pulling yarn too tight when switching to silver yarn for the screw fitting can distort the front loop join; join gently and check loop tension before continuing.
✗ Using safety eyes for toys intended for small children is unsafe and could be hazardous; either embroider the eyes with black thread or avoid giving to young children.
✗ Failing to embroider guidelines lightly first may produce uneven facial features; mark positions and test stitches before committing to embroidery.