๐Ÿงถ Beautiful โœจ Detailed ๐Ÿ’ Adorable

Frog Prince Amigurumi Pattern

Frog Prince Amigurumi Pattern
4.4โ˜… Rating
5-7 Hours Time Needed
2.4K Made This
โœ‚๏ธ

Intermediate Level

Ideal for those with basic crochet experience, featuring slightly more advanced stitches and techniques to expand your skills.

โฑ๏ธ

Weekend Treat

Takes 5-7 hours, making it an enjoyable project to finish over a couple of days.

๐Ÿงธ

Cute Companion

An adorable friend to cherish, handcrafted with love to bring comfort and joy for years to come.

About This Frog Prince Amigurumi Pattern

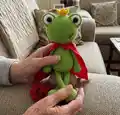
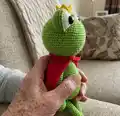
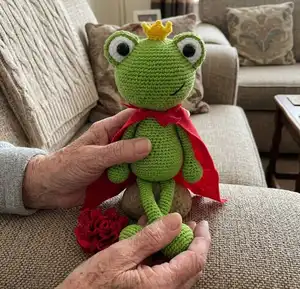
This pattern creates a tall, whimsical Frog Prince amigurumi complete with big expressive eyes, eyelids, long limbs, and a tiny crown. The design uses worsted weight yarn and simple single crochet shaping to form a charming, poseable toy. You will work pieces separately and assemble them for a polished finished look. The pattern includes notes on where to place safety eyes and detailed finishing tips.

Frog Prince Amigurumi Pattern crochet pattern - detailed view of completed project

Clear round-by-round instructions guide you through shaping the head, body, arms, and legs. The pattern also includes materials, abbreviations, and assembly directions for an easy finish.

Why You'll Love This Frog Prince Amigurumi Pattern

I absolutely love this pattern because it turns simple stitches into a character full of personality and charm. I enjoy how the oversized eyes and small crown give the frog a playful storybook look that always brings smiles. The shaping is thoughtful โ€” the elongated body and long legs make it unique and fun to sew together. I appreciate that it uses common materials and straightforward techniques, so I can focus on the finishing touches that personalize each frog.

Frog Prince Amigurumi Pattern step 1 - construction progress Frog Prince Amigurumi Pattern step 2 - assembly progress Frog Prince Amigurumi Pattern step 3 - details and accessories Frog Prince Amigurumi Pattern step 4 - final assembly and finishing

Switch Things Up

I love experimenting with color combinations to give each Frog Prince a unique personality; try mint green with pastel accents for a softer look.

I often change the yarn weight and hook size to make different sizes; using bulky yarn gives a cuddle-sized frog while finer yarn makes a dainty mini.

I add embroidered details like freckles or a small bow tie to make each frog feel special and personal.

Swap the safety eyes for embroidered eyes if you want a child-safe version without hard parts.

I sometimes replace the crown yarn color with metallic or sparkly yarn to give a royal shimmer to the frog's head.

Try adding a removable fabric cape or tiny crocheted scarf to vary outfits and styling for gifts or seasonal looks.

If you want posable limbs, consider adding thin wire into the legs before stuffing to allow slight posing.

Change the eyelid shape or size to alter the frog's expression โ€” lower eyelids make a sleepy look, higher give a surprised expression.

I like to use different eye sizes to play with proportion; larger eyes give a cuter, cartoonish effect while smaller eyes look more subtle.

For a whimsical set, crochet several frogs in a range of colors and display them together as a collection or gift bundle.

Experiment with stuffing amounts; a firmer stuffing keeps shapes crisp while less stuffing makes the toy more floppy and cuddly.

I often sew on small accessories like a felt lily pad or tiny heart to personalize the frog for special occasions.

Common Mistakes & How to Fix Them

โœ— Skipping stitch markers while working continuous rounds causes you to lose track of round starts; use a stitch marker and move it each round to stay accurate. โœ— Forgetting to stuff gradually leads to lumps and uneven shaping; stuff small amounts at a time and shape as you go to maintain a smooth surface. โœ— Placing safety eyes without checking row placement results in uneven eye placement; pin or mark the eye positions between the recommended rounds before securing them. โœ— Pulling stitches too tight when closing openings makes seams hard to sew and bulky; maintain moderate tension and leave long tails for easier sewing and smoother finishes.

Frog Prince Amigurumi Pattern

Make a charming Frog Prince amigurumi you can cherish or gift. This pattern guides you step-by-step through crocheting the head, body, limbs, eyes, eyelids, and a tiny crown with clear rounds and assembly notes. With simple shaping and finishing tips, you will create a 17-inch tall frog full of personality. Perfect for intermediate crocheters looking for a sweet, characterful project.

Intermediate 5-7 Hours

Materials Needed for Frog Prince Amigurumi Pattern

โ€” Main Fabric

  • 01
    Worsted Weight yarn (#4), approximately 150g main color (Color A: Green)
  • 02
    Accent colors: approximately 50g total (Color B: White, Color C: Yellow)

โ€” Tools Required

  • 01
    Crochet hook size F / 3.75 mm
  • 02
    18 mm safety eyes (2 pieces)
  • 03
    Scissors
  • 04
    Yarn needle for sewing
  • 05
    Stitch markers
  • 06
    Polyester fiberfill stuffing
  • 07
    Black embroidery thread for mouth/details
  • 08
    Pins for assembly

Progress Tracker

0% Complete

โ€” Head :

Info :

Worked from top to bottom

Info :

With Color A:

Round 1 :

Make 6 sc into a magic ring= 6

Round 2 :

Increase in each st around= 12

Round 3 :

(sc, inc) x 6= 18

Round 4 :

sc, inc, (2 sc, inc) x 5, sc= 24

Round 5 :

(3 sc, inc) x 6= 30

Round 6 :

2 sc, inc, (4 sc, inc) x 5, 2 sc= 36

Round 7 :

(5 sc, inc) x 6= 42

Round 8 :

3 sc, inc, (6 sc, inc) x 5, 4 sc= 48

Round 9 :

(7 sc, inc) x 6= 54

Round 10 :

4 sc, inc, (8 sc, inc) x 5, 4 sc= 60

Round 11 :

(9 sc, inc) x 6= 66

Round 12-19 :

sc in each st around

Round 20 :

(9 sc, dec) x 6= 60

Round 21 :

4 sc, dec, (8 sc, dec) x 5, 4 sc= 54

Round 22 :

(7 sc, dec) x 6= 48

Round 23 :

3 sc, dec, (6 sc, dec) x 5, 3 sc= 42

Round 24 :

(5 sc, dec) x 6= 36

Round 25 :

2 sc, dec, (4 sc, dec) x 5, 2 sc= 30

Round 26 :

(3 sc, dec) x 6= 24

Round 27 :

(2 sc, dec) x 6= 18

Info :

F/O

โ€” Body :

Info :

With Color A:

Round 1 :

Make 6 sc into a magic ring= 6

Round 2 :

Increase in each st around= 12

Round 3 :

(sc, inc) x 6= 18

Round 4 :

(2 sc, inc) x 6= 24

Round 5 :

(3 sc, inc) x 6= 30

Round 6 :

(4 sc, inc) x 6= 36

Round 7 :

(5 sc, inc) x 6= 42

Round 8 :

(6 sc, inc) x 6= 48

Round 9-15 :

Sc in each st around

Round 16 :

(6 sc, dec) x 6= 42

Round 17-18 :

Sc in each st around

Info :

Start stuffing the body

Round 19 :

(5 sc, dec) x 6= 36

Round 20-21 :

Sc in each st around

Round 22 :

(4 sc, dec) x 6= 30

Round 23-25 :

Sc in each st around

Round 26 :

(3 sc, dec) x 6= 24

Round 27-29 :

Sc in each st around

Round 30 :

(2 sc, dec) x 6= 18

Round 31-32 :

Sc in each st around

Info :

F/O and leave a long tail for sewing

โ€” Eyes(Make 2) :

Info :

With Color B:

Round 1 :

Make 6 sc into a magic ring= 6

Round 2 :

Increase in each st around= 12

Round 3 :

(sc, inc) x 6= 18

Round 4-6 :

sc in each st around

Info :

Place the safety eyes between rounds 5 and 6.

Info :

F/O and leave a long tail for sewing

โ€” Eyelids(Make 2) :

Info :

With Color A:

Round 1 :

Make 6 sc into a magic ring= 6

Round 2 :

Increase in each st around= 12

Round 3 :

(sc, inc) x 6= 18

Round 4 :

(2 sc, inc) x 6= 24

Round 5 :

(3 sc, inc) x 6= 30

Round 6-9 :

Sc in each st around

Info :

Fold the eyelid in half and sc it closed.

Info :

F/O and leave a long tail for sewing

โ€” Arms(Make 2) :

Info :

With Color A:

Round 1 :

Make 6 sc into a magic ring= 6

Round 2 :

Increase in each st around= 12

Round 3 :

(sc, inc) x 6= 18

Round 4-6 :

sc in each st around

Info :

Start stuffing the arms

Round 7 :

(4 sc, dec) x 3= 15

Round 8 :

(3 sc, dec) x 3= 12

Round 9 :

(2 sc, dec) x 3= 9

Info :

Stop stuffing the legs

Round 10-27 :

sc in each st around

Info :

Fold the arms in half and sc the opening closed. F/O and leave a long tail for sewing

โ€” Legs(Make 2) :

Info :

With Color A:

Round 1 :

Make 6 sc into a magic ring= 6

Round 2 :

Increase in each st around= 12

Round 3 :

(sc, inc) x 6= 18

Round 4 :

(2 sc, inc) x 6= 24

Round 5 :

(3 sc, inc) x 6= 30

Round 6-9 :

Sc in each st around

Info :

Start stuffing the legs

Round 10 :

(2 sc, dec) x 4, 14 sc= 26

Round 11 :

(sc, dec) x 4, 14 sc= 22

Round 12 :

Dec x 4, 14 sc= 18

Round 13 :

(sc, dec) x 6= 12

Round 14 :

(2 sc, dec) x 3= 9

Info :

Stop stuffing the legs

Round 15-35 :

sc in each st around

Info :

Fold the legs in half and sc the opening closed. F/O and leave a long tail for sewing

โ€” Crown :

Info :

With Color C:

Row/Step :

Ch 12

Row/Step :

1. sl to to 1st ch to make a ring

Round 2-3 :

sc in each st around

Round 4 :

ch 3, sl st in 2nd ch from hook, sc in next chain, sc in next st on crown.

Info :

Repeat 5 more times to have 6 points

Info :

F/O and leave a long tail for sewing

โ€” Assembly :

Info :

Sew the eyes onto the head.

Info :

Sew the eyelids around the eyes.

Info :

Sew the head onto the body.

Info :

Sew the arms and legs onto the body.

Info :

Sew the crown in between the eyes onto the head.

Info :

For the cape I used a no sew tutorial here http://www.littlepinkmonsters.com/no-sew-superhero-cape/

Assembly Instructions

  • Sew the eyes onto the head, then sew the eyelids around the eyes to secure the eyes and create the frog look.
  • Sew the head onto the body aligning the neck opening to the top of the body and stitch securely using matching yarn.
  • Position and sew the arms and legs onto the body, spacing them symmetrically and reinforcing stitches for durability.
  • Sew the crown between the eyes onto the head, using the long tail left from the crown to secure it neatly.
  • Use pins to position pieces before sewing to check symmetry and make final adjustments prior to permanently stitching.

Important Notes

  • ๐Ÿ’กDo not join rounds unless stated; work in a continuous spiral to maintain consistent shaping throughout the pieces.
  • ๐Ÿ’กUse a stitch marker to mark the beginning of each round so you can easily keep track of round counts and changes.
  • ๐Ÿ’กAll stitches are worked in both loops unless stated otherwise in the pattern; check for BLO or FLO instructions when present.
  • ๐Ÿ’กPlace safety eyes between rounds 5 and 6 of the eye pieces for correct positioning and secure attachment.

This Frog Prince amigurumi pattern helps you create a whimsical, handmade companion with a tiny crown and big personality. ๐Ÿธ Follow the step-by-step rounds and assembly notes to shape each part and bring your frog to life. โœจ Perfect for gifting or as a decorative keepsake โ€” happy crocheting and enjoy every stitch! ๐Ÿงถ

You ask,

we answer.

FAQs

What size will the finished piece be?

The finished amigurumi measures approximately 17 inches from bottom to top of head when using worsted weight yarn and a 3.25-3.75 mm hook as recommended.

Can I use different yarn weights for this pattern?

Yes, you can change yarn weight but the final size and stitch tension will change; choose an appropriate hook size and expect a different finished height.

Do I need prior crochet experience for this pattern?

This pattern is rated intermediate, so basic crochet skills like magic ring, single crochet, increases, and decreases are recommended for best results.

How long does this project typically take to complete?

Most crocheters complete this Frog Prince in about 5-7 hours, depending on experience and time spent on assembly and finishing details.

Where should I place the safety eyes?

Place the safety eyes between rounds 5 and 6 of the eye piece as noted in the eyes section, then secure and continue crocheting.