🧢 Beautiful ✨ Detailed πŸ’ Adorable

Lighthouse Stacking Toy Amigurumi Pattern

Lighthouse Stacking Toy Amigurumi Pattern
4.9β˜… Rating
5-7 Hours Time Needed
3.8K Made This
βœ‚οΈ

Intermediate Level

Ideal for those with basic crochet experience, featuring slightly more advanced stitches and techniques to expand your skills.

⏱️

Weekend Treat

Takes 5-7 hours, making it an enjoyable project to finish over a couple of days.

🧸

Cute Companion

An adorable friend to cherish, handcrafted with love to bring comfort and joy for years to come.

About This Lighthouse Stacking Toy Amigurumi Pattern

This pattern creates a layered lighthouse stacking toy with removable rings and a central pole, perfect for little hands. It uses simple amigurumi techniques and worked-in-the-round pieces to build each ring, plus a roof, top and small appliques. You will enjoy combining basic increases and decreases to shape the rings and top.

Lighthouse Stacking Toy Amigurumi Pattern crochet pattern - detailed view of completed project

Detailed round-by-round instructions are provided for each piece, including finishing and assembly tips. The design is colorful, sturdy and a lovely handmade gift for toddlers.

Why You'll Love This Lighthouse Stacking Toy Amigurumi Pattern

I absolutely love this pattern because it balances playful design with practical construction, giving you a stacking toy that is both decorative and sturdy. I enjoyed designing the rings so they nest perfectly on the pole while still being easy for small hands to remove. I love the tiny details like the little door and windows β€” they bring personality and charm to the lighthouse. Working the rings in rounds and using front/back loop finishes gives a neat, professional edge that I am proud to share.

Lighthouse Stacking Toy Amigurumi Pattern step 1 - construction progress Lighthouse Stacking Toy Amigurumi Pattern step 2 - assembly progress Lighthouse Stacking Toy Amigurumi Pattern step 3 - details and accessories Lighthouse Stacking Toy Amigurumi Pattern step 4 - final assembly and finishing

Switch Things Up

I love to customize the colors to match a nursery or a seasonal palette; try soft pastels for a baby-safe look or bright nautical stripes for a seaside theme.

I sometimes change yarn weight and hook size to make a mini keychain version or a larger plush tower; bulky yarn creates a chunky, cuddly toy.

I add embroidered details or felt accents for extra texture, like tiny waves, stars, or a name banner along one ring for personalization.

Switch up the finishing rounds by using reverse crochet (crab stitch) for a decorative ridge instead of a slip stitch to change the edge style.

Try stuffing the pole more firmly for a stable tower, or insert a cardboard tube inside a larger pole to make it rigid and dishwasher-safe for toy bins.

I sometimes make matching little boats or sea shells as accessory props to create a whole play scene and a themed gift set.

For toddlers, I reduce small parts and sew appliques securely, using embroidered crosses for windows instead of buttons for safety.

If you want a pastel collectible, swap the red and grey for blush and cream and use a delicate metallic thread for the rim accents.

I enjoy creating a matching mini lighthouse by using thinner yarn and a 2.5 mm hook for a pocket-sized version to keep as a keepsake.

Feel free to mix techniques: add a loop on top and make the whole set a hanging mobile by threading a ribbon through the pole and spacing the rings decoratively.

Common Mistakes & How to Fix Them

βœ— Skipping stitch markers at the start of rounds can make you lose track of rounds; place a marker at the first stitch of each round to keep count. βœ— Forgetting to stuff as you go can make it hard to fill narrow parts later; add stuffing gradually while shaping each piece to maintain even form. βœ— Not sewing base parts in the back loops as instructed can distort the seam; align and sew in the specified back loops of rounds 6 and 11 for a clean join. βœ— Cutting tails too short before sewing will make assembly difficult; leave long tails for sewing and weave them in after parts are attached. βœ— Ignoring front loop/back loop instructions will change the edge appearance; follow BLO/FLO directions for the intended finished edge and decorative rounds.

Lighthouse Stacking Toy Amigurumi Pattern

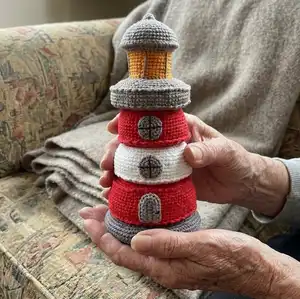
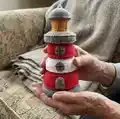
Make a charming lighthouse stacking toy that doubles as a cuddly amigurumi and a playful stacking set. This pattern guides you through crochet rings, a central pole, roof and sweet little door and windows, with clear round-by-round instructions. Perfect for gifting or as a handmade nursery toy, you will enjoy stitching each colorful layer. Follow along and create a nautical keepsake to treasure.

Intermediate 5-7 Hours

Materials Needed for Lighthouse Stacking Toy Amigurumi Pattern

β€” Main Fabric

  • 01
    White - Alize Cotton Gold 55
  • 02
    Light grey - Alize Cotton Gold 200
  • 03
    Red - Alize Cotton Gold 56
  • 04
    Yellow - Alize Cotton Gold 216

β€” Tools Required

  • 01
    Hook: 3 mm (or in accordance with the yarn you use)
  • 02
    Fiberfill for stuffing
  • 03
    Scissors
  • 04
    Tapestry needle for sewing

Progress Tracker

0% Complete

Info :

TERMS USED MR - magic ring Ch - chain sl st - slip stitch sc - single crochet inc - increase (2 sc in 1 st) dec - decrease BLO - back loop only FLO - front loop only rev - reverse crochet (crab stitch)

Info :

MATERIALS: Yarn: White - Alize Cotton Gold 55 Light grey - Alize Cotton Gold 200 Red - Alize Cotton Gold 56 Yellow - Alize Cotton Gold 216 Hook: 3 mm (or in accordance with the yarn you use) Fiberfill for stuffing, scissors, tapestry needle fr sewing.

β€” BASE :

Info :

BASE (make 2 parts) Start with grey color

Round 1 :

6 sc in MR (6)

Round 2 :

6 inc (12)

Round 3 :

(1 sc; inc)*6 (18)

Round 4 :

(2 sc; inc)*6 (24)

Round 5 :

(3 sc; inc)*6 (30)

Round 6 :

FLO (4 sc; inc)*6 (36)

Round 7 :

(5 sc; inc)*6 (42)

Round 8 :

3 sc; inc; (6 sc; inc)*5; 3 sc (48)

Round 9 :

(7 sc; inc)*6 (54)

Round 10 :

4 sc; inc; (8 sc; inc)*5; 4 sc (60)

Round 11 :

FLO (9 sc; inc)*6 (66)

Round 12 :

5 sc; inc; (10 sc; inc)*5; 5 sc (72)

Round 13 :

(11 sc; inc)*6 (78)

Round 14 :

6 sc; inc; (12 sc; inc)*5; 6 sc (84)

Round 15 :

(13 sc; inc)*6 (90)

Round 16-17 :

90 sc (90) cut the yarn, leave a long tail for sewing.

β€” POLE :

Info :

Crochet with white color, fill with stuffing as you go

Round 1 :

6 sc in MR (6)

Round 2 :

6 inc (12)

Round 3 :

(1 sc; inc)*6 (18)

Round 4 :

(2 sc; inc)*6 (24)

Round 5-49 :

24 sc (24)

Round 50 :

(3 sc; inc)*6 (30)

Info :

Sew the pole with the part of the base (in round 5) like in the pictures. Then sew two parts of the base together in back loops of rounds 6 and 11. Fill with stuffing as you go. After that sew edges of two parts of base in round 17.

β€” LARGE RING :

Info :

Crochet with red color

Round 1 :

36 ch, sl st in 1st ch (36) continue to work in rounds

Round 2-11 :

1 ch; 36 sc; sl st (36) turn the work inside out and continue in rounds

Round 12 :

BLO (5 sc; inc)*6 (42)

Round 13 :

3 sc; inc; (6 sc; inc)*5; 3 sc (48)

Round 14 :

(7 sc; inc)*6 (54)

Round 15 :

4 sc; inc; (8 sc; inc)*5; 4 sc (60)

Round 16 :

(9 sc; inc)*6 (66)

Round 17 :

5 sc; inc; (10 sc; inc)*5; 5 sc (72)

Round 18 :

(11 sc; inc)*6 (78)

Round 19 :

6 sc; inc; (12 sc; inc)*5; 6 sc (84)

Round 20 :

(13 sc; inc)*6 (90)

Round 21 :

BLO (13 sc; dec)*6 (84)

Round 22-25 :

84 sc (84)

Round 26 :

6 sc; dec; (12 sc; dec)*5; 6 sc (78)

Round 27-30 :

78 sc (78)

Round 31 :

BLO (11 sc; dec)*6 (72)

Round 32 :

5 sc; dec; (10 sc; dec)*5; 5 sc (66)

Round 33 :

(9 sc; dec)*6 (60)

Round 34 :

4 sc; dec; (8 sc; dec)*5; 4 sc (54)

Round 35 :

(7 sc; dec)*6 (48)

Round 36 :

3 sc; dec; (6 sc; dec)*5; 3 sc (42)

Round 37 :

(5 sc; dec)*6 (36) fill with stuffing, cut the yarn, leave a tail for sewing. Sew round 37 with round 1.

Info :

There are two ways to make pretty edges of the rings - in rounds 21 and 31 in the front loops make slip stitch round or reverse crochet (crab stitch) round.

β€” MIDDLE RING :

Info :

Crochet with white color

Round 1 :

36 ch, sl st in 1st ch (36) continue to work in rounds

Round 2-11 :

1 ch; 36 sc; sl st (36) turn the work inside out and continue in rounds

Round 12 :

BLO (5 sc; inc)*6 (42)

Round 13 :

3 sc; inc; (6 sc; inc)*5; 3 sc (48)

Round 14 :

(7 sc; inc)*6 (54)

Round 15 :

4 sc; inc; (8 sc; inc)*5; 4 sc (60)

Round 16 :

(9 sc; inc)*6 (66)

Round 17 :

5 sc; inc; (10 sc; inc)*5; 5 sc (72)

Round 18 :

(11 sc; inc)*6 (78)

Round 19 :

BLO (11 sc; dec)*6 (72)

Round 20-23 :

72 sc (72)

Round 24 :

5 sc; dec; (10 sc; dec)*5; 5 sc (66)

Round 25-28 :

66 sc (66)

Round 29 :

BLO (9 sc; dec)*6 (60)

Round 32 :

4 sc; dec; (8 sc; dec)*5; 4 sc (54)

Round 31 :

(7 sc; dec)*6 (48)

Round 32 :

3 sc; dec; (6 sc; dec)*5; 3 sc (42)

Round 33 :

(5 sc; dec)*6 (36) fill with stuffing, cut the yarn, leave a tail for sewing. Sew round 33 with round 1.

Info :

In rounds 19/29 in the front loops make slip stitch round (78slst/66slst) or reverse crochet (crab stitch) round (39 rev/33 rev).

β€” SMALL RING :

Info :

Crochet with red color

Round 1 :

36 ch, sl st in 1st ch (36) continue to work in rounds

Round 2-11 :

1 ch; 36 sc; sl st (36) turn the work inside out and continue in rounds.

Round 12 :

BLO (5 sc; inc)*6 (42)

Round 13 :

3 sc; inc; (6 sc; inc)*5; 3 sc (48)

Round 14 :

(7 sc; inc)*6 (54)

Round 15 :

4 sc; inc; (8 sc; inc)*5; 4 sc (60)

Round 16 :

(9 sc; inc)*6 (66)

Round 17 :

BLO (9 sc; dec)*6 (60)

Round 18-21 :

60 sc (60)

Round 22 :

4 sc; dec; (8 sc; dec)*5; 4 sc (54)

Round 23-26 :

54 sc (54)

Round 27 :

BLO (7 sc; dec)*6 (48)

Round 28 :

3 sc; dec; (6sc; dec)*5; 3 sc (42)

Round 29 :

(5 sc; dec)*6 (36) fill with stuffing, cut the yarn, leave a tail for sewing. Sew round 29 with round 1.

β€” TOP :

Info :

Crochet with grey color

Round 1 :

6 sc in MR (6)

Round 2 :

6 inc (12)

Round 3 :

(1 sc; inc)*6 (18)

Round 4 :

(2 sc; inc)*6 (24)

Round 5 :

(3 sc; inc)*6 (30)

Round 6 :

(4 sc; inc)*6 (36)

Round 7-14 :

1 ch; 36 sc; sl st (36) turn the work inside out and continue in rounds.

Round 15 :

BLO (5 sc; inc)*6 (42)

Round 16 :

3 sc; inc; (6 sc; inc)*5; 3 sc (48)

Round 17 :

(7 sc; inc)*6 (54)

Round 18 :

4 sc; inc; (8 sc; inc)*5; 4 sc (60)

Round 19 :

(9 sc; inc)*6 (66)

Round 20 :

5 sc; inc; (10 sc; inc)*5; 5 sc (72)

Round 21 :

BLO 72 sc (72)

Round 22-24 :

72 sc (72)

Round 25 :

BLO 5 sc; dec; (10 sc; dec)*5; 5 sc (66)

Round 26 :

(9 sc; dec)*6 (60)

Round 27 :

4 sc; dec; (8 sc; dec)*5; 4 sc (54)

Round 28 :

(7 sc; dec)*6 (48)

Round 29 :

3 sc; dec; (6 sc; dec)*5; 3 sc (42)

Round 30 :

(5 sc; dec)*6 (36) fill with stuffing, change to yellow color

Round 31 :

FLO 36 sc (36)

Round 32-38 :

36 sc (36) change to grey color

Round 39 :

FLO (5 sc; inc)*6 (42)

Round 40 :

3 sc; inc; (6 sc; inc)*5; 3 sc (48) cut the yarn, hide a tail, fill with stuffing.
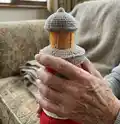
β€” ROOF :

Info :

Crochet with grey color

Round 1 :

6 sc in MR (6)

Round 2 :

6 sc (6)

Round 3 :

6 inc (12)

Round 4 :

12 sc (12)

Round 5 :

12 inc (24)

Round 6 :

24 sc (24)

Round 7 :

(1 sc; inc)*6 (36)

Round 8 :

36 sc (36)

Round 9 :

(2 sc; inc)*6 (48)

Round 10-12 :

48 sc (48) connect the roof with the top of lighthouse with one single crochet round (48 sc), fill with stuffing as you go.

Info :

In rounds 21/25 in the front loops make one slip stitch round (72slst) or reverse crochet (crab stitch) round (36 rev).

β€” DOOR :

Info :

Crochet with grey color

Row 1 :

8 ch (8)

Row 2 :

7 sc (7)

Round 3 :

1 ch, 6 sc; 3 sc in one; 6 sc; turn (15)

Round 4 :

1 ch, 6 sc; 3 inc; 6 sc; turn (18) cut the yarn leave a tail for sewing.

β€” WINDOWS :

Info :

(make .3) Crochet with grey color

Round 1 :

6 sc in MR (6)

Round 2 :

6 inc (12)

Round 3 :

(1 sc; inc)*6 (18) cut the yarn leave a tail for sewing.

Info :

Sew the door and windows to a rings (blocks). That's it! Your lighthouse is finished. Congratulations! The only thing is left to do is to find a good lighthouse keeper:)

Assembly Instructions

  • Sew the pole to the base by attaching it to the part of the base in round 5, aligning edges and securing with mattress or whip stitch as shown.
  • Sew the two base parts together in the back loops of rounds 6 and 11, filling with stuffing as you go to maintain shape.
  • Sew the edges of the two base parts together in round 17 to close the base neatly and securely.
  • For each ring, sew the final round with the first round (e.g., sew round 37 with round 1 of the large ring) to create a closed ring section.
  • Connect the roof with the top of the lighthouse using one single crochet round (48 sc) around the top opening and stuff as you go.
  • Pin and sew the door and windows onto the ring surfaces (blocks) in visually centered positions before permanently stitching them into place.

Important Notes

  • πŸ’‘Use stitch markers to mark the first stitch of each round so you don't lose track while working in continuous rounds.
  • πŸ’‘Stuff parts gradually while crocheting narrow sections to ensure even fill and maintain shape without lumps.
  • πŸ’‘When joining base parts, sew in the back loops as instructed for a neat seam and better structural stability.

This lighthouse stacking toy is a heartfelt handmade project that brightens any child's play corner and doubles as a rustic decor piece. It combines simple amigurumi techniques with fun, colorful rings that stack safely and easily. Enjoy making each ring and adding the tiny details that give it personality and charm. πŸ§Άβš“οΈ

You ask,

we answer.

FAQs

What size will the finished piece be?

The finished stacking lighthouse measures approximately the same scale as shown in photos when using Alize Cotton Gold yarn and a 3 mm hook; exact size will vary slightly with tension.

Can I use different yarn weights for this pattern?

Yes, you can use different yarn weights but the finished size and stacking fit will change; choose an appropriate hook for your yarn and expect size variation.

Do I need prior crochet experience for this pattern?

This pattern is rated intermediate because it uses continuous rounds, BLO/FLO finishing and multiple pieces that require accurate assembly.

How long does this project typically take to complete?

Most crocheters complete this project in 5-7 hours, though time may vary based on experience level and how thorough you are with stuffing and sewing.