🧢 Beautiful ✨ Detailed πŸ’ Adorable

Lion Granny Square Pattern

Lion Granny Square Pattern
4.6β˜… Rating
2-3 Hours Time Needed
4.1K Made This
βœ‚οΈ

Beginner Friendly Level

Perfect for those just starting their crochet journey, with clear instructions and simple techniques

⏱️

Bite-Sized Project

Finishes in 2-4 hoursβ€”perfect for an afternoon of creative relaxation.

🏑

Cozy Accent

A warm touch for your space that transforms ordinary corners into inviting nooks filled with handmade charm.

About This Lion Granny Square Pattern

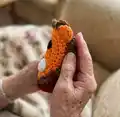
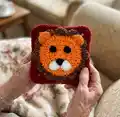
This pattern creates a delightful lion face granny square that works great as an applique or a standalone motif. Youll use simple rounds, a color change, and a textured fur round to build the face and mane. The project is compact, quick to make, and ideal for using small amounts of scrap yarn.

Lion Granny Square Pattern crochet pattern - detailed view of completed project

Clear step-by-step round instructions and photos guide you through every stitch. Perfect for beginner crocheters wanting a fun, rewarding project.

Why You'll Love This Lion Granny Square Pattern

I absolutely love this pattern because it combines simple crochet rounds with playful details to bring a lion face to life. I enjoy how quickly the square grows β€” you get a satisfying result in just a few rounds. The textured mane adds personality with minimal extra effort, and the small components (eyes, nose, mouth) let me practice tiny amigurumi techniques. Making these as gifts brightens up blankets and bags, and I love seeing how different color choices change the character.

Lion Granny Square Pattern step 1 - construction progress Lion Granny Square Pattern step 2 - assembly progress Lion Granny Square Pattern step 3 - details and accessories Lion Granny Square Pattern step 4 - final assembly and finishing

Switch Things Up

I love to change colors to suit different projects; try pastel shades for a nursery blanket or jewel tones for a bold cushion.

You can change the yarn weight and hook size to make the square larger or smaller; bulky yarn with a larger hook gives a chunky look.

I often swap the orange main color for cream or tan for a more natural lion look, or use ombre yarns for subtle shading.

Try making the mane in two contrasting colors worked in alternating rounds to add depth and interest.

Replace the crochet eyes with felt circles or safety eyes if you want a smoother finish or quicker assembly.

I sometimes embroider whiskers or tiny details on the mouth for added personality and texture.

Combine multiple lion squares with plain granny squares to create a playful themed blanket or wall hanging.

For a 3D effect, lightly stuff the mouth pieces before sewing them down to give the muzzle a raised appearance.

Add a small loop at the top corner and use the square as a festive ornament or keychain by fastening a stitch marker loop.

I also recommend experimenting with fluffy yarns for the mane to create a soft, tactile finish that children will love to touch.

Common Mistakes & How to Fix Them

βœ— Not tightening the magic ring can leave a visible hole in the center; pull the tail firmly to close the MR or use the invisible stitch technique to secure the center. βœ— Skipping stitch counts during increase rounds results in uneven shaping; count stitches at the end of every round to ensure you have the correct total. βœ— Failing to work in the correct loop for the mane will misalign textures; attach the brown yarn to the FRONT LOOP of the [2tc, ch2, 2tc] stitch as instructed. βœ— Changing color incorrectly at the end of Round 4 can leave a loose join; either change color in the last dc and sl st to the first dc or finish with the invisible stitch then attach the new color securely.

Lion Granny Square Pattern

Create a charming Lion Granny Square to add playful personality to blankets, bags, or home decor. This pattern guides you through each round with clear photos and simple techniques. Youll make a textured lion face applique with a neat border β€” perfect for gifting or decorating. Follow the step-by-step instructions to achieve consistent, professional results.

Beginner Friendly 2-3 Hours

Materials Needed for Lion Granny Square Pattern

β€” Main Fabric

  • 01
    Lightweight acrylic yarn (light/worsted light weight) in Orange - small amount
  • 02
    Lightweight acrylic yarn in Brown - small amount
  • 03
    Lightweight acrylic yarn in Red - small amount
  • 04
    Lightweight acrylic yarn in Black - small amount
  • 05
    Lightweight acrylic yarn in White - small amount

β€” Tools Required

  • 01
    4 mm hook
  • 02
    Yarn Needle
  • 03
    Scissors

Progress Tracker

0% Complete

β€” Square :

Round 1 :

MR, ch2, 12dc inside MR (12)

Info :

Tighten the MR by pulling on the tail of your yarn and then sl st in the 1st dc (skip the ch2).

Round 2 :

ch2, *dc inc* all around (24)

Round 3 :

ch2, *dc, dc inc* all around (36)

Round 4 :

ch2, *2dc, dc inc* all around (48)

Info :

Invisible stitch: after you are done with Round 4, cut the yarn, leave a long tail, and pull the yarn all the way through. With your needle, go into the 2nd dc from the back to the front through both loops, and then go through the center of the last dc towards the back. Pull the tail tight enough to create a stitch on top of the 1st dc and then weave in the excess yarn to secure it.

Info :

Color Change: at the end of Round 4, you will need to do a color change to red. Method 1: change color at the last dc of Round 4 and then sl st to the 1st dc. Method 2: after Round 4, finish off with an invisible stitch and then attach the color red.

Info :

Insert your hook into any stitch and attach the red yarn by pulling it through the back loop.

Round 5 :

ch1, *3sc, 2hdc, 2dc, [2tc + ch2 + 2tc] in the same stitch, 2dc, 2hdc* all around BLO (68)

Round 6 :

ch2, *dc* all around and [2dc + ch2 + 2dc] in the ch2 space (84)

Info :

Sl st in the first sc that you did at the beginning of Round 5. At the end of the round, finish off and weave in any excess yarn. You can finish off using the invisible stitch method or sl st in the 1st dc and then yarn over and pull it all the way through.

β€” Fur :

Info :

Attach the brown yarn to Round 4 in the Front Loop. Make sure to attach the brown yarn to the front loop of [2tc, ch2, 2tc] stitch. This way when you add the ears later on, the hair and the ears would not block each other.

Round 1 :

ch1, *skip a st, 5dc in the same st, skip a st, sl st* all around (72)

Info :

At the end of the round, finish off and weave in any excess yarn.

β€” Mouth :

Info :

The mouth is done in the continuous rounds methods (no slip stitching when finish the round). Using the white yarn

Round 1 :

MR, ch1, 6sc in MR (6)

Info :

Tighten the MR and continue to Round 2 without slip stitching.

Round 2 :

*inc* all around (12)

Round 3 :

*sc* all around (12)

Info :

Cut the yarn and finish off. Leave a long tail for stitching.

β€” Nose :

Round 1 :

MR, ch1, [2sc, dc, 2sc] in MR (5)

Info :

Tighten the MR but do not close it completely. Finish off and leave a long tail for sewing.

β€” Ears :

Row 1 :

MR, ch3 (which count as a dc), 7dc in MR (8)

Info :

Finish off without closing the MR and leave a long tail for stitching.

β€” Eyes :

Round 1 :

MR, ch1, 5sc in MR (5)

Info :

Close the MR, finish off, and leave a long tail for stitching. You can replace the eyes with two pieces of felt.

β€” Assembly :

Info :

Place the face components on the square. Use the tails for sewing.

Info :

The ears are aligned to the corners of the square.

Info :

The mouth pieces are a bit tilted and are between Round 2 and 3.

Info :

The nose is in the center and the pointed part (dc) is directed downwards.

Info :

The eyes are located on Round2.

Assembly Instructions

  • Place the face components on the square. Use the tails for sewing to secure each piece in place.
  • Align the ears to the corners of the square and sew them with the tails, making sure the ears sit over the mane without blocking it.
  • Position the two mouth pieces between Round 2 and Round 3, slightly tilted, then tack them down and sew securely.
  • Sew the nose in the center of the face with the pointed dc oriented downwards, leaving the tail to weave in behind.
  • Place the eyes on Round 2, spacing them evenly and stitch through the tails to secure; you may use felt instead of crocheted eyes if preferred.

Important Notes

  • πŸ’‘The ( ) at the end of each round/row indicates the total number of stitches that should be completed for that round/row.
  • πŸ’‘When working through the rounds/rows, work through the entire stitch (back loop and front loop) unless stated otherwise.
  • πŸ’‘The chains at the beginning of a round/row do not count as a stitch unless stated otherwise.
  • πŸ’‘You can use any yarn to make this square; for example, if you use a larger hook and a suitable yarn, the square will be bigger.

This Lion Granny Square pattern adds a playful handmade accent to your projects with a textured mane and cute facial details. Use it for blankets, bags, or as a sweet applique on clothing. Whether you make one or a dozen, these squares bring warmth and charm to every stitch. 🦁🧢✨

You ask,

we answer.

FAQs

What size will the finished piece be?

The square is 11 cm x 11 cm when made with the recommended lightweight yarn and a 4 mm hook.

Can I use different yarn weights for this pattern?

Yes, you can use different yarn weights, but this will affect the final size and texture; choose an appropriate hook size for your yarn and be prepared for a larger or smaller square.

Do I need prior crochet experience for this pattern?

This pattern is beginner friendly, so basic knowledge of magic ring, dc, sc, and working in rounds is sufficient to complete the square.

How long does this project typically take to complete?

Most crocheters complete this project in 2-3 hours, though time may vary based on experience level and yarn choice.