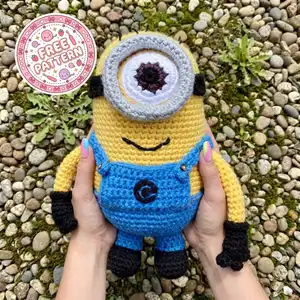
This lovable yellow amigurumi features a single big eye goggle, bright blue overalls, tiny black gloves and boots, and a cheerful embroidered smile. Designed to be squeezable and huggable, the finished toy uses simple shapes, bold color blocks, and easy-to-follow shaping to capture a playful character. Perfect as a gift or desk companion, this pattern focuses on round-by-round clarity and assembly tips to help you recreate the look shown in the photo.
Progress Tracker
0% Complete
— Head :
Round 1 :
6 sc in magic ring (6)
Round 3 :
(1 sc, inc) x 6 (18)
Round 4 :
(2 sc, inc) x 6 (24)
Round 5 :
(3 sc, inc) x 6 (30)
Round 6 :
(4 sc, inc) x 6 (36)
Round 7 :
(5 sc, inc) x 6 (42)
Round 8 :
(6 sc, inc) x 6 (48)
Round 9-15 :
1 sc in each st (48)
Info :
Place safety eye placement marker between rounds 13-14, centered on the face. For a single large goggle, the eye center should be at the middle front; mark the center stitch and count out 3-4 stitches to either side to position the goggle strap later.
Round 16 :
(6 sc, dec) x 6 (42)
Round 17 :
(5 sc, dec) x 6 (36)
Info :
Begin stuffing the head lightly but firmly to maintain roundness. Use small amounts of fiberfill to avoid lumps. Keep stuffing accessible since you will continue decreasing in the next rounds.
Round 18 :
1 sc in each st (36)
Round 19 :
(4 sc, dec) x 6 (30)
Round 20 :
(3 sc, dec) x 6 (24)
Round 21 :
(2 sc, dec) x 6 (18)
Info :
Keep stuffing the head firmer near the top to avoid a flattened look. Smooth stuffing with your fingers as you go and push the fiberfill toward the center of the head to maintain shape.
Round 22 :
(1 sc, dec) x 6 (12)
Info :
Fasten off leaving a long tail for sewing to the body if you plan to sew the head on. Alternatively, if you plan to join head and body later with slip stitch, do not fasten off; leave a tail of at least 25 cm for joining.
— Eye (make 1 large eye piece) :
Round 1 :
In black (or very dark brown) yarn: 6 sc in magic ring (6)
Round 3 :
(1 sc, inc) x 6 (18)
Round 4 :
Switch to dark brown yarn: 1 sc in each st (18)
Round 5 :
Switch to white yarn: 1 sc in each st (18)
Round 6 :
2 sc, (dec, 2 sc) across to shape the white edge if you want a slightly smaller sclera (18) - or simply keep 1 sc in each st for a flat disc
Info :
If using a safety eye, stop here and mount it to the center of the dark brown iris before adding the grey rim. If embroidering the eye, use a few satin stitches to add highlights or lighten the center before adding the rim.
Round 7 :
Switch to grey yarn for the goggle rim: in grey, work 1 sc in each st around the white (18). If you want a thicker rim, work an additional round of (1 sc, inc) x 6 to increase to 24.
Round 8 :
Optional extra rim round: (3 sc, inc) x 6 (24) - gives a chunky goggle rim that stands proud of the head
Info :
Block the eye disc gently into a circular shape by shaping with fingers and small amounts of stuffing in the center to keep it slightly convex. This helps the goggle look rounded and realistic.
— Goggle Strap (make 2 halves and join behind head) :
Round 1 :
Using black yarn, ch 24, sc in 2nd ch from hook and across (23)
Round 2-6 :
1 sc in each st (23) - make a strip long enough to wrap around head; make two strips to join behind head or make one long continuous strip approximately 44-48 ch depending on head circumference (adjust to fit)
Info :
Measure the strap against the head and overlap slightly behind the head for sewing. You can also stitch the strap directly onto the head after placing the goggle rim to ensure correct alignment.
— Body :
Round 1 :
6 sc in magic ring (6)
Round 3 :
(1 sc, inc) x 6 (18)
Round 4 :
(2 sc, inc) x 6 (24)
Round 5 :
(3 sc, inc) x 6 (30)
Round 6-10 :
1 sc in each st (30)
Info :
Change to bright blue yarn now if you want a continuous set of overalls starting near the chest. For the look in the photo, change to blue at the lower chest area and reserve a couple of yellow rounds to form the top of the body where the goggle sits.
Round 11 :
Change to blue yarn and work 1 sc in each st BLO (30) to create a ridge line where the overalls start
Round 12-18 :
1 sc in each st (30)
Info :
Stuff the body moderately from the top as you work, leaving the bottom a little open for leg attachment. Stuff firmer at the base of the body to give stability so the toy will stand or sit easily.
Round 19 :
(3 sc, dec) x 6 (24)
Round 20 :
1 sc in each st (24)
Round 21 :
(2 sc, dec) x 6 (18)
Round 22 :
1 sc in each st (18)
Info :
Stop here to create openings for legs if you prefer sewn-on legs. For sewn-on legs, fasten off leaving a long tail to sew legs into the bottom stitches. For crocheted-in legs, do not fasten off—work legs separately and sew into the bottom 12-18 stitches as indicated in assembly.
— Overalls Bib :
Round 1 :
With blue yarn, ch 12, turn, sc in 2nd ch from hook and across (11)
Round 2 :
1 sc in each st (11)
Round 3 :
Change to BLO for a decorative ridge: 1 sc in each st BLO (11)
Round 4-7 :
1 sc in each st (11) - continue until bib height is desired (usually 6-8 rows)
Info :
Sew the bib to the body centered on the front between rounds 13-16 of the body. Use pins to mark the exact placement; the bib should sit below the goggle and above where the legs attach.
Round 8 :
Optional pocket: ch 6, sc in 2nd ch from hook across (5) then attach to front of bib with whip stitch; embroider a 'C' in black yarn in the center of the pocket
— Left Arm (make 1) :
Round 1 :
6 sc in magic ring (6)
Round 3 :
(1 sc, inc) x 6 (18)
Round 4-7 :
1 sc in each st (18)
Info :
Work the arm in the round to the length shown in the photo: arms are slightly shorter than the body, measuring about 12-14 rounds from shoulder to wrist for this size. Stuff the hand area firmly toward the tip and the arm lightly so it remains squeezable.
Round 8 :
(2 sc, dec) x 6 (12) - narrow toward wrist
Round 9-11 :
1 sc in each st (12)
Info :
Change to black yarn for glove cuffs; carry the yellow yarn inside if you prefer to avoid cutting and rejoining frequently. If carrying yarn, secure floats every 6-8 stitches.
Round 12 :
Change to black yarn: 1 sc in each st (12)
Round 13 :
(1 sc, dec) x 4 (8) - form glove fingers base
Round 14 :
1 sc in each st (8)
Round 15 :
(1 sc, dec) x 2 (6)
Round 16 :
1 sc in each st (6)
Round 17 :
3 dec (3) - close glove tip and fasten off leaving long tail for sewing
Info :
Sew glove seam closed if necessary and shape the tip by inserting a small bit of stuffing. Attach arm to body at the side seams between rounds 12-15 of the body for natural placement.
— Right Arm (make 1) :
Round 1 :
6 sc in magic ring (6)
Round 3 :
(1 sc, inc) x 6 (18)
Round 4-7 :
1 sc in each st (18)
Round 8 :
(2 sc, dec) x 6 (12)
Round 9-11 :
1 sc in each st (12)
Round 12 :
Change to black yarn: 1 sc in each st (12)
Round 13 :
(1 sc, dec) x 4 (8)
Round 14 :
1 sc in each st (8)
Round 15 :
(1 sc, dec) x 2 (6)
Round 16 :
1 sc in each st (6)
Round 17 :
3 dec (3) - close glove tip and fasten off leaving a long tail for sewing
Info :
Sew the arms symmetrically to the body between body rounds 12-16. For the look in the photo, the arms attach slightly below the chest line, angled forward. Pin before sewing to check pose.
— Left Leg (make 1) :
Round 1 :
6 sc in magic ring (6)
Round 3 :
(1 sc, inc) x 6 (18)
Round 4 :
1 sc in each st (18)
Info :
Change to black yarn for boots at round 5. If you want a defined sole, use FLO for one round before switching to black to create a ridge line.
Round 5 :
Change to black yarn: 1 sc in each st (18)
Round 6-8 :
1 sc in each st (18)
Round 9 :
(2 sc, dec) x 6 (12) - narrow toward ankle
Round 10-14 :
Change to blue yarn: 1 sc in each st (12) - pants leg
Round 15 :
(1 sc, dec) x 4 (8)
Round 16 :
1 sc in each st (8)
Round 17 :
(1 sc, dec) x 2 (6)
Round 18 :
1 sc in each st (6) - leave opening for attaching to body; fasten off leaving long tail
Info :
Make both legs identical. For a stable base, stuff the boot area more firmly than the leg shaft. Attach legs to the bottom of the body spaced evenly and slightly turned outward for a balanced stance.
— Right Leg (make 1) :
Round 1 :
6 sc in magic ring (6)
Round 3 :
(1 sc, inc) x 6 (18)
Round 4 :
1 sc in each st (18)
Round 5 :
Change to black yarn: 1 sc in each st (18)
Round 6-8 :
1 sc in each st (18)
Round 9 :
(2 sc, dec) x 6 (12)
Round 10-14 :
Change to blue yarn: 1 sc in each st (12)
Round 15 :
(1 sc, dec) x 4 (8)
Round 16 :
1 sc in each st (8)
Round 17 :
(1 sc, dec) x 2 (6)
Round 18 :
1 sc in each st (6) - fasten off leaving long tail for sewing
— Overall Straps (make 2) :
Round 1 :
With blue yarn, ch 14, sc in 2nd ch from hook and across (13)
Round 2-4 :
1 sc in each st (13) - create strap length; fold slightly and sew to bib and over shoulder to attach to back of body
Info :
Add small buttons or studs at the bib ends to mimic overall fasteners. Use pins to position straps symmetrically before sewing.
— Hair (optional, make 3 small strands) :
Round 1 :
Cut three 6-8 cm lengths of black yarn. Tie each to the top center of the head through a single stitch and trim to leave short hair bits as in the photo.
Info :
Alternatively, braid or twist longer lengths for expressive hair. Knot and secure inside the head with a dab of fabric glue if desired.
— Finishing Details and Embroidery :
Info :
Embroider a small curved smile using black yarn centered between rounds 11-12 of the head. Use backstitch or surface slip stitch to create a neat, slightly raised smile. Add a small circular 'C' to the pocket center in black yarn using satin stitch to mimic the emblem in the photo.
Info :
Sew the goggle rim to the head centered over the marked eye position. Attach the strap pieces behind the head and sew securely. If using safety eyes, ensure the washers are applied and locked from the inside before final stuffing and closing.
Info :
Weave in all tails by threading through multiple internal stitches to hide and secure. Trim any excess closely. Add optional blush using a small amount of fabric paint or powdered blush and a soft brush if desired.
This cheerful little amigurumi brings playful charm to any shelf or gift box — a perfect combination of bold colors and simple shapes! The clear round-by-round instructions make assembly satisfying and accessible, and the finished toy is beautifully cuddly and expressive. Enjoy the process of crafting each section and watching everything come together into a lovable finished friend. 🧶✨ Whether gifting or keeping this character, each stitch carries personality and warmth. Happy crocheting! 🎁