🧶 Beautiful ✨ Detailed 💝 Adorable

Granny Patchwork Lap Robe Pattern

Granny Patchwork Lap Robe Pattern
4.9★ Rating
12-15 Hours Time Needed
1.3K Made This
✂️

Intermediate Level

Ideal for those with basic crochet experience, featuring slightly more advanced stitches and techniques to expand your skills.

⏱️

Multi-Day Project

A rewarding 12+ hour journey—perfect for dedicated crafters who love detailed work.

🤗

Soft Hug

Gentle, plush, and full of warmth, creating a sense of comfort and coziness wherever they find a home.

About This Granny Patchwork Lap Robe Pattern

This pattern creates a patchwork lap robe made from a variety of granny-square units of different sizes combined into a colorful blanket-like robe. You will make multiple granny squares (2-, 3-, 4-, 6- and 12-round versions), assemble them according to the diagram, and add a three-round border. It is a wonderful way to use leftover worsted-weight yarns and play with color combinations.

Granny Patchwork Lap Robe Pattern crochet pattern - detailed view of completed project

The instructions include full round-by-round directions for the basic granny square, special units, and joining. The pattern also gives a companion Granny Square Shawl layout and a shell border to finish your piece beautifully.

Why You'll Love This Granny Patchwork Lap Robe Pattern

I absolutely love this pattern because it celebrates color and creative freedom—you can use scraps or planned palettes to make each square unique. I enjoy the rhythm of working granny rounds and how quickly a small square grows into a beautiful patchwork. The mix of square sizes and sewn-together units lets me create interesting compositions without complicated shaping. Sewing the pieces together and adding the border is always satisfying; the project becomes a real heirloom you can gift or cherish.

Granny Patchwork Lap Robe Pattern step 1 - construction progress Granny Patchwork Lap Robe Pattern step 2 - assembly progress Granny Patchwork Lap Robe Pattern step 3 - details and accessories Granny Patchwork Lap Robe Pattern step 4 - final assembly and finishing

Switch Things Up

I often change the color schedule to create gradients or ombre effects by using 2-3 closely related shades across consecutive rounds.

I like to alternate yarn weights and hooks to make a chunkier lap robe or a delicate shawl; be aware this changes the finished size, so swatch first.

I sometimes replace some of the 2-round or 3-round small squares with tiny appliques or crocheted flowers for added texture and interest.

To make a baby-sized version, use lighter yarn and smaller hooks and reduce the number of squares in each strip; this produces a cute, portable blanket quickly.

If you prefer fewer seams, you can join granny squares as you go using a whipstitch or single crochet join, which also creates a decorative seam line.

I like to embroider simple facial features or motifs on selected squares to make a themed lap robe, such as hearts or stars, to coordinate with room decor.

For a modern look, use a neutral base color for the outer rounds of each square and pop bright colors just in the centers for subtle sophistication.

I sometimes add a crocheted edging other than the shell border, like picot or scallops, to customize the finish and suit the recipient’s taste.

Try fabric-backed squares for extra warmth and durability if the robe will see heavy use; simply sew a lightweight cotton square to the wrong side before assembling.

I recommend experimenting with stripe blocks (like Square 5) in variegated or self-striping yarn to add complexity without many color changes.

Want a wearable wrap? Sew the final layout with openings for arms and finish the edges with a buttoned or tied closure to convert the piece into a cozy wearable robe.

I enjoy making coordinating accessories like cushion covers or mini pouches using the same square sizes and colors to create a matching set for gifting.

Common Mistakes & How to Fix Them

✗ Skipping the initial chain and slip stitch to form a proper ring can make the center tight and distorted; always ch 6 and join with sl st to form a neat ring before starting the first round. ✗ Not changing colors cleanly between rounds can leave messy tails and loopy joins; fasten off and weave in ends or carry yarn neatly and secure color changes with a tidy knot and weave. ✗ Ignoring stitch counts at the end of rounds leads to lopsided squares and mismatched seams; count each corner and group after every round to confirm the correct number of 3-dc groups. ✗ Sewing squares without pinning them in position can produce uneven seams and mismatched patterns; pin or baste squares together aligning corners and stripes before stitching to ensure even edges. ✗ Overstuffing when finishing and blocking can warp the fabric and change square dimensions; use gentle tension when blocking and avoid stretching squares out of shape while seaming.

Granny Patchwork Lap Robe Pattern

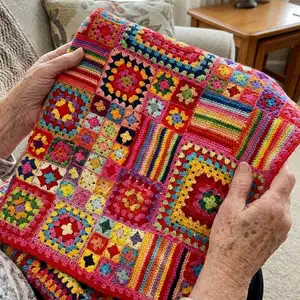
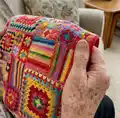
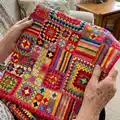
Make a bright, cozy Granny Patchwork Lap Robe using classic granny squares and simple joining techniques. This pattern guides you through multiple square sizes, patchwork assembly, and a finishing border so you can create a cheerful lap robe or adapt the layout for a shawl. It is full of color-change opportunities and basic crochet repetition that make it satisfying and meditative to stitch.

Intermediate 12-15 Hours

Materials Needed for Granny Patchwork Lap Robe Pattern

— Main Fabric

  • 01
    Knitting worsted weight yarn (approx. 30 oz total) in a wide variety of colors for the Granny Patchwork Lap Robe
  • 02
    Sport weight yarn: 12 oz white and 6 oz rose for the Granny Square Shawl (alternative project)

— Tools Required

  • 01
    Crochet hook size I (approx. 5.5mm)
  • 02
    Crochet hook size E (approx. 3.5mm)
  • 03
    Scissors
  • 04
    Yarn needle for sewing and weaving in ends
  • 05
    Stitch markers (recommended)
  • 06
    Pins for assembly and alignment
  • 07
    Measuring tape

Progress Tracker

0% Complete

— Granny Patchwork Lap Robe :

Size :

About 44"x52".

Materials :

* Knitting worsted weight yarn 30 ozs. in a wide variety of colors. * Crochet hook size I.

Gauge :

After rnd 3 = 4".

GRANNY SQUARE :

Ch 6, join with sl st to form a ring.

Rnd 1 :

Ch 3 for first dc, 2 dc in ring, ch 2, (3 dc in ring, ch 2) 3 times, join to top of starting ch. Cut yarn.

Rnd 2 :

Join new color in any ch-2 space, ch 3 for first dc, in same space work 2 dc, ch 2, 3 dc, (ch 1, in next ch-2 corner work 3 dc, ch2, 3 dc) 3 times, ch 1, join to top of starting ch. Cut yarn.

Rnd 3 :

Join new color in any ch-2 corner, ch 3 for first dc, in same space work 2 dc, ch 2, 3 dc, * ch 1, 3 dc in next ch-1 space, in corner work 3 dc, ch 2, 3 dc; repeat from * 2 times more, end ch 1, 3 dc in next ch-1 space ch 1, join to top of starting ch. Cut yarn.

Rnd 4 :

Join new color in any ch-2 corner, ch 3 for first dc, in same space work 2 dc, ch 2, 3 dc, * (ch 1, 3 dc in next ch-1 space) 2 times, ch 1, in corner work 3 dc, ch 2, 3 dc; repeat from * 2 times more, end (ch 1, 3 dc in next ch-1 space) 2 times, ch 1, join to top of starting ch. Cut yarn.

Rnds 5-12 :

Continue in pattern as established having one more 3-dc group between each corner on each rnd.

Square 1 :

Make 2. Following directions for Granny Square, make 12-round squares.

Square 2 :

Make 7. Following directions for Granny Square, make 6-round squares.

Square 3 :

Make 4. For each square, make 9 2-round Granny Squares and sew smaller units into one large square unit. (Note: You will need a total of 36 2-round Granny Squares which, sewn together, will make 4 squares.)

Square 4 :

Make 6. For each square, make 4 3-round Granny Squares and sew the smaller units into one large square unit. (Note: You will need a total of 24 3-round Granny Squares which, sewn together, will make 6 squares.)

Square 5 :

Make 5. Note: Change colors each row. Ch 28. Row 1: Dc in 3rd ch from hook and in each ch across. Cut yarn. Turn. Row 2: Join new color, ch 3 for first dc, dc in each dc across. Cut yarn. Turn. Rows 3-12: Repeat Row 2.

Assembling :

Following diagram, sew squares together.

Border :

Following Granny Square Pattern as established, work 3 rnds for border.

— Granny Square Shawl :

Size :

About 48" square.

Materials :

* Sport yarn 12 ozs. white 6 ozs. rose. * Crochet hook size E.

Gauge :

After rnd 4 = 3-1/2".

GRANNY SQUARE :

Ch 5, join with sl st to form a ring.

Rnd 1 :

Ch 3 for first dc, 2 dc in ring, ch 2 for corner, (3 dc in ring, ch 2) 3 times, join with sl st to top of starting ch.

Rnd 2 :

Sl st to ch-2 corner, ch 3 for first dc, in same space work 2 dc, ch 2, 3 dc, ch 1, (in next ch-2 space work 3 dc, ch 2, 3 dc, ch 1) 3 times, join with sl st to top of starting ch.

Rnd 3 :

Sl st to ch-2 corner, ch 3 for first dc, in same space work 2 dc, ch 2, 3 dc for starting corner, * ch 1, 3 dc in next ch-1 space, ch 1, in next space work 3 dc, ch 2, 3 dc for corner; repeat from * 2 times more, end ch 1, 3 dc in next ch-1 space, ch 1, join with sl st to top of starting ch.

Rnd 4 :

Sl st to ch-2 corner, ch 3 for first dc, in same space work 2 dc, ch 2, 3 dc, * ch 1, 3 dc in next ch-1 space, ch 1, in corner work 3 dc, ch 2, 3 dc, repeat from * 2 times more, end ch 1, join with sl st to top of starting ch.

Rnd 5 :

Sl st to corner, ch 3 for first dc, in same space work 2 dc, ch 2, 3 dc, * ch 1, 3 dc in next ch-1 space 2 times, ch 1, in corner work 3 dc, ch 2, 3 dc; repeat from * 2 times more, end ch 1, 3 dc in next ch-1 space ch 1, join with sl st to top of starting ch.

Rnd 6 :

Sl st to corner, ch 3 for first dc, in same space work 2 dc, ch 2, 3 dc, * ch 1, 3 dc in next ch-1 space 3 times, ch 1, in corner work 3 dc, ch 2, 3 dc; repeat from * 2 times more, end ch 1, 3 dc in next ch-1 space ch 1, join with sl st to top of starting ch.

Remaining Rnds :

Continue working as established, having one more 3-dc group between corners on each rnd. Follow this basic Granny Square motif for the entire shawl.

Motif 1 (Center Square) :

Make one 16 rnd Granny Square in the following colors: Rnds 1 through 12: Rose. Rnds 13 through 16: White.

Motif 2 :

Make 20 4-rnd Granny Squares in the following colors: Rnds 1 and 2: Rose. Rnds 3 and 4: White.

Assembling Motif 2 :

Sew together 2 strips of 6 granny squares each and 2 strips of 4 granny squares each. Match 4-square strips to opposite sides of Motif 1 and sew in place. Match 6-square strips to 2 remaining opposite edges and sew in place.

Motif 3 :

Make twelve 12 rnd granny squares. Rnds 1 through 8: Rose. Rnds 9 through 12: White.

Assembling Motif 3 :

Make 2 strips of 4 squares each and 2 strips of 2 squares each. Match 2 square strips to opposite sides of Motif 2 unit and sew in place. Match 4-square strips to remaining opposite edges and sew in place.

Motif 4 :

Make thirty-six 6-rnd granny squares. Rnds 1 through 4: Rose. Rnds 5 and 6: White.

Assembling Motif 4 :

Make 2 strips of 10 squares each and 2 of 8 squares each. Sew 8-square strips to opposite edges of Motif 3 unit as before. Sew 10-square strips to remaining edges.

Shell Border :

Join rose in any corner, ch 3 for first dc, in same corner work 3 dc, ch 2, 4 dc, (sc in next ch-1 space, in next ch-1 space work 3 dc, ch 2, 3 dc) repeat between () to next corner, in corner work 3 sc; repeat between () to next corner, in corner work 3 dc, ch 2, 4 dc. Continue around in pattern as established, working 3 sc in last corner. Join with sl st to top of starting ch-3. Fasten off.

Assembly Instructions

  • For Square 3 units: Make 9 two-round Granny Squares for each large square, then sew the 9 smaller units together to form one large square unit, repeating until you have four assembled squares.
  • For Square 4 units: Make 4 three-round Granny Squares for each large square, sew the 4 smaller units into one large square unit; you will need 24 three-round units total to make six assembled squares.
  • Following the diagram in the pattern, arrange all completed squares (12-round, 6-round, assembled multi-unit squares and strip squares) and sew them together matching edges and color flow for a balanced patchwork.
  • After sewing squares together, work border by following the established Granny Square pattern for three rounds around the entire robe or shawl to create a unified edge.
  • For the shawl, assemble motifs in the order described: center Motif 1, attach Motif 2 strips, then Motif 3 and Motif 4 strips; finish with the shell border as written.

Important Notes

  • 💡Use consistent tension throughout to keep all granny squares the same size and ensure neat seams when assembling.
  • 💡Weave in ends or change colors neatly after each round to keep the wrong side tidy and avoid bulky seams in assembled squares.
  • 💡Block or lightly steam squares if necessary before assembling to help match edges and improve overall drape.
  • 💡Pin or baste strips and squares together to verify alignment and pattern flow before sewing final seams.

This colorful Granny Patchwork Lap Robe is designed to celebrate scraps and creativity, turning small squares into a warm, cheerful lap robe you will love. The pattern mixes multiple square sizes, striped strip sections, and a classic shell border to finish the edges with style. Perfect for gifts or cozying up on chilly evenings—grab your yarn and start stitching today! 🧶✨

You ask,

we answer.

FAQs

What size will the finished piece be?

The Granny Patchwork Lap Robe measures about 44" x 52" as shown; the Granny Square Shawl layout yields about a 48" square.

What yarn and hook sizes are recommended?

The lap robe uses worsted weight yarn with a crochet hook size I; the shawl sample uses sport weight yarn with a crochet hook size E. Changing yarn weight or hook will alter finished size and drape.

Do I need to sew squares together or can I join them by crochet?

The pattern directs you to sew squares together following the diagram, but you may use slip-stitch or single-crochet joining methods if you prefer a crocheted seam instead of sewn seams.

How long does the project typically take to complete?

This is a multi-day project; most crafters will spend around 12-15 hours total depending on experience, assembly speed, and number of color changes.