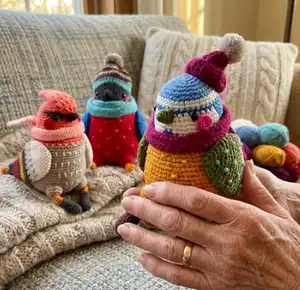
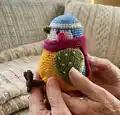
Make a charming kingfisher amigurumi with clear, step-by-step instructions for the head, body, wings, tail, legs and accessories. This pattern features color changes and decorative stitches to create a cozy, handmade bird perfect for gifting or decorating. You will learn useful assembly tips and finishing touches so your toy looks polished and professional.
Progress Tracker
0% Complete
— Head :
Info :
Start in Turquoise. Stuff as you go.
Round 1 :
6 sc in a MR (6)
Round 3 :
[sc, inc] x 6 (18)
Round 4 :
sc, [inc, 2 sc] x 5, inc, sc (24)
Round 5 :
[3 sc, inc] x 6 (30)
Round 6 :
2 sc, [inc, 4 sc] x 5, inc, 2 sc (36)
Round 7 :
[5 sc, inc] x 6 (42)
Round 8 :
3 sc, [inc, 6 sc] x 5, inc, 3 sc (48)
Round 9 :
[7 sc, inc] x 6 (54)
Round 10-12 :
(3 rounds). sc in each st around (54)
Info :
Change to Orange, don't cut the Turquoise yarn.
Round 13-14 :
sc in each st around (54)
Info :
Change to Turquoise, cut the Orange yarn.
Round 15 :
sc in each st around (54)
Info :
Change to White, cut the Turquoise yarn.
Info :
If you're a safety eyes user, you may place them between rounds 13 and 14 (the distance between the eyes is 12 stitches), but we recommend to do it when the toy is finished because you won't be able to adjust them once they're secured.
Round 16-17 :
sc in each st around (54)
Round 18 :
12 sc, [3 sc, dec] x 6, 12 sc (48)
Round 19 :
12 sc, [2 sc, dec] x 6, 12 sc (42)
Round 20 :
12 sc, [1 sc, dec] x 6, 12 sc (36)
Round 21 :
12 sc, dec x 6, 12 sc (30)
Round 22 :
[3 sc, dec] x 6 (24)
Round 23 :
BLO [2 sc, dec] x 6 (18)
Round 24 :
[sc, dec] x 6 (12)
Info :
Fasten off leaving a tail about 10 cm long and cut the yarn. Using a tapestry needle, weave the yarn tail through the front loops of each of the six stitches and pull tight to close. Weave in the end.
— Body :
Info :
Join Orange yarn to Rnd 22 of the head and start crocheting the body (see pics on the next page). Stuff as you go.
Round 1 :
FLO [3 sc, inc] x 6 (30)
Round 2 :
12 sc, 6 inc, 12 sc (36)
Round 3 :
12 sc, [sc, inc] x 6, 12 sc (42)
Round 4 :
3 sc, [inc, 6 sc] x 5, inc, 3 sc (48)
Round 5 :
sc in each st around (48)
Round 6 :
[7 sc, inc] x 6 (54)
Round 7 :
sc in each st around (54)
Round 8 :
4 sc, [inc, 8 sc] x 5, inc, 4 sc (60)
Round 9 :
sc in each st around (60)
Round 10 :
[9 sc, inc] x 6 (66)
Round 11-15 :
(5 rounds). sc in each st around (66)
Round 16 :
12 sc, [5 sc, dec] x 6, 12 sc (60)
Round 17-21 :
(5 rounds). sc in each st around (60)
Round 22 :
12 sc, [4 sc, dec] x 6, 12 sc (54)
Round 23 :
sc in each st around (54)
Round 24 :
[7 sc, dec] x 6 (48)
Round 25 :
3 sc, [dec, 6 sc] x 5, dec, 3 sc (42)
Round 26 :
[5 sc, dec] x 6 (36)
Round 27 :
2 sc, [dec, 4 sc] x 5, dec, 2 sc (30)
Round 28 :
[3 sc, dec] x 6 (24)
Round 29 :
sc, [dec, 2 sc] x 5, dec, sc (18)
Round 30 :
[sc, dec] x 6 (12)
Info :
Fasten off leaving a tail about 10 cm long and cut the yarn. Using a tapestry needle, weave the yarn tail through the front loops of each of the six stitches and pull tight to close. Weave in the end.
— Wings :
Info :
Right wing - Start in White. Don't stuff.
Round 1 :
6 sc in a MR (6)
Round 3 :
[sc, inc] x 6 (18)
Round 4 :
sc, [inc, 2 sc] x 5, inc, sc (24)
Round 5 :
12 sc, [sc, inc] x 6 (30)
Round 6 :
sc in each st around (30)
Round 7 :
12 sc, [2 sc, inc] x 6 (36)
Info :
Change to Turquoise, cut the White yarn.
Round 8-12 :
(5 rounds). sc in each st around (36)
Round 13 :
12 sc, [6 sc, dec] x 3 (33)
Round 14-17 :
(4 rounds). sc in each st around (33)
Info :
Change to Orange, cut the Turquoise yarn.
Round 18 :
sc in each st around (33)
Round 19 :
12 sc, [5 sc, dec] x 3 (30)
Info :
Change to Dark Turquoise, cut the Orange yarn.
Round 20-22 :
(3 rounds). sc in each st around (30)
Round 23 :
12 sc, [1 sc, dec] x 6 (24)
Round 24 :
sc in each st around (24)
Round 25 :
sc, [dec, 2 sc] x 5, dec, sc (18)
Round 26 :
sc in each st around (18)
Round 27 :
[sc, dec] x 6 (12)
Round 28 :
sc in each st around (12)
Info :
Fasten off leaving a tail about 10 cm long and cut the yarn. Using a tapestry needle, weave the yarn tail through the front loops of each of the six stitches and pull tight to close. Weave in the end.
Info :
Using scraps of yarn in different colors, decorate the wings to your taste. We used crossed stitches and French knots.
Info :
Sew the wings to the sides of the body as shown in the pictures.
Item Name (Left wing) :
Start in White. Don't stuff. 1. 6 sc in a MR (6). 2. inc x 6 (12). 3. [sc, inc] x 6 (18). 4. sc, [inc, 2 sc] x 5, inc, sc (24). 5. [sc, inc] x 6, 12 sc (30). 6. sc in each st around (30). 7. [2 sc, inc] x 6 (36). Change to Turquoise, cut the White yarn. 8-12 (5 rounds). sc in each st around (36). 13. [6 sc, dec] x 3 (33). 14-17 (4 rounds). sc in each st around (33). Change to Orange, cut the Turquoise yarn. 18. sc in each st around (33). 19. 12 sc, [5 sc, dec] x 3 (30). Change to Dark Turquoise, cut the Orange yarn. 20-22 (3 rounds). sc in each st around (30). 23. 12 sc, [1 sc, dec] x 6 (24). 24. sc in each st around (24). 25. sc, [dec, 2 sc] x 5, dec, sc (18). 26. sc in each st around (18). 27. [sc, dec] x 6 (12). 28. sc in each st around (12). 29. dec x 6 (6). Fasten off leaving a tail. Weave in the end.
— Beak :
Info :
In Dark Gray. Stuff as you go if possible.
Round 1 :
4 sc in a MR (4)
Round 2 :
sc in each st around (4)
Round 3 :
[sc, inc] x 2 (6)
Round 4 :
sc in each st around (6)
Round 5 :
[2 sc, inc] x 2 (8)
Round 6-7 :
sc in each st around (8)
Round 8 :
[3 sc, inc] x 2 (10)
Round 9 :
sc in each st around (10)
Round 10 :
[4 sc, inc] x 2 (12)
Info :
Make a sl st, fasten off and cut the yarn, leaving a tail about 15 cm long for sewing. Sew the beak to the head between Rounds 13 and 15.
— Tail :
Info :
Don't stuff the tip (first 9 rounds) so you can shape the tail. Work alternating Turquoise and Orange yarn. The color that's currently in use is indicated in curly brackets.
Round 1 :
{turquoise} 3 sc, {orange} 3 sc in a MR (6)
Round 2 :
{turquoise} inc, 2 sc, {orange} inc, 2 sc (8)
Round 3 :
{turquoise} 3 sc, inc, {orange} 3 sc, inc (10)
Round 4 :
{turquoise} 5 sc, {orange} 5 sc (10)
Round 5 :
{turquoise} inc, 4 sc, {orange} inc, 4 sc (12)
Round 6 :
{turquoise} 5 sc, inc, {orange} 5 sc, inc (14)
Round 7 :
{turquoise} 7 sc, {orange} 7 sc (14)
Round 8 :
{turquoise} inc, 6 sc, {orange} inc, 6 sc (16)
Round 9 :
{turquoise} 8 sc, {orange} 8 sc (16)
Round 10 :
{turquoise} 7 sc, inc, {orange} 7 sc, inc (18)
Round 11 :
{turquoise} 9 sc, {orange} 9 sc (18)
Round 12 :
{turquoise} inc, 8 sc, {orange} inc, 8 sc (20)
Round 13 :
{turquoise} 10 sc, {orange} 10 sc (20)
Round 14 :
{turquoise} 9 sc, inc, {orange} 9 sc, inc (22)
Round 15 :
{turquoise} 11 sc, {orange} 11 sc (22)
Round 16 :
{turquoise} inc, 10 sc, {orange} inc, 10 sc (24)
Round 17 :
{turquoise} 12 sc; fasten off the turquoise yarn, leaving a tail about 15 cm long for sewing; {orange} 12 sc; fasten off, leaving a tail about 15 cm long for sewing (24)
Info :
Sew the tail to the back of the body (see pictures).
— Legs (make 2) :
Info :
Part 1 - Start in Yellow. Stuff as you go. Ch 7. Work around both sides of the foundation chain.
Round 1 :
start in the 2nd ch from the hook: inc, 4 sc, 4 sc in the last ch; do not turn your work, crochet on the other side of the chain: 4 sc, inc (16)
Round 2 :
[sc, inc] x 8 (24)
Round 3 :
BLO sc in each st around (24)
Round 4 :
sc in each st around (24)
Round 5 :
4 sc, 9 dec, 2 sc (15)
Round 6 :
5 sc, 3 dec, 4 sc (12)
Info :
Stuff your work very firmly at this point, because it will be very difficult to do it later.
Round 8-14 :
(7 rounds). sc in each st around (6)
Info :
Make additional 1-2 sc and change to Orange, cut the White yarn.
Round 15 :
FLO inc x 6 (12)
Round 16 :
[1 sc, inc] x 6 (18)
Round 17 :
[2 sc, inc] x 6 (24)
Round 18-20 :
(3 rounds). sc in each st around (24)
Info :
Stuff your work and fasten off, leaving a tail about 10 cm long for sewing and cut the yarn.
Info :
Part 2 - Go back to round 7 and the Yellow yarn. Crochet the top of the boot.
Round 1 :
FLO sc in each st around (12)
Round 2 :
sc in each st around (12)
Round 3 :
sl st in each st around (12)
Info :
Fasten off, cut the yarn, weave the end in between the stitches. Sew the legs to the body between rounds 20 and 26.
— Hat :
Info :
In Dark Turquoise. Ch 26. Crochet in rows. Start from the 2nd ch from hook. Crochet rows then fold and sew back seam.
Row 1 :
25 sl st, ch 1, turn (25)
Row 2 :
BLO 20 sc, 5 sl st, ch 1, turn (25)
Row 3 :
BLO 25 sl st, ch 1, turn (25)
Info :
Repeat rows 2-3 at least 28 more times and try the hat on. Keep crocheting until it hugs the head nicely. The sample has 74 rows in total (rows 2-3 repeated 35 times).
Info :
Fasten off leaving a tail about 20 cm long for sewing and cut the yarn. Fold your work in half and sew the back of the hat as shown in the photo.
Info :
Join the Dark Turquoise yarn to the bottom of the hat (leaving a tail about 15 cm long at the beginning) and crochet one row along the bottom:
Round :
BLO 1 sc, [2 sc, dec] x 6, [dec, 2 sc] x 6, sc (38)
Info :
Fasten off leaving a tail about 15 cm long. The tails are supposed to be used as ties. Decorate the headpiece with a small pompom.
— Assembly :
Info :
Sew the tail to the back of the body, centered, approx. between Round 19 and 25.
Info :
Sew the legs between Round 19 and 28 of the body. The distance between the legs should be approx. 3 stitches.
Info :
Decorate the wings to your taste using scraps of yarn or embroidery floss in different colors. Feel free to use any crafting materials you have on hand to make the toy your very own.
Info :
Sew the wings to the sides of the body at approx. 45° angle.
Info :
Sew the beak to the center of the face between rounds 17 and 22.
Info :
Insert the eyes between rounds 13 and 14. The distance between the eyes is about 11-12 stitches. We used 4 mm safety eyes and hot glue. Do not hesitate embroidering the eyes instead.
Info :
Put the hat on bird's head and tie a bow using the yarn ends you left while making it.
Info :
See more pictures of assembly in the guide photos for positioning reference.
This cheerful Kingfisher amigurumi brings bright color and handmade charm to any shelf or nursery. It is a delightful weekend project with decorative stitches and simple assembly steps. Finish with a tiny hat and embroidered accents for a truly personal touch. 🧶🐦