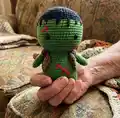
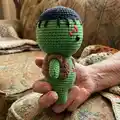
About This Monster Frankenstein Amigurumi Pattern
This pattern creates a small, adorable Monster Frankenstein amigurumi with a stitched scar detail and a tiny removable sweater. You will crochet the head, body, legs, arms, and a little sweater, joining pieces as you go for a neat finish. The design is compact, great for gifting or displaying.
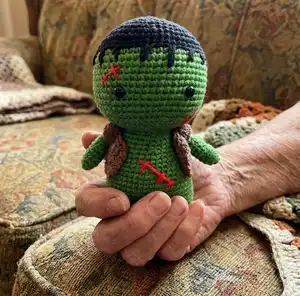
Simple shaping and color change techniques are used to create the hairline and facial details. Clear round-by-round instructions make assembly straightforward and fun.
Why You'll Love This Monster Frankenstein Amigurumi Pattern
I absolutely love this pattern because it turns basic stitches into a character full of personality and charm. I enjoy the satisfying process of joining the legs into the body in one seamless step. The little details like the hairline and stitched scars let me add a creative, handmade touch every time. It is small enough to finish in a few sessions yet interesting enough to keep me engaged until the last stitch.
Switch Things Up
I love how easy it is to customize this pattern with different yarn colors and textures; try mint greens, pastels, or variegated yarns to create a unique monster.
I often change the eye size to alter personality—smaller eyes give a cuter look, larger eyes make the face more expressive.
If you want a chubbier version, use a thicker yarn and a larger hook to make a plush, squishy friend.
To make a tiny keychain version, use thinner yarn and a smaller hook and skip the sweater for a miniature doll.
I sometimes embroider different scar shapes or add felt accessories like a tiny bow tie for extra character and charm.
Try surface crochet or small beads to add texture to the sweater instead of simple single crochet rounds.
I recommend switching the sweater color for seasonal themes—orange and black for Halloween or red and green for a holiday twist.
If you like posable toys, add thin wire inside the arms before attaching so you can bend and pose them safely.
Try adding a loop to the top of the head for hanging ornaments or backpacks, creating a portable spooky friend.
I enjoy making matching siblings by changing only the hair color or scarf to create a themed set that looks cohesive together.
Common Mistakes & How to Fix Them
✗ Skipping the instruction to cut the thread after the first leg can make joining the second leg messy; cut the yarn after the first leg and follow the pattern to join the second leg without cutting when instructed.
✗ Changing color without securing the previous yarn can create loose ends and gaps at the color join; secure and weave in the tail after the color change and use the BLO round to tidy the transition.
✗ Overstuffing the head or body causes distortion of the shape and bulging stitches; stuff gradually and evenly, adding small amounts to achieve a smooth, firm shape.
✗ Forgetting to leave a long tail when fastening off makes sewing pieces together difficult; always leave the long tail as instructed to sew the head and body securely.
✗ Not checking your stitch counts after increases or decreases results in uneven shaping; count your stitches at the end of each round and correct mistakes immediately to maintain the correct shape.