🧶 Beautiful ✨ Detailed 💝 Adorable

Jack Skellington Amigurumi Pattern

Jack Skellington Amigurumi Pattern
3.9★ Rating
5-7 Hours Time Needed
1.7K Made This
✂️

Intermediate Level

Ideal for those with basic crochet experience, featuring slightly more advanced stitches and techniques to expand your skills.

⏱️

Weekend Treat

Takes 5-7 hours, making it an enjoyable project to finish over a couple of days.

🧸

Cute Companion

An adorable friend to cherish, handcrafted with love to bring comfort and joy for years to come.

About This Jack Skellington Amigurumi Pattern

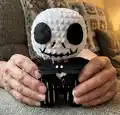
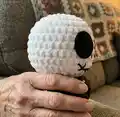
This pattern creates a small Jack Skellington amigurumi inspired by the classic character, worked in black and white chenille and cotton/acrylic yarns. You will crochet the head, body, arms and small jacket details, then sew on felt eyes and decorative stripes. The high-contrast design makes each detail pop and is fun to customize with different yarns or felt shapes. Clear round-by-round instructions make assembly straightforward for intermediate crocheters.

Jack Skellington Amigurumi Pattern crochet pattern - detailed view of completed project

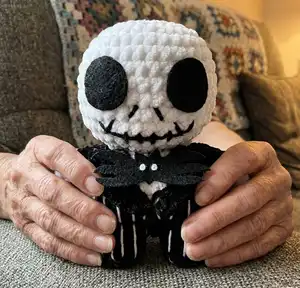
Follow the pattern to make the head and body separately then join and add the jacket’s front and back hems. Includes suggestions for sewing, stuffing, and adding felt eyes for finishing touches.

Why You'll Love This Jack Skellington Amigurumi Pattern

I absolutely love this pattern because it captures so much character with very simple shapes and high-contrast details. I enjoyed combining plush chenille with cotton yarn for crisp stripes and a soft feel. The pattern is satisfying to work through — the legs and body construction make for a cute silhouette. Sewing on the felt eyes and papillon adds an immediate personality boost that never fails to make me smile. Sharing this pattern lets me see so many creative finishes from makers who customize colors and accessories.

Jack Skellington Amigurumi Pattern step 1 - construction progress Jack Skellington Amigurumi Pattern step 2 - assembly progress Jack Skellington Amigurumi Pattern step 3 - details and accessories Jack Skellington Amigurumi Pattern step 4 - final assembly and finishing

Switch Things Up

I love customizing this pattern by changing yarn weight and hook size to create multiple sizes from keychain minis to large plushies.

I often swap chenille for a smooth cotton to get crisper stripe details and easier sewing for beginners.

I sometimes replace felt eyes with safety eyes or embroidered eyes for a different look and extra durability.

I recommend experimenting with color swaps—try gray tones or pastel versions to give Jack a unique personality.

I like to add tiny accessories like a crocheted bow tie, scarf, or mini hat for seasonal variations and gift-ready styling.

I occasionally insert a small length of thin wire in the arms for slight posability—just be careful and secure wire ends well.

I also suggest making the papillon from layered felt pieces or crocheting a tiny bow for a handcrafted charm effect.

I sometimes embroider different mouth expressions to make each doll read happy, spooky, or silly depending on placement and stitch direction.

I encourage trying different stuffing levels—firmer stuffing gives a neat silhouette while softer stuffing yields a cuddlier feel.

I recommend making a set with matching accessories like tiny pumpkins or a felt display base for a seasonal collection.

Common Mistakes & How to Fix Them

✗ Not changing colors cleanly at the indicated rounds can leave messy floats; switch colors at the last yarn-over and weave in ends neatly to hide transitions. ✗ Forgetting to stuff the head and body evenly leads to misshapen pieces; stuff gradually as you crochet and add more filling before closing to keep a rounded shape. ✗ Skipping stitch counts during increases and decreases will change proportions; count stitches at the end of each round to ensure your piece matches the pattern. ✗ Pulling stitches too tight when using chenille yarn can make the fabric stiff and uneven; maintain relaxed, consistent tension to keep stitches even and flexible. ✗ Sewing parts in the wrong position can look awkward; pin pieces in place and check symmetry before stitching to secure the head, arms and hem correctly.

Jack Skellington Amigurumi Pattern

Make a spooky-cute Jack Skellington amigurumi using soft chenille and simple crochet techniques. This pattern walks you through the head, body, arms and finishing details so you can create a charming handmade figure. Perfect as a gift or seasonal decoration, it highlights bold black-and-white contrast for striking results. Follow the step-by-step rounds and assembly notes to finish a polished little character.

Intermediate 5-7 Hours

Materials Needed for Jack Skellington Amigurumi Pattern

— Main Fabric

  • 01
    Black chenille size 4 medium (small skein for body and jacket)
  • 02
    White chenille size 4 medium (small skein for head and hands)
  • 03
    Black cotton/acrylic yarn (for details and stripes, small amount)
  • 04
    White cotton/acrylic yarn (for suit stripes and details, small amount)
  • 05
    Black felt (for eyes and papillon details)
  • 06
    White felt (for papillon details and small accents)
  • 07
    Polyester stuffing (enough to firmly stuff head and body)

— Tools Required

  • 01
    Crochet hook size 5mm
  • 02
    Tapestry needle
  • 03
    Stitch markers
  • 04
    Scissors
  • 05
    Hot/super glue
  • 06
    Pins for assembly (optional)

Progress Tracker

0% Complete

— Head :

Round 1 :

8sc in a mr (8)

Round 2 :

8inc (16)

Round 3 :

(sc, inc)x8 (24)

Round 4 :

(3sc, inc)x6 (30)

Round 5 :

(2sc, inc, 2sc)x6 (36)

Round 6-10 :

36sc (36) – 5 rounds

Round 11 :

(4sc, dec)x6 (30)

Round 12 :

(3sc, dec)x6 (24)

Round 13 :

(4sc, dec)x4 (20) Cut yarn, FO with invisible join. Add fiber fill (stuff a lot to get rounded shape).

— Body :

Body pt.1 :

Start with black yarn R1: 5sc in a mr (5) R2: 5inc (10) R3: BLO 10sc (10) R4-5: 10sc (10) – 2 rounds Cut yarn and FO with an invisible join. Make another leg but this time don’t cut yarn and ch2 (pic 1).

Round 6 :

Insert the hook in any of the first leg st (pic 2) and make 10sc, 2sc in the 2ch, 10sc, 2sc in the 2ch (24)

Body pt.2 :

R7: (3sc, inc)x2, 6sc, inc, 3sc, inc, 5sc (28)

Round 8 :

BLO 28sc (28)

Round 9 :

28sc (28)

Round 10 :

13sc, cc to white 2sc. cc to black 13sc (28)

Round 11 :

12sc, cc to white 4sc, cc to black 12sc (28)

Round 12 :

(3sc, dec)x2, sc, cc to white 2sc, dec, 2sc, cc to black, sc, dec, 3sc, dec, 3sc (23) Start stuffing as you go, when you stuff the feet remember to keep them flat

Round 13 :

4sc, dec, 3sc, cc to white sc, dec, 2sc, cc to black 2sc, dec, 5sc (20) Finish stuffing. Cut yarn leaving a long tail for sewing (pic 3).

— Arms (x2) :

Round 1 :

4sc in a mr (4)

Round 2 :

4inc (8)

Round 3-5 :

cc to black 8sc (8) – 3 rounds

Round 6 :

fold the arm and close it making 4sc (4) Cut yarn leaving a long tail (pic 4).

— Jacket\'s front hem :

Info :

Start using black yarn R1: slip knot, ch6, starting from the 2nd ch from the hook make: 1sc, 1hdc, ch 2, in the back of the 2nd ch from the hook make 1sc (pics 6-8), sc in the next 3sts. Cut yarn leaving a ling tail for sewing (pic 5).

— Jacket\'s back hem :

Info :

Count 8 BLO sts (made in R8) in the back of the body (you can mark the first and last sts with a stitch marker).

Round 1 :

Insert hook in the BLO st of R8 and ch5 (the first ch doesn’t count as a st), sl st in the 2nd ch from the hook and make 2sc in the next 2sts.

Round 2 :

sl st in the next st, ch5, sl st in the 2nd ch from the hook and make 3sc in the next 3sts

Round 3 :

sl st in the next st, ch4, sl st in the 2nd ch from the hook and make 2sc in the next 2sts

Info :

Repeat R2 and R3 until you have 7 spikes (you should end with a short one of R3). Cut yarn and FO (pic 9).

— Sewing :

Info :

• Sew the head to the body, add fiber fill while Sewing if needed • Sew the arms to the body at R12-13 • Cut 2 black felt circles using pic 10 as reference and glue them on R7-9

— Body details :

Info :

Note that the size may vary according to the yarn you are using • Sew the jacket’s front hem following the outline of the white Stitches • With white cotton/acrylic yarn sew the suit’s stripes: sew the legs’ part and the upper part separately • Cut black and white felt to make the papillon like pic

Assembly Instructions

  • Sew the head to the body, add fiber fill while sewing if needed to maintain a rounded head shape and secure firmly.
  • Sew the arms to the body at rounds R12-13, positioning them evenly on either side and using the long tail to stitch securely.
  • Attach the jacket's front hem along the front of the body following the white stitches outline and stitch in place for a neat finish.
  • Glue or sew two black felt circles as eyes onto the head at the position matching rounds R7-9, using pic 10 for size reference.
  • Sew the jacket's back hem spikes into the BLO stitches counted from R8, arranging seven spikes evenly across the back before fastening off.

Important Notes

  • 💡Use stitch markers to mark the beginning of each round and the 8 BLO stitches for the jacket\'s back hem to ensure correct placement.
  • 💡Start stuffing the body and head as you go and finish stuffing firmly before closing to keep a rounded and stable shape.
  • 💡Keep yarn tails long for sewing parts together and pin pieces in place before stitching to check symmetry and positioning.
  • 💡When changing colors (cc) carry or finish yarn ends cleanly to avoid bulky joins on the chenille fabric.
  • 💡Work with consistent tension and check stitch counts after each round to keep proportions matching the pattern.

This Jack Skellington amigurumi brings spooky charm to any shelf or gift box with its bold black-and-white design. Make it in soft chenille for a plush, tactile finish and add felt details to capture Jack's iconic look. Share finished dolls with friends or keep one for yourself — they make delightful seasonal treasures. 🧶🖤

You ask,

we answer.

FAQs

What size will the finished piece be?

The finished amigurumi size may vary depending on your yarn and tension; using the recommended chenille size 4 and 5mm hook produces a small handheld doll approximately 12-18 cm tall.

Can I use different yarn weights for this pattern?

Yes, you can substitute yarn weights, but your finished piece will change size; choose an appropriate hook and adjust stuffing amounts and felt eye sizes accordingly.

Do I need prior crochet experience for this pattern?

This pattern is rated intermediate, so familiarity with magic ring, increases, decreases, BLO, and basic color changes is recommended for best results.

How long does this project typically take to complete?

Most crocheters complete this project in 5-7 hours, though time may vary based on experience level, yarn choice, and how detailed you sew the jacket and felt details.