๐Ÿงถ Beautiful โœจ Detailed ๐Ÿ’ Adorable

Hungry Hamsters Amigurumi Pattern

Hungry Hamsters Amigurumi Pattern
4.1โ˜… Rating
2-3 Hours Time Needed
1.9K Made This
โœ‚๏ธ

Intermediate Level

Ideal for those with basic crochet experience, featuring slightly more advanced stitches and techniques to expand your skills.

โฑ๏ธ

Bite-Sized Project

Finishes in 2-4 hoursโ€”perfect for an afternoon of creative relaxation.

๐Ÿงธ

Cute Companion

An adorable friend to cherish, handcrafted with love to bring comfort and joy for years to come.

About This Hungry Hamsters Amigurumi Pattern

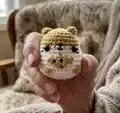
This pattern teaches you how to crochet tiny hamsters in two sizes: palm-sized (about 6 cm) and mini (about 3 cm). You will also make tiny snacksโ€”cookies, pizza/watermelon slices, strawberries, and acornsโ€”to give them character. Techniques include working in continuous rounds, color changes, and small amigurumi assembly. Photos and notes help you place eyes, sew limbs, and add embroidered details.

Hungry Hamsters Amigurumi Pattern crochet pattern - detailed view of completed project

The instructions use US terminology and include full round-by-round directions for every piece. Perfect for making a set of collectible hamsters or small handmade gifts.

Why You'll Love This Hungry Hamsters Amigurumi Pattern

I absolutely love this pattern because it combines tiny-scale crochet with playful character design, which makes every hamster feel special. I enjoy designing little snacks that add personality and allow for creative color choices. The pattern is compact but satisfying โ€” you can finish a hamster in a couple of hours and make matching snacks for a sweet finishing touch. I also love that it includes both palm-sized and micro versions so you can experiment with different hooks and threads.

Hungry Hamsters Amigurumi Pattern step 1 - construction progress Hungry Hamsters Amigurumi Pattern step 2 - assembly progress Hungry Hamsters Amigurumi Pattern step 3 - details and accessories Hungry Hamsters Amigurumi Pattern step 4 - final assembly and finishing

Switch Things Up

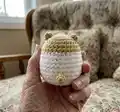
I love to change up colors to create different hamster personalities; you can use pastel shades for a sweet nursery set or bold autumn tones for a seasonal collection.

If you want a chunkier hamster, I swap to a bulkier yarn and a bigger hook to create a plush, squishy version thatโ€™s great for cuddling.

To make miniature keychains, I use the 1.10mm version and attach a small keyring to the top before finishing the tail seam.

I often mix embroidery and tiny sewn-on beads for eyes on toys intended for adults or decor, but I use safety eyes for children-safe toys where appropriate.

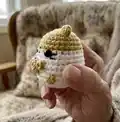
Try stitching tiny outfits or hats for your hamsters โ€” a different color hat or a scarf can change the whole look and make them gift-ready.

I sometimes embroider different facial expressions by altering the placement and length of the mouth and whisker stitches to create grumpy or surprised hamsters.

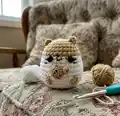
For display sets, I make matching snacks in complementary colors โ€” strawberry and mint, or pepperoni pizza and tomato-red accents โ€” to give a cohesive feel.

To practice micro crochet, I use DMC thread split into fewer strands and a 0.75mm hook for the very smallest snacks and extra-detailed embroidery.

Want posable limbs? Iโ€™ll add a thin wire inside the legs before stuffing to let me pose them for photos or tiny scenes.

Donโ€™t be afraid to combine yarns โ€” a fuzzy tail or different-texture ears can add charm; I usually test a small sample first to ensure stitch gauge and appearance.

Common Mistakes & How to Fix Them

โœ— Skipping stitch markers when working in continuous rounds can cause you to lose the start of the round; place a marker at the first stitch of each round and move it up as you go. โœ— Inserting safety eyes too low or too high can leave white gaps around the eyes; test placement and adjust to sit between rounds 8 and 9 or use larger eyes if needed. โœ— Overstuffing the body early will make shaping difficult and distort the stitches; stuff gradually and stop to shape, aiming for semi-firm before final decreases. โœ— Using the same hook size for snacks and body will make snacks too large; use a hook 3-4 sizes smaller for snacks or the smaller hook listed for micro versions. โœ— Not leaving long tails after finishing small pieces makes sewing them on awkward; always leave long yarn tails for sewing legs, ears, tails, and snacks. โœ— Pulling yarn too tight while embroidering seeds or pepperoni can pucker the fabric; use small, even stitches and a gentle tension to keep the surface flat.

Hungry Hamsters Amigurumi Pattern

Make a collection of tiny, squishy Hungry Hamsters you can customize with little snacks and accessories. This pattern includes both palm-sized and mini versions so you can choose the perfect size for gifts or keychain charms. Clear round-by-round instructions and snack patterns make it easy to create a charming set you will love to display or gift. Perfect for stitching small, satisfying projects that are packed with personality.

Intermediate 2-3 Hours

Materials Needed for Hungry Hamsters Amigurumi Pattern

โ€” Main Fabric

  • 01
    Monaco Mercerized Cotton Thread for mini hamsters and snacks (used with 1.10mm hook)
  • 02
    Monaco Acrylic Yarn (3-ply) for palm-sized hamsters (used with 2.25mm hook)
  • 03
    DMC Embroidery threads for micro snacks and details (split strands as needed)
  • 04
    Brown yarn for cookie/chocolate chip details
  • 05
    Small amounts of green, red, pink, black embroidery threads for pizza, watermelon, strawberry and seeds

โ€” Tools Required

  • 01
    Crochet hook size 2.25mm (for palm-sized hamster body)
  • 02
    Crochet hook size 1.10mm (for mini hamster and some snacks)
  • 03
    Crochet hook size 0.75mm (for micro snacks with DMC thread)
  • 04
    Safety eyes 6mm (2 pieces) for palm-sized hamster
  • 05
    Safety eyes 3mm (2 pieces) for mini hamster
  • 06
    DMC embroidery thread (split to required strands) for micro details
  • 07
    Stitch marker
  • 08
    Black embroidery/sewing thread for mouth and whiskers
  • 09
    Tapestry/sewing needle
  • 10
    Toy stuffing (polyfill)
  • 11
    Scissors
  • 12
    Pins for assembly

Progress Tracker

0% Complete

โ€” Head/Body :

Info :

Use 2.25mm hook and start in beige.

Round 1 :

6sc in MR (6)

Round 2 :

inc x6 (12)

Round 3 :

(inc, sc) x6 (18)

Round 4 :

(inc, 2sc) x6 (24)

Round 5 :

(inc, 3sc) x6 (30)

Round 6-7 :

sc around [2 rounds] (30)

Round 8-9 :

s2white sc around [2 rounds] (30)

Info :

Insert eyes between Rounds 8 & 9 (about 6 stitches apart).

Round 10 :

(inc, 4sc) x6 (36)

Round 11-12 :

sc around [2 rounds] (36)

Round 13 :

(inc, 5sc) x6 (42)

Round 14 :

(dec, 5sc) x6 (36)

Round 15 :

(dec, 4sc) x6 (30)

Round 16 :

(dec, 3sc) x6 (24)

Info :

Start filling with polyfill until semi-firm.

Round 17 :

(dec, 2sc) x6 (18)

Round 18 :

(dec, sc) x6 (12)

Round 19 :

dec x6 (6)

Info :

Finish off and add more stuffing until body is well-shaped. Sew close.

Info :

Note: the top of the safety eyes should slightly touch the colored portion. If there are some white gaps between the eyes, use larger sized eyes or insert them higher up between rounds 7 & 8 instead.

โ€” Legs, Ears & Tail :

Legs (Make 4) :

Leave some allowance before you start your chain. Ch 2 and hdc in 2nd ch from hook. Finish off and leave long tail for sewing.

Ears (Make 2) :

R1 - Ch2, 4sc in 2nd ch from hook (4). R2 โ€“ (inc, sc) x2 (6). Cut thread and leave long tail for sewing.

Tail :

R1 - Ch2, 4sc in 2nd ch from hook (4). Cut thread and leave long tail for sewing.

โ€” Cookie A (using 2.25mm hook) :

Round 1 :

In MR, ch2 then 8 hdc around (8)

Round 2 :

Sl st in each st around (8)

Info :

Leave long yarn tail for sewing. With brown yarn, sew on small chocolate chips.

โ€” Cookie 2 (using smaller hook and yarn as hamster) :

Round 1 :

6sc in MR (6)

Round 2 :

inc x6 (12)

Round 3 :

(inc, sc) x6 (18)

Round 4 :

sc around BLO (18)

Round 5 :

(dec, sc) x6 (12)

Round 6 :

dec x6 (6)

Info :

Finish off and leave long tail for sewing. With dark brown thread/yarn, sew small triangles to make choco chips. Sew close.

โ€” Mini Watermelon / Pizza :

Info :

Note: circle color indicate color change of round for Watermelon or Pizza.

Round 1 :

4sc in MR (4)

Round 2 :

(inc, sc) x2 (6)

Round 3 :

(inc, 2sc) x2 (8)

Round 4 :

(inc, 3sc) x2 (10)

Round 5 :

(inc, 4sc) x2 (12)

Round 6 :

(inc, 5sc) x2 (14)

Info :

Finish off and leave long tail for sewing. Flatten triangle, making sure that the yarn tail is situated on the side.

Info :

For the watermelon slice, sew on some black thread to put watermelon seeds (this part is optional).

Info :

For the pizza slice, embroider 3-4 pepperoni slices with red thread. Sew 4-5 times over the same stitch (careful not to make them overlap). Embroider peppers by sewing green thread 2-3 times diagonally randomly on the pizza.

Info :

Sew close the pizza/watermelon slice close by threading the yarn tail through the back loops of the last round.

Info :

Note: for micro crocheting with a 0.75mm hook, use 3 strands of DMC embroidery thread (DMC embroidery threads have 6 strands so split as needed).

โ€” Mini Strawberry (using 1.10mm hook) :

Round 1 :

6sc in MR (6)

Round 2 :

sc around (6)

Round 3 :

inc x6 (12)

Round 4 :

(inc, 2sc) x4 (16)

Round 5 :

sc around (16)

Round 6 :

(dec, sc) x4 (12)

Round 7 :

dec x6 (6)

Info :

Stuff lightly and finish off with long tail for sewing. Embroider strawberry seeds with white yarn and sew close. Do not cut off yarn tail so you can use it to sew on to the hamster.

Strawberry leaf :

In a magic ring, *ch 2 then sl st in the 2nd ch from hook. Sl st again into the magic ring*. Repeat ** 4 more times. Leave long tail for sewing and sew on top of strawberry.

โ€” Mini Acorn (using 1.10mm hook) :

Round 1 :

6sc in MR (6)

Round 2 :

(inc, sc) x3 (9)

Round 3 :

(inc, 2sc) x3 (12)

Round 4 :

sc around (12)

Round 5 :

(inc, 3sc) x3 (15)

Round 6 :

sc around BLO (15)

Info :

Finish off. Do not sew close.

Acorn cap :

R1 - 6sc in MR (6). R2 - inc x6 (12). R3 - (inc, sc) x6 (18). R4 - sl st around (18). Finish off with long thread for sewing and sew the front loops of the acorn cap to the edge of the acorn. Embroider a French knot to the top as the nub.

โ€” Assembly :

Info :

Attach the individual parts to the body with sewing pins first to make sure youโ€™re happy with the placement.

1. Mouth :

With black sewing thread or yarn, sew a small dash (-) between the eyes between R7&8. Sew a vertical line (|) from the center of the nose down. Sew on 2 diagonal lines (v) to give him a tiny smile.

2. Whiskers :

Sew two diagonal lines beside the eyes to make the whiskers.

3. Ears :

Sew the ears to the top of the head about 6 stitches apart.

4. Sew on the snack of choice :

Sew the snack on the center of the belly.

5. Sew the hands :

Sew the hands as if they are holding the snack. If you want your sewing to be extra unnoticeable you can use sewing thread in a similar shade to keep it securely in place.

6. Count 2 rounds down from the hands :

Sew the legs horizontally facing towards the belly. They should align with the eyes.

7. Sew the tail :

Sew the tail on the back of the hamster around R15.

Assembly Instructions

  • Attach the individual parts to the body with sewing pins first to make sure youโ€™re happy with the placement.
  • With black sewing thread or yarn, sew a small dash (-) between the eyes between R7 & R8 for the mouth, then a vertical line down and two small diagonal lines to form the smile.
  • Sew the ears to the top of the head about 6 stitches apart for symmetry and balance.
  • Sew the hands on either side of the belly so they appear to be holding the chosen snack, using matching thread for an invisible finish.
  • Count two rounds down from the hands and sew the legs horizontally facing toward the belly so they align with the eyes.
  • Sew the tail on the back of the hamster around round R15, positioning centrally along the back.
  • Pin and check placement before final sewing; adjust stuffing and shape as needed to achieve the desired look.

Important Notes

  • ๐Ÿ’กWhen crocheting the snacks, use a hook that is 3-4 sizes smaller than the one used for the hamster body to ensure the snack is proportionate.
  • ๐Ÿ’กThis pattern uses US terminology and is worked in continuous rounds, so use a stitch marker to keep track of the start of each round.
  • ๐Ÿ’กFinished size: palm-sized hamsters are approximately 6 cm tall and mini hamsters are approximately 3 cm tall using the recommended hooks and yarns.
  • ๐Ÿ’กLeave long yarn tails on small pieces for sewing to make assembly easier and cleaner.
  • ๐Ÿ’กStuff gradually and shape before final decreases to avoid lumps and to get a smooth, well-shaped body.

This Hungry Hamsters pattern brings tiny, lovable characters to life with simple amigurumi techniques and adorable snack accessories. Make palm-sized or micro versions to create a charming set for display, gifts, or keychains. Enjoy experimenting with colors and tiny embroidered details to give each hamster its own personality. ๐Ÿงถ๐Ÿนโœจ

You ask,

we answer.

FAQs

What size will the finished piece be?

The palm-sized hamster measures approximately 6 cm tall and the mini hamster measures approximately 3 cm tall when using the recommended yarns and hook sizes.

Can I use different yarn weights for this pattern?

Yes, you can change yarn weight but it will alter the final size; choose an appropriate hook for your yarn and remember snacks require a much smaller hook or thread to remain proportionate.

Do I need prior crochet experience for this pattern?

This pattern is rated intermediate, so basic knowledge of single crochet, increases, decreases, and working in continuous rounds is recommended for best results.

How long does this project typically take to complete?

Most crocheters complete a single hamster with a snack in about 2-3 hours, though time may vary based on experience and whether you make micro accessories.