🧢 Beautiful ✨ Detailed πŸ’ Adorable

Twinkling Snowflakes Crochet Pattern

Twinkling Snowflakes Crochet Pattern
4.4β˜… Rating
5-7 Hours Time Needed
1.7K Made This
βœ‚οΈ

Intermediate Level

Ideal for those with basic crochet experience, featuring slightly more advanced stitches and techniques to expand your skills.

⏱️

Weekend Treat

Takes 5-7 hours, making it an enjoyable project to finish over a couple of days.

❄️

Winter Warmth

Cozy layers for chilly nights that combine practical warmth with beautiful, intricate stitch patterns.

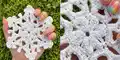
About This Twinkling Snowflakes Crochet Pattern

This pattern includes full instructions for three distinct snowflake designs: Snowflake 1, Snowflake 2 and Snowflake 3, each with charted diagrams and round-by-round directions. You will work clusters, treble clusters and decorative picot-style points to create lacy, sparkling snowflakes. The pattern is written for Bernat Handicrafter Holidays White Sparkle, giving a delicate shimmer to each finished piece.

Twinkling Snowflakes Crochet Pattern crochet pattern - detailed view of completed project

Suitable for intermediate crocheters comfortable with clusters and shaping, the pattern offers variations in size and complexity. Pinning and light starching are suggested for crisp finished shapes.

Why You'll Love This Twinkling Snowflakes Crochet Pattern

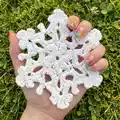
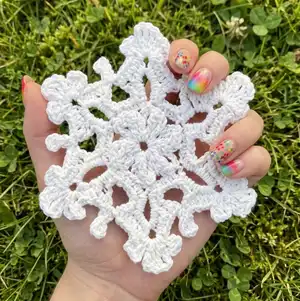
I absolutely love this pattern because each snowflake has its own personality while using the same base techniques, so you get variety without relearning the entire pattern. The sparkle yarn adds festive shimmer that looks stunning when blocked and pinned, and the designs translate beautifully into ornaments or garlands. I enjoy how the cluster stitches form intricate centers that blossom into elegant points, and the charts make following shaping much easier. This pattern invites creativity β€” you can make a coordinated set or mix and match sizes and colors to suit your decor.

Twinkling Snowflakes Crochet Pattern step 1 - construction progress Twinkling Snowflakes Crochet Pattern step 2 - assembly progress Twinkling Snowflakes Crochet Pattern step 3 - details and accessories Twinkling Snowflakes Crochet Pattern step 4 - final assembly and finishing

Switch Things Up

I love changing the look of these snowflakes by swapping yarns; try metallic or pearlized threads for extra shimmer.

I sometimes use pastel colors to make spring or wedding-themed versions instead of classic white.

I make larger or smaller snowflakes by changing the yarn weight and hook size to create a coordinated set.

I add a small bead or sequin to the center of each snowflake for a bit of sparkle and weight.

I experiment with blocking shapes slightly differentlyβ€”elongating points or opening the lace moreβ€”by pinning to different measurements.

I often string several snowflakes into a garland using matching thread and tiny clear beads between each piece.

I recommend trying crochet thread with a finer hook to create delicate, doily-like snowflakes perfect for heirloom gifts.

I sometimes reinforce the center with a tiny dab of fabric stiffener for ornaments that need to hold a shape year after year.

I like to create a mobile by suspending snowflakes at different lengths from an embroidery hoop for a whimsical display.

I enjoy mixing and matching the three snowflake designs to make a hanging cluster of differing sizes for more visual interest.

Common Mistakes & How to Fix Them

βœ— Skipping the foundation join when starting rings can create an uneven center; always join with slip stitch to the first chain to form a neat ring. βœ— Not counting stitches after a round causes mismatched points and uneven snowflakes; recount each round and check stitch totals carefully. βœ— Failing to pin and starch the finished snowflake will result in floppy shapes; block to measurements and lightly spray starch then steam iron for crisp points. βœ— Working with inconsistent tension makes the delicate lace look uneven; maintain a steady, relaxed tension and practice clusters on a scrap before starting.

Twinkling Snowflakes Crochet Pattern

Make delicate, sparkly snowflakes to decorate your home or give as handmade gifts. This pattern uses Bernat Handicrafter Holidays White Sparkle yarn to create three unique snowflake designs. You will enjoy clear, step-by-step rounds and charted diagrams to guide your work. Perfect for creating ornaments, garlands, or festive table accents.

Intermediate 5-7 Hours

Materials Needed for Twinkling Snowflakes Crochet Pattern

β€” Main Fabric

  • 01
    Bernat Handicrafter Holidays (2.8 oz/80 g; 138 yds/126 m) - White Sparkle (48005) - 1 ball will make approx 4 Snowflakes

β€” Tools Required

  • 01
    Size U.S. F/5 (3.75 mm) crochet hook or size needed to obtain gauge
  • 02
    Spray starch (optional)

Progress Tracker

0% Complete

β€” Snowflake 1 :

Round 1 :

Ch 6. Join with sl st to first ch to form a ring. 1st rnd: *Ch 4. [(Yoh) twice and draw up a loop in ring. (Yoh and draw through 2 loops on hook) twice] twice. Yoh and draw through all loops on hook - Tr cluster made. Ch 4. Sl st in ring. Rep from * 5 times more. Fasten off.

Round 2 :

Ch 3. Join yarn with sl st to first Tr cluster. (Ch 9. Sl st in same sp as previous sl st. Ch 3. Sl st in next Tr cluster) 5 times. Ch 9. Sl st in same sp as previous sl st. Join with sl st to first ch.

Round 3 :

Ch 1. *1 sc in each of next 3 ch. [(3 sc. Ch 3) 3 times. 3 sc] in next ch-9 loop. Rep from * 5 times more. Join with sl st to first sc. Fasten off.

Round 4 :

Join yarn with sl st to first ch-3 sp. Ch 1. 2 sc in same sp as sl st. *1 sc in each of next 3 sc. (1 sc. Ch 3. 1 dc. Ch 3. 1 sc) in next ch-9 loop. Rep from * 5 times more. Join with sl st to first sc. Fasten off.

Round 5 :

Ch 3. 1 sc) all in next ch-3 sp. 1 sc in each of next 3 sc. 2 sc in next ch-3 sp. Ch 4. (1 hdc. Ch 2. Sl st) in 2nd ch from hook. Ch 2. Skip next 9 sc. 2 sc in next ch-3 sp. Rep from * 5 times more. Fasten off.

β€” Snowflake 2 :

Round 1 :

Ch 7. Join with sl st to first ch to form a ring.

Round 2 :

1st rnd: Ch 1. (3 sc. Ch 9) 6 times in ring. Join with sl st to first sc. Fasten off.

Round 3 :

2nd rnd: Join yarn with sl st to any ch-9 loop. Ch 3. (2 dc. Ch 3. 3 dc) in same sp as sl st. [Ch 1. (3 dc. Ch 3. 3 dc) in next ch-9 loop] 5 times. Ch 1. Join with sl st to top of ch 3.

Round 4 :

3rd rnd: Sl st back into last ch-1 sp. Ch 1. 1 sc in same sp as sl st. *Ch 1. 6 dc in next ch-3 sp. Ch 6. Sl st to first ch. Turn. (Ch 4. 2 tr. Ch 4. Sl st) 3 times in last ch-6 sp made - top cluster made. Turn. 6 dc in same ch-3 sp as last 6 dc. Ch 1.** 1 sc in next ch-1 sp. Rep from * 4 times more, then from * to ** once. Join with sl st to first sc. Fasten off.

β€” Snowflake 3 :

Round 1 :

Ch 6. Join with sl st to first ch to form a ring.

Round 2 :

1st rnd: Ch 6 (counts as dc and ch 3). (1 dc. Ch 3) 11 times in ring. Join with sl st to 3rd ch of ch 6. 12 ch-3 sps.

Round 3 :

2nd rnd: Sl st in next ch-3 sp. Ch 3. (Yoh and draw up a loop. Yoh and draw through 2 loops on hook) twice in same sp as last sl st. Yoh and draw through all loops on hook - beg cluster made. [Ch 5. (Yoh and draw up a loop. Yoh and draw through 2 loops on hook) 3 times in next ch-3 sp. Yoh and draw through all loops on hook - cluster made] 11 times. Ch 5. Join with sl st to top of first cluster.

Round 4 :

3rd rnd: (Sl st. Ch 1. 1 sc. Ch 5. 1 sc) in next ch-5 sp. *(Sl st. Ch 3. Cluster) in next cluster. (Ch 3. Cluster in top of cluster just made) twice. (Ch 3. Sl st. Ch 6. Sl st. Ch 3. Sl st) all in top of last cluster. Working down towards 2nd rnd, (Ch 3. Sl st to base of cluster) 3 times. (1 sc. Ch 5. 1 sc) in next ch-5 sp. (Sl st. Ch 3. Cluster) in next cluster. (Ch 3. Sl st. Ch 6. Sl st. Ch 3. Sl st) all in top of cluster. Working down towards 2nd rnd, ch 3. Sl st to base of cluster.** (1 sc. Ch 5. 1 sc) in next ch-5 sp. Rep from * 4 times more, then from * to ** once. Join with sl st to first sc. Fasten off.

Info :

Finishing: Pin Snowflake to measurements. Apply spray starch if desired and steam iron lightly.

Assembly Instructions

  • Pin snowflake to measurements to shape and open the lace when blocking and finishing.
  • Apply spray starch if desired to give the snowflake stiff, crisp points for display.
  • Steam iron lightly over a pin-blocked snowflake to set the shape after applying spray starch.
  • Fasten off and weave in ends at each fasten-off point as you finish rounds to tidy the piece.

Important Notes

  • πŸ’‘Pin to the exact measurements given for each snowflake to achieve the correct diameter and symmetry.
  • πŸ’‘Use the recommended hook size or adjust to obtain the gauge for consistent size and drape.
  • πŸ’‘Apply spray starch and steam iron lightly for the best, crisp finished shape; allow to dry before handling.

Create sparkling winter decor with these delicate snowflakes β€” perfect for ornaments, garlands, or special gifts. Pin and starch each piece for a crisp, professional finish that twinkles in holiday lights. Make a set in different sizes and hang them proudly this season! β„οΈβœ¨

You ask,

we answer.

FAQs

What size will the finished pieces be?

Snowflake sizes vary by design: Snowflake 1 is approx 7" [18 cm], Snowflake 2 is approx 8Β½" [21.5 cm], and Snowflake 3 is approx 10" [25.5 cm] using the recommended yarn and hook.

How much yarn do I need?

One ball of Bernat Handicrafter Holidays White Sparkle (2.8 oz/80 g; 138 yds/126 m) will make approximately 4 snowflakes.

What hook size should I use?

Use a U.S. F/5 (3.75 mm) crochet hook or the size needed to obtain the gauge of 16 sc and 17 rows = 4" [10 cm].

How should I finish and block the snowflakes?

Pin each snowflake to the measurements, apply spray starch if desired, and steam iron lightly to set the shape. Allow to dry completely before removing pins.