🧢 Beautiful ✨ Detailed πŸ’ Adorable

Hermione Granger Amigurumi Pattern

Hermione Granger Amigurumi Pattern
4.8β˜… Rating
5-7 Hours Time Needed
1.4K Made This
βœ‚οΈ

Intermediate Level

Ideal for those with basic crochet experience, featuring slightly more advanced stitches and techniques to expand your skills.

⏱️

Weekend Treat

Takes 5-7 hours, making it an enjoyable project to finish over a couple of days.

🧸

Cute Companion

An adorable friend to cherish, handcrafted with love to bring comfort and joy for years to come.

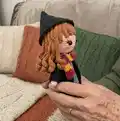
About This Hermione Granger Amigurumi Pattern

This pattern guides you step-by-step to crochet a Hermione Granger amigurumi complete with robe, scarf and book. It includes hair strand instructions and small accessory construction for a detailed finish. You'll enjoy shaping the head, body, and clothing with clear round-by-round directions.

Hermione Granger Amigurumi Pattern crochet pattern - detailed view of completed project

Perfect for fans of Harry Potter, the doll features embroidered details and a striped scarf. Techniques include color changes, working in FLO/BLO, and small sewn pieces for assembly.

Why You'll Love This Hermione Granger Amigurumi Pattern

I absolutely love this pattern because it captures Hermione's personality in a tiny, handmade doll. I enjoyed designing the layered hair strands and the little scarf which add so much character. The construction is thoughtful so each piece fits together neatly when assembled. I find the mix of simple rounds and small finishing details very satisfying to crochet and sew. Making one always feels like creating a special gift full of charm.

Hermione Granger Amigurumi Pattern step 1 - construction progress Hermione Granger Amigurumi Pattern step 2 - assembly progress Hermione Granger Amigurumi Pattern step 3 - details and accessories Hermione Granger Amigurumi Pattern step 4 - final assembly and finishing

Switch Things Up

I love how easy it is to personalize this pattern by changing colors β€” try pastel shades for a soft, whimsical Hermione or bold colors for a playful twist.

Want a bigger doll? Use a thicker yarn and increase your hook size; the proportions remain similar but the finished doll becomes chunkier and more huggable.

For a pocket-sized keychain version, use fingering-weight yarn and a smaller hook to create a tiny Hermione perfect for bags and gifts.

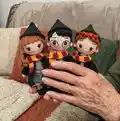
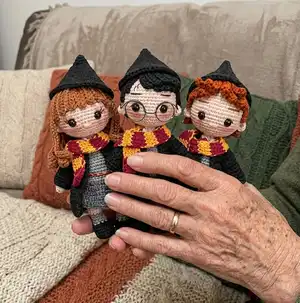
Switch the scarf colors to represent other Hogwarts houses β€” blue and silver for Ravenclaw or green and silver for Slytherin β€” to create a full set of house dolls.

I often add tiny accessories like a crocheted wand or glasses made from thin wire to increase the character and playability of the doll.

Experiment with different hair styles: braids, buns, or shorter cuts by changing strand lengths and placement on the head for varied looks.

Try embroidering a tiny name tag or book title to personalize the little book and make the doll a memorable gift.

If you want posable limbs, insert thin craft wire into the arms and legs before stuffing for subtle movement and pose options.

I recommend practicing the hair strand attachment on a spare round to test placement and strand density before committing to the final head.

When making multiples, vary skin tones and hair colors to create a whole classroom of characters β€” it's a fun way to build a themed collection.

Common Mistakes & How to Fix Them

βœ— Skipping the color change rounds for the scarf will ruin the stripe pattern; follow the color change instruction every two rounds to maintain the red and yellow stripes. βœ— Forgetting to stuff the legs lightly before joining can make the body lumpy; stuff gradually and evenly to keep the shape smooth when joining to the body. βœ— Not placing safety eyes between rounds 8 and 9 at the correct spacing will alter facial proportions; measure and space the eyes 6 or 7 stitches apart as instructed. βœ— Pulling hair strands too tightly while sewing will distort the head shape; attach each strand loosely then adjust and secure so the head keeps its round form. βœ— Skipping the BLO/FLO instructions when specified can change the texture and fit of clothing pieces; always work in BLO or FLO where indicated to match the pattern shaping.

Hermione Granger Amigurumi Pattern

Create a charming Hermione Granger amigurumi with this detailed crochet pattern. You'll work simple rounds to build a fully assembled doll complete with hair, robe, scarf, and tiny book. The pattern highlights color changes and finishing details so your character looks polished and full of personality. Perfect for gifting to Harry Potter fans or adding to your handmade collection.

Intermediate 5-7 Hours

Materials Needed for Hermione Granger Amigurumi Pattern

β€” Main Fabric

  • 01
    Cotton thread - peach (skin color)
  • 02
    Cotton thread - black (robe, shoes, hair details)
  • 03
    Cotton thread - yellow (scarf stripes, embroidery)
  • 04
    Cotton thread - red (scarf stripes, embroidery)
  • 05
    Cotton thread - dark gray (skirt, robe accents)
  • 06
    Cotton thread - gray (skirt and details)
  • 07
    Cotton thread - white (neck, book pages)
  • 08
    Cotton thread - brown (hair base for wig pieces and book cover)
  • 09
    Embroidery threads - red and yellow (for tie and small embroidery accents)

β€” Tools Required

  • 01
    Crochet hook (1.10 mm)
  • 02
    Fiberfill for stuffing
  • 03
    Safety eyes (size as desired)
  • 04
    Tapestry needle for sewing
  • 05
    A small button
  • 06
    Embroidery needle
  • 07
    Scissors
  • 08
    Stitch markers (optional)
  • 09
    Pins for assembly (optional)

Progress Tracker

0% Complete

β€” Arms :

Info :

Start with peach color:

Round 1 :

5 sc in a MR (5)

Round 2 :

5 sc (5)

Round 3-8 :

5 sc (5)

Info :

Change to gray color

Info :

Do not stuff.

Info :

Close with 2 sc.

β€” Legs :

Info :

With black color:

Round 1 :

6 sc in a MR (6)

Round 2 :

6 sc (6)

Round 3-4 :

6 sc (6)

Info :

Change to gray color.

Round 5-6 :

6 sc (6)

Info :

Change to peach color.

Info :

Stuff lightly.

Info :

Make 2. Do no cut the thread of second leg. Continue with the body

β€” Body :

Info :

Continue with peach color: Ch 4, 6 sc (first leg), 4 sc over the ch, 6 sc (second leg) (20)

Round 1 :

20 sc (20)

Round 2 :

7 sc, 1 dec, 8 sc, 1 dec, 1 sc (18)

Info :

Change to gray color.

Round 4 :

6 sc, 1 dec, 8 sc, 1 dec (16)

Round 5 :

BLO; 6 sc (6)

Round 6-7 :

6 sc (6)

Round 8 :

Attaching the arms: 1 sc (body and arm), 5 sc in body only, 2 sc (body and arm), 7 sc in body only, 1 sc (body and arm) (16). Stuff.

Round 9 :

2 sc, 1 dec, [1 dec, 2 sc] x 3 (12)

Info :

Change to peach color.

β€” Cabeza :

Round 1 :

2 sc, 1 dec (8)

Round 2 :

Inc x 9 (18)

Round 3 :

1 sc, 1 inc (27)

Round 4 :

2 sc, 1 inc (36)

Round 5 :

3 sc, 1 inc (45)

Round 6-10 :

45 sc (45)

Info :

SAFETY EYES: between rounds 8 and 9, separated by 6 or 7 stitches.

Round 11 :

7 sc, 1 dec (40)

Round 12 :

8 sc, 1 dec (36)

Round 13 :

4 sc, 1 dec (30)

Round 14 :

3 sc, 1 dec (24)

Round 15 :

2 sc, 1 dec (20)

Round 16 :

1 sc, 1 dec (12)

Round 17 :

6 dec (6)

Info :

Embroider the eyebrows.

β€” Ears :

Round 1 :

3 sc in a MR (3)

Info :

Sew them between rounds 7 and 9.

β€” Hair :

Info :

With brown color:

Round 1 :

6 sc in a MR (6)

Round 2 :

6 inc (12)

Round 3 :

BLO: 1 sc, 1 inc (18)

Info :

Now we are working each strand over the stitches of round 3. When you finish each strand move to the next stitch of the round 3 with a slst.

Round (Strands 1-5) :

1) to 5) Ch 6: from the thir ch: 4 hdc (4)

Round (Strands 6-18) :

6) to 18) Ch 18: from the second ch:: inc of sc x 4, 8 sc, 5 hdc (21)

Info :

Work now in FLO of round 2, the same way:

Round (FLO strands) :

1) to 12) Ch 12: 12 sc (12)

Info :

Strands 1-5 go on the forehead. The others, covering the head.

β€” Jacket :

Info :

BACK PART x 1: With black color, working in turning rounds, ch1 at the beginning.

Back Round 1 :

Ch 9: from the second ch, 8 sc (8)

Back Round 2-10 :

to 10): 8 sc (8)

Info :

FRONT PART x 2: With black color, working in turning rounds, ch1 at the beginning.

Front Round 1 :

Ch 4: from the second ch, 3 sc (3)

Front Round 2-10 :

to 10) 3 sc (3).

Info :

Sew the shoulders of the back and the front part. (only 3 stitches on each shoulder)

Info :

Sew the side part only 6 stitches (the rest of stitches are the armhole)

Info :

Make and edge with sc.

β€” Sleeves :

Info :

Working on the armhole:

Round 1 :

[2 sc, 1 inc] x 3, 1 sc (13)

Round 2-3 :

to 3) 13 sc (13). Cut.

β€” Book :

Info :

Brown part x 2: in turning rounds with ch 1 at the beginning:

Round 1 :

Ch 5: 4 sc (4)

Round 2-5 :

to 5) 4 sc (4). Cut.

Info :

White part: in turning rounds with ch 1 at the beginning:

Round 1 :

Ch 5: 4 sc (4)

Round 2-10 :

to 10) 4 sc (4). Cut.

Info :

Fold in hald the white part, put it between b opth brown parts, sew them finishing the book.

β€” Scarf :

Info :

Start with red color and then change to yellow every other 2 rounds. Working in turning rounds, ch1 ath the beginning.

Round 1 :

Ch 3: from the second ch, 2 sc (2)

Round 2 :

2 sc (2). Change to yellow color.

Round 3-4 :

2 sc (2). Change to red color.

Info :

Continue to round 42 (finishing with red color).

β€” White neck :

Round 1 :

With white color: Ch 18: from the third ch: 1 inc of hdc, 14 sc, 1 inc of hdc (18).

β€” Tie :

Info :

Work with two strands of embroidery threads yellow and 2 red, together.

Round 1 :

Ch 5: from the second ch, 3 sc, inc of 5 hdc, 3 sc on the other side of the ch. Cut.

β€” Skirt :

Info :

Join dark gray color in FLO of round 4 of the body:

Round 1 :

[3 sc, inc] x 4 (20)

Round 2 :

[4 sc, inc] x 4 (24)

Round 3-4 :

to 4) 24 sc (24). Cut.

β€” Final details :

Infos :

Sew or glue the White neck around the neck of the amigurumi. Put her the tie.

Assembly Instructions

  • Sew the two legs to the body at the base where you left the second leg's thread attached, then continue crocheting the body rounds as indicated so the legs become integral to the body.
  • Attach arms to the body when instructed in the body round: sew each arm into the armhole positions and secure with whipstitch before stuffing the body firmly.
  • Sew the ears between rounds 7 and 9 of the head, spacing them evenly and securing each with several stitches for durability.
  • Sew the shoulders of the jacket: align front parts with back part and sew only the 3 stitches on each shoulder, then sew the side parts leaving the armhole (6 stitches) open.
  • Attach the hair strands as instructed by placing strands 1-5 on the forehead and the remaining strands to cover the head; use slst to move between stitches when finishing each strand.
  • Place and sew or glue the white neck piece around the doll's neck and attach the small embroidered tie in front as the final clothing detail.

Important Notes

  • πŸ’‘All the pieces are worked in a spiral, unless another method is indicated, so do not join rounds with slip stitch unless the pattern specifies.
  • πŸ’‘Place safety eyes between rounds 8 and 9 and space them 6 or 7 stitches apart to achieve the correct facial proportions.
  • πŸ’‘Stuff limbs lightly and progressively; overstuffing can distort seams and make assembly difficult.
  • πŸ’‘When changing colors, carry the yarn neatly or weave in ends as you go to avoid bulky joins within clothing or hair pieces.
  • πŸ’‘Pin parts in place before sewing to ensure correct alignment and symmetry of arms, ears, and jacket pieces.

This Hermione Granger amigurumi pattern brings a little Hogwarts magic to your hands with tiny details and a striped scarf. It's perfect as a collectible or a thoughtful handmade gift that shows your love for the series. Make one for yourself or a Harry Potter fan and enjoy every stitch. 🧢✨🎁

You ask,

we answer.

FAQs

What size will the finished piece be?

The finished amigurumi measures approximately 18 cm tall when using the recommended cotton thread and a 1.10 mm hook; exact size may vary with yarn tension and hook choice.

Can I use different yarn weights for this pattern?

Yes, you can use different yarn weights but the finished size will change; adjust hook size accordingly and expect to change the amount of stuffing and accessory sizing.

Do I need prior crochet experience for this pattern?

This pattern is rated intermediate, so basic knowledge of single crochet, increases, decreases, working in BLO/FLO and reading round counts is recommended for best results.

How long does this project typically take to complete?

Most crocheters complete this project in 5-7 hours, though time may vary based on experience, customization, and assembly complexity.