🧢 Beautiful ✨ Detailed πŸ’ Adorable

A Hairy Caterpillar Amigurumi Pattern

A Hairy Caterpillar Amigurumi Pattern
4.6β˜… Rating
5-7 Hours Time Needed
2.2K Made This
βœ‚οΈ

Intermediate Level

Ideal for those with basic crochet experience, featuring slightly more advanced stitches and techniques to expand your skills.

⏱️

Weekend Treat

Takes 5-7 hours, making it an enjoyable project to finish over a couple of days.

🧸

Cute Companion

An adorable friend to cherish, handcrafted with love to bring comfort and joy for years to come.

About This A Hairy Caterpillar Amigurumi Pattern

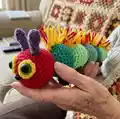
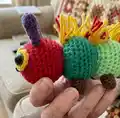
This pattern creates a colourful hairy caterpillar amigurumi worked in round-by-round segments from the head down to the tail. It uses Double Knit yarn and UK terminology, with clear shaping and colour change points for each body segment. The design includes eye rings, small feet, antennae and a fun yarn spine for texture. You will stuff pieces as you work and sew parts in place for a neat finish.

A Hairy Caterpillar Amigurumi Pattern crochet pattern - detailed view of completed project

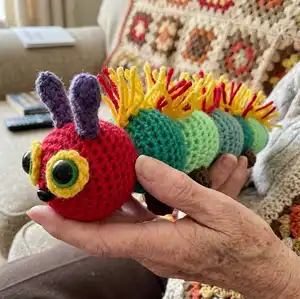
Suitable for crocheters comfortable with increases and decreases, this pattern expands your amigurumi skills. The finished toy measures approximately 25cm using the recommended materials.

Why You'll Love This A Hairy Caterpillar Amigurumi Pattern

I absolutely love this pattern because it combines simple shaping with a playful textured finish that really brings the caterpillar to life. I enjoy the colour-changing segments β€” they make the piece feel handcrafted and unique every time. The hairy spine is a fun finishing touch that adds character and tactile interest, and I always find it is what makes people smile. Working from head to tail keeps the assembly and stuffing tidy and straightforward. It is satisfying to see each segment come together into a cohesive, adorable creature.

A Hairy Caterpillar Amigurumi Pattern step 1 - construction progress A Hairy Caterpillar Amigurumi Pattern step 2 - assembly progress A Hairy Caterpillar Amigurumi Pattern step 3 - details and accessories A Hairy Caterpillar Amigurumi Pattern step 4 - final assembly and finishing

Switch Things Up

I love suggesting ways to customize this caterpillar β€” change colours of each segment to create unique personalities and themes.

I often switch yarn weight and hook size to make mini keychain versions or large huggable toys; bulky yarn with a bigger hook makes it chunkier.

I like to replace safety eyes with embroidered eyes for a baby-safe version, or add eyelids for extra expression.

You can vary the hairy spine by using different yarn textures like eyelash or boucle for a fluffier effect.

Try adding wire inside the antennae or body segments for posability if you want a poseable display piece.

I sometimes embroider tiny mouth shapes or freckles to alter the caterpillar's personality and expression.

Mix in ombre or variegated yarns for unexpected colour transitions without changing yarns every segment.

Make sets of matching mini caterpillars in coordinating shades as a playful garland or mobile for a nursery.

I recommend testing a colour change placement on scrap before committing to keep segment proportions consistent.

Consider tiny accessories like a crocheted scarf, hat, or flowers sewn to the spine for seasonal variations and gift-ready charm.

Common Mistakes & How to Fix Them

βœ— Leaving the magic ring fully closed on the eye rings will prevent the safety eye stem fitting through; leave a small hole in the centre of the eye ring so the eye stem can be pushed through and attached later. βœ— Skipping stitch counts during increases and decreases can distort body shaping; count your stitches at the end of each round especially on increase/decrease rows to maintain the correct segment sizes. βœ— Forgetting to change colour exactly at the end of the specified round will make segment transitions uneven; mark the stitch where you need to join the new colour and cut/tidy the yarn as instructed. βœ— Not stuffing as you go causes uneven lumps and makes closing the tail difficult; stuff each segment gradually and reshape as you work to keep an even profile throughout the body. βœ— Attaching feet or antennae without pinning first can lead to asymmetry; pin parts in place and check spacing (feet about 3 stitches apart, eyes between rows 3 and 4) before sewing securely.

A Hairy Caterpillar Amigurumi Pattern

Make a colourful, textured hairy caterpillar amigurumi using simple UK crochet techniques. This pattern guides you through making a segmented body, eye rings, antennae, feet and the distinctive yarn spine so your caterpillar is full of personality. You will learn colour changes, basic shaping, and how to attach hair strands securely. Perfect for gifting or brightening a shelf with a handmade friend.

Intermediate 5-7 Hours

Materials Needed for A Hairy Caterpillar Amigurumi Pattern

β€” Main Fabric

  • 01
    Double Knit (DK) yarn - Red x1 ball (main head colour)
  • 02
    Double Knit (DK) yarn - Dark Green x1 ball (body segment colour)
  • 03
    Double Knit (DK) yarn - Bright Green x1 ball (body segment colour)
  • 04
    Double Knit (DK) yarn - Sage Green x1 ball (body segment colour)
  • 05
    Oddments: Purple (for antennae), Dark Brown (for feet), Yellow (for eye rings and hairy spine)
  • 06
    Small amounts of Red yarn for interspersed spine strands

β€” Tools Required

  • 01
    Crochet hook size 4mm
  • 02
    Polyester stuffing
  • 03
    Safety eyes 12mm green x2
  • 04
    Safety nose 9mm black triangle nose
  • 05
    Stitch marker
  • 06
    Tapestry needle for sewing in ends
  • 07
    Scissors

Progress Tracker

0% Complete

β€” Notes :

Info :

This pattern is written in UK terminology. Finished Length: Aprox 25cm.

β€” Eye Rings x2 :

Info :

Using Yellow make a magic ring, ch1

Round 1 :

dc x8 into ring, ss into first st. FO.

Info :

Do not fully close your magic ring, leave a small hole in the centre, just enough to fit the stem of the safety eye through. Pop a safety eye into the centre, but do not attach the back yet. You will attach the eyes to the head between rows 3 and 4 once you have made the head.

β€” Head & Body :

Infos :

You will be starting at the head and working down the body to the tail. Stuff as you go. Using Red make a magic ring, ch1

Round 1 :

dc x8 into ring (8)

Round 2 :

inc around (16)

Round 3 :

[inc, dc] repeat around (24)

Round 4 :

[inc, dc x2] repeat around (32)

Round 5-10 :

dc around (32)

Info :

Attach eyes (including eye rings), between rows 3 and 4, about 7 stitches apart.

Round 11 :

[dec, dc x2] repeat around (24)

Round 12 :

[dec, dc] repeat around (16)

Round 13 :

dec around (8). Change to Dark Green

Round 14 :

inc (24)

Round 15 :

[inc, dc] repeat around (24)

Round 16 :

[inc, dc x2] repeat around (32)

Round 17-20 :

dc around (32)

Round 21 :

[dec, dc x2] repeat around (24)

Round 22 :

[dec, dc] repeat around (16)

Round 23 :

dec around (8). Change to Bright Green

Round 24-32 :

repeat rows 14-23 - Changing to Sage Green at the end of round 32.

Round 33-41 :

repeat rows 14-23 - Changing to Dark Green at the end of round 41.

Round 42 :

inc around (16)

Round 43 :

[inc, dc] repeat around (24)

Round 44-46 :

dc around (24)

Round 47 :

[dec, dc] repeat around (16)

Round 48 :

dec around (8). change to Bright Green

Round 49-55 :

rep[eat rows 42-48, changing to Sage Green at teh end of row 55.

Round 56 :

inc around (16)

Round 57-58 :

dc around (16)

Round 59 :

dec (8)

Round 60 :

dec (4)/ FO. leaving a long end to close. Thread end through remaining stitches and pull to close.

Info :

Sew in ends

β€” Antenna x2 :

Info :

Using Purple make a magic ring, ch1

Round 1 :

dc x3 into ring (3)

Round 2 :

inc, dc, inc (5)

Round 3 :

dc around (5)

Round 4 :

dec, dc x3 (4)

Round 5-6 :

dc around (4). FO.

Info :

Stuff tips of antenna lightly. Sew antenna to centre top of head, a couple of rows above the eyes, and a couple of stitches apart.

β€” Feet x 6 :

Info :

Using Brown make a magic ring, ch1

Round 1 :

dc x4 into ring (4)

Round 2 :

inc around (8)

Round 3-4 :

dc around (8). FO

Info :

Stuff lightly. Sew 2 feet to the first body segment (first green segment after the head). Attach feet to the underside, about 3 stitches apart. Sew 2 to the second body segment. Sew 2 to the fourth body segment.

β€” Hairy Spine :

Info :

Cut several 10cm lengths of Yellow yarn, and a about 8 Red. Attach along the centre of the Caterpillars back, interspersing the Red at random intervals till you reach the tail.

To Attach the hair strands - :

Attach the strands by inserting your crochet hook into the loop of a stitch. Catch the middle of the hair strand and pull a loop through. Pull the ends of the strand through the loop. This should hold firmly.

Info :

Cut spine hairs to length (aprox 2cm), so they stick up nicely.

Info :

Tadah! Enjoy!

Assembly Instructions

  • Attach the eye rings and safety eyes to the head between rows 3 and 4, spacing them about 7 stitches apart and do not attach safety backs until in position.
  • Sew antennae to the centre top of the head a couple of rows above the eyes, spacing them a couple of stitches apart and stuff tips lightly before closing.
  • Sew feet in pairs beneath the first, second and fourth body segments; attach two feet to the underside of the first segment about 3 stitches apart, then two to the second and two to the fourth segment.
  • Attach the hairy spine along the centre back by knotting 10cm yarn strands into stitches, intersperse red strands at random intervals until you reach the tail.
  • Weave in and sew all ends securely, and pull the long tail from the final round through remaining stitches to close the body neatly.
  • Pin parts in place before sewing to check symmetry and spacing, then sew securely with a tapestry needle.

Important Notes

  • πŸ’‘This pattern is written in UK terminology; verify your stitch equivalents if you normally use US terms.
  • πŸ’‘Stuff each segment as you work to maintain even shaping and avoid lumps in the finished toy.
  • πŸ’‘Leave a small hole in the eye rings so the stem of the safety eyes can be inserted before fastening the backs.
  • πŸ’‘Change colours at the rounds indicated and secure yarn ends neatly to avoid bulky joins.
  • πŸ’‘Leave a long tail at the final closing round to thread through remaining stitches and pull the body closed.

This charming hairy caterpillar is a colourful, tactile amigurumi that brightens any shelf or nursery with its playful spine and jaunty antennae. Make one for yourself or as a thoughtful handmade gift, changing colours to suit your style. Happy crocheting and enjoy watching this little friend come to life! 🧢🧡

You ask,

we answer.

FAQs

What size will the finished piece be?

The finished amigurumi measures approximately 25 cm long when using Double Knit yarn and a 4mm hook as recommended.

Can I use different yarn weights for this pattern?

Yes, but changing yarn weight will alter the final size; adjust your hook size accordingly and expect differences in texture and finished dimensions.

Do I need prior crochet experience for this pattern?

This pattern is rated intermediate and assumes you are comfortable working in the round with increases and decreases and making basic attachments.

How long does this project typically take to complete?

Most crocheters finish this pattern in about 5-7 hours depending on experience and the amount of detail added to the hairy spine and assembly.

Where should I place the safety eyes?

Place the safety eyes between rows 3 and 4 of the head, about 7 stitches apart; use the eye rings as a guide and do not attach the backs until you are satisfied with placement.